Posts Tagged ‘review’
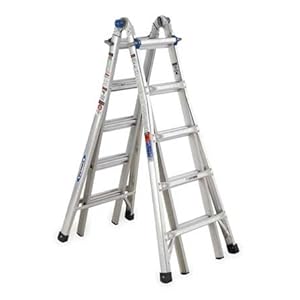
Tool Review: Werner MT-22 Telescoping MultiLadder
Every homeowner at one point feels the need to either get up on their roof or reach something really high off the ground. The problem with large ladders is just that – they’re large. An extension ladder capable of reaching the roof of a typical 2-story house is likely to be 10′ long when stored, which at a minimum may make transporting it back from the store difficult. Also, it cannot work as a stepladder, as it has to be braced against something solid, typically your house. The industry has come up with a solution to this issue, and it is known as a telescoping multiladder.
There are several brands of this style of ladder available, and most of them work in a very similar way. In this article, I’ll be reviewing the Werner MT-22.
There are 4 main ways to use this ladder, and we’ll look at them one at a time. First, though, we’ll look at the hinges and locks and see how they operate.
Here’s the hinges in the locked position. The blue plastic knob is sticking out from the ladder, and you can’t see the pins. In order to move them to the open position, you simply push the blue plastic ends so they are flush with the ladder. They are pretty solid, but you can move them easily by pushing with the palm of your hand.

Then, you can see the 3 pins pop out of the ladder frame. You’ll do this on either side, and then the ladder will swing freely until it reaches one of 3 positions – extension ladder, or 180 degrees, stepladder, which I would estimate around 20 or so degrees, and storage, where the legs are right next to one another and the ladder is not particularly stable. Once it reaches one of those positions, the hinges snap back into place, locking solidly.

The second set of locks are the ones that go into the ladder rungs when they are extended. They are solid metal pieces that are spring-loaded, and at the end they have a “U” shape. To unlock them, pull them out and then rotate them away from the ladder.

To lock the rungs, just do the same thing in reverse – pull out the metal U, turn it so the end goes into the rung, and let it slide ino the rung.

The whole system is fairly easy to use, and if there is not any weight on the elements, they slide and go into place quite freely. If you’re trying to unlock a hinge and it’s under some weight, it might take some wiggling, however. They can be left half locked (in the outer set of holes) and then when you slide the inner ladder to match up the holes, it’ll spring fully engaged. There is a tiny bit of a ridge around the inner hole, so it might not catch perfectly every time, but it works most of the time.
Now that we’re familiar with the special parts of this ladder, we’ll go on to review the different ways it can be used.
The first usage method is as a traditional stepladder:

The ladder used this way has a weight rating of 300 pounds per side. You can lock the rung hinges on any particular rung, so it can be used for a short reach or a long reach. This is great in a backyard if you want to get up to a high tree branch with pruning shears. Next is the usage as a stair stepladder:

This method is extremely useful when the thing you are trying to get to is above a staircase. If you have a larger home, you may have a very large foyer, with some lights in the ceiling above a staircase. Now you can get to them to work on them, and as a bonus, 2 people can do this – one from either side.
3rd is the primary reason I bought the ladder, the extension ladder:

As you can see, it reaches up to the roof of the second story house, allowing me to clean the gutters. The top two steps are not meant to be stepped on. Instead, you’re supposed to hold onto the rungs above you for stability, so I don’t think I could get on top of the roof with this ladder easily, but that is likely to be another project. This way of using the ladder brings me to its one drawback – the weight. This ladder is fairly heavy, weighing in at 42 pounds. The difficulty comes in maneuvering the ladder when it is in extension mode. I’ve found the best way to use it this way is to extend the top section fully first. Second, place it against the wall, hold the inner rungs of the bottom section, and undo the hinges. Lastly, pull it back towards you a bit, just so can pull the inner part up. I was able to move it a couple of rungs up each time before I leaned it back against the wall and reset my arms to pull it up another 2 rungs. It gets much easier with practice. It’s simply very difficult to push it straight up right while keeping the ladder up, and if you extend it fully on the ground, it’s difficult to pull the ladder to an upright position – it is 19 feet long. This is where one area where a competitor’s ladder, if it is lighter, could be much more useful. Bonus points for commenting and describing the unsafe application of the ladder in this picture.
The last method, and the least useful for me, is the scaffold method:

Imagine the pole is a scaffold plank:
This method is used when you are working either on a wide high piece and don’t want to continually move the ladder, or if you are working directly above a hole in the ground (a basement storm cellar outside entrance, for example) For this method, you simply slide off the inner rungs on both sides, and then lock them together, then insert the plank between the two separate ladders. I simply don’t have a lot of need yet for this sort of activity, but it’s nice to know that it can be used in that way.
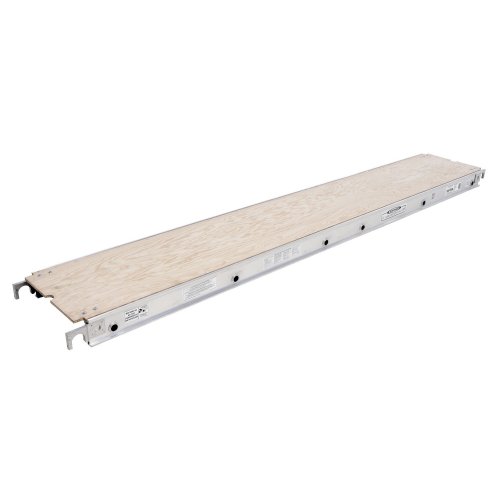
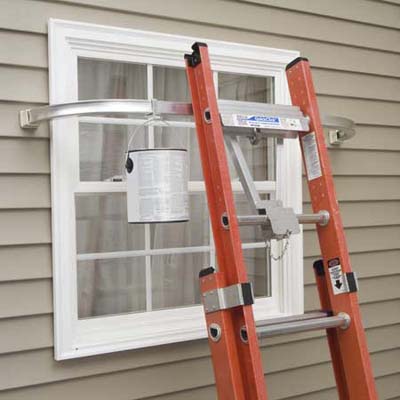
Werner also makes several accessories for the ladder, including a work/tool platform as well as a stand-off/stabilizer that can be used to either allow you to work across a window, or just to give you more stability at the top.
Overall, I am very satisfied with the ladder. The main problem I have with it, as I noted earlier, is that it is heavy, but it’s also made out of steel instead of aluminum – you could buy a lighter one, but you’d pay more for it. It stores easily, and it can be transported in a typical sedan, both of which are things that a “normal” extension ladder is not capable of. Also, there’s no rope or pulleys involved, which is another plus. I would give this product a solid 4 out of 5 Captain Constructions, especially if you cannot get an extension ladder home yourself.


Tool Review: Ideal Lil’ Ripper Stripper™
I recently picked up the Lil’ Ripper Stripper™ from Ideal Industries, at Home Depot for about $5.00.

Not that I needed a new tool, especially another wire stripper; but for $5.00, how could I resist?
Really, I was just interested to see how useful it actually was. I’m almost always skeptical of multi-tools, since they aim to replace tools designed specifically for a single task. The Lil’ Ripper Stripper is no exception, so it really has to preform well to replace tools in my tool pouch.
Features:
- Rips Romex® wire outer jacket cleanly and quickly.
- Clips outer sheathing to remove excess Romex® wire jacket.
- Strips inner conduit wires.
- Looping holes loop wire for screw-on connections.
- Twist-Assist™ tightens most popular sizes of winged twist-on wire connectors.
- Injection molded elastomer grip provides a comfortable, slip resistant grip.
- Strip length measuring scale allows for quick and easy measurements.
- Conveniently fits in your pocket.
Since Ideal gave me a good feature list, lets tackle each one individually.
Ripping Romex® (NM wire)
The Lil’ Ripper Stripper, makes ripping non-metallic cable sheath simple and fast. If you look in one end of the tool, you’ll notice a small metal hook.

To rip the cable, simply place the hook under the cable sheathing, then slide the tool along the cable. The Lil’ Ripper Stripper definitely earns this part of its name, this thing rips cable like a champ. It slices through the sheath clean, fast, and without any concern of nicking the conductors. Because of its shape and size, you can even easily rip the sheath from cables already installed in boxes.
Removing excess sheathing
To remove the excess sheathing, you slide the sheathing into the large notch, at the end of the tool, and pull.
This feature seemed like an afterthought, or maybe the cutting blade was relocated to accommodate another feature. Either way, it’s not great at this. The cutting blade is set back a bit too far, which makes getting the excess sheath deep enough to cut it a challenge. Even the guy in the demo video had trouble with this feature, so it doesn’t seem to be user error on my part.
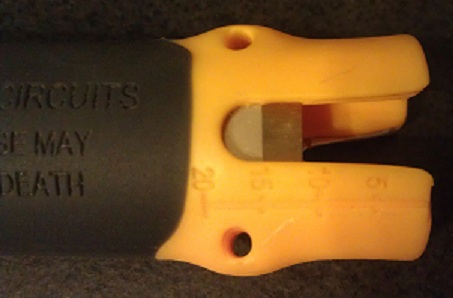
Stripping conductors
To strip the conductors, you simply slide the wire into the V notch at the end of the tool, give it a couple twists, then pull the insulation off.
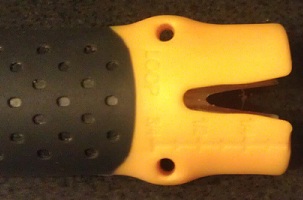
It works relatively well, though it can easily nick the conductors if the wire is inserted too forcefully. You’ll also notice a measuring scale on the face of the tool, which helps you determine how much insulation to remove.

Terminal loops
To create terminal loops in the wire, you insert the wire into one of two holes on the side of the tool, then give it a quarter turn.

This is a nice feature, and works very well.
Twist-Assist™
To twist on wire caps, insert the cap into the end of the tool, insert the wires into the cap, then twist. This is a handy feature if you’re working in gloves, and find it difficult to twist on little wire caps because of it. The length and size of the tool give you a little extra grip, allowing you to twist on the wire caps without a problem. It’s only designed to work with winged wire caps, so if you’re working with caps without wings, you’re out of luck.
Comfortable, slip resistant grip.
The tool is comfortable in your hand, and it does provide a slip resistant coating. However, the best part of the grip is the constant reminder that you shouldn’t be working on live circuits.
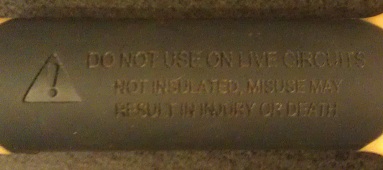
DO NOT USE ON LIVE CIRCUITS Not Insulated, misuse may result in injury or death
Conveniently fits in your pocket
Yes, it does fit in your pocket. But guess what Ideal… I want it to hang from my tool belt! Is it too much to ask for a key chain loop, so I can hang it from a carabiner on my tool pouch? I guess then they’d have to charge $5.50 for the tool, and maybe that’s too steep for the average DIYer.
All in all, this is a fairly nice tool. It would be a nice addition to any DIYers tool belt, er… pocket. It rips cable sheath really well, strips wires, makes terminal loops, and helps twist on wire caps. It’s a useful, sturdy tool, but I’m not sure I’m ready to give up my wire strippers just yet. For a DIYer looking for a useful inexpensive tool, this is a good solid choice. The Idea Lil’ Ripper Stripper gets 3.5 Captain Constructions, out of 5.


Tool Review: Ideal In-Sure™ Push-In Wire Connectors
A while ago I asked if push-in connectors were up to code. After determining they were, I checked the local Home Depot for these things every time I went. Then one day, bam! There they are. I grabbed an assorted 10 pack for ~$2.00, and ran home, filled with the type of excitement only a child feels on Christmas morning when he first lays eyes upon the bounty left by old Saint Nick. Admittedly, I was probably more excited than any grown man should ever be over this sort of thing.
Some may not know what Ideal In-Sure™ Push-In Wire Connectors are used for. Ideal In-Sure™ Push-In Wire Connectors, are devices used for joining two or more wires and insulating those connections. They can be used as an alternative to traditional twist-on wire caps (wire nuts), and require no twisting motion to create a solid connection. When using push-in connectors, the ends of the wires to be joined are stripped and pushed into the connectors. With traditional wire caps, the wires would have to be twisted together (mechanically joined) before twisting on the insulating wire cap.
Unlike twist-on wire connectors, it’s easy to remember how many wires can be connected with a single push-in wire connector. If you have a 2-port connector, you can connect any combination of 2 #18 AWG to #12 AWG wires. Using twist-on connectors, you’ll likely have to memorize or reference a combination chart.
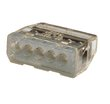
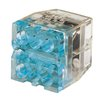
In-Sure™ Push-In Wire Connectors come in 7 varieties, so selecting the appropriate connector is easy.
2-Port
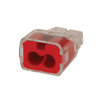

Acceptable Wire Sizes
3-Port
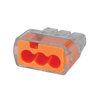
Acceptable Wire Sizes
3-Port Large


Acceptable Wire Sizes
4-Port
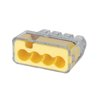
Acceptable Wire Sizes
5-Port

Acceptable Wire Sizes
6-Port
Acceptable Wire Sizes
8-Port

Acceptable Wire Sizes
Features
- No-twist connection reduces repetitive motion fatigue
- Low insertion force for fast and easy connections
- Compact size makes installation easy
- Clear shell gives visual verification of connection
- UL Listed to 486C and CSA Certified to C22.2 #188
- UL 467 Listed for grounding and bonding applications
- 600V maximum building wire, 1000V maximum signs and lighting fixtures
- Shell rated at 105 C (221 F)
Most old school electricians hate push connectors, due mostly to the crappy design of the first generation stab connectors on the back of receptacles. I, however, am more open minded, and will try anything that might make a job easier.
Once I got these things home, I did the only thing any reasonable and sane DIYer would do: I took one apart to see how they worked.
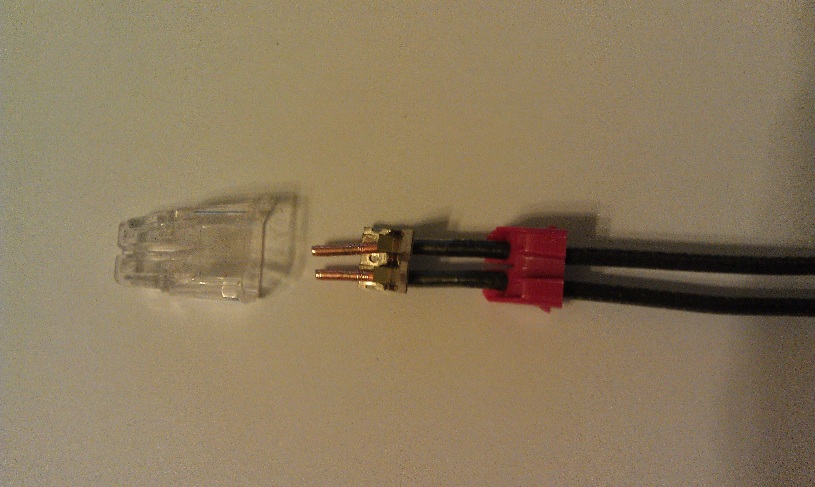
As you can see, they’re made up of three parts. The bushing (red), the contacts (metallic), and the insulating cover (clear).
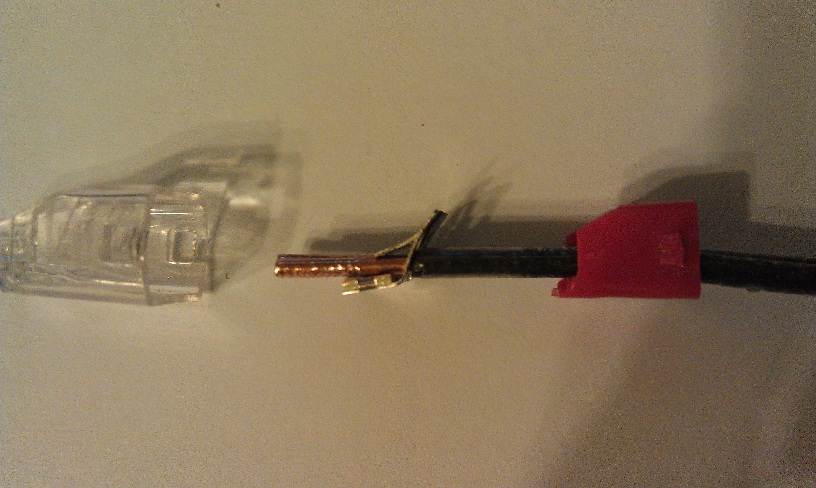
From the side, you can clearly see how the wires are held in place. And let me tell you, they are held in place really well. I yanked, tugged, pried, and pulled to try and get the wires to come out. So under normal circumstances, you shouldn’t have to worry about a wire slipping out. I did, however, find a way to remove the wires surprisingly easily. If you twist the wire back and forth while pulling, the wires will come right out. Doing so does damage the wire quite badly (you may be able to see the damage if you look closely at the above images), so it would have to be trimmed back and re-stripped before inserting it into a new connector. According to Ideal, twisting the wire to release it is a feature, not a bug.
When fully inserted into the connectors, the wires make a solid connection. So there should be no worry of resistive heating or arcing with these connectors.
Now I was satisfied the wires were not going to fall out, and I wasn’t going to burn down the house due to a bad connection. I decided to see how much time these things could save me in a typical situation. I wanted to see how long it would take to wire up a simple luminaire, first with traditional twist-on wire caps, then with push-in wire connectors.
The Setup
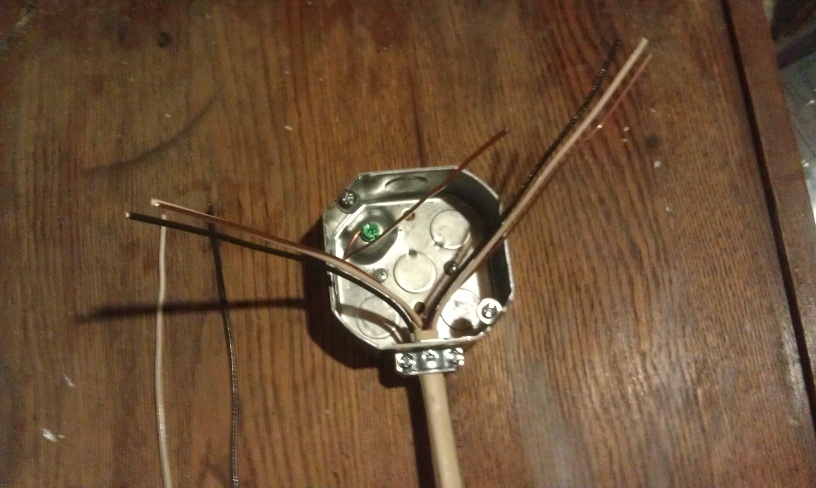
As you can see, I set up a typical scenario that electricians have seen many times. I have a feeder (from breaker), a feeder to the next fixture, and a couple pig-tails to connect the lamp holder.
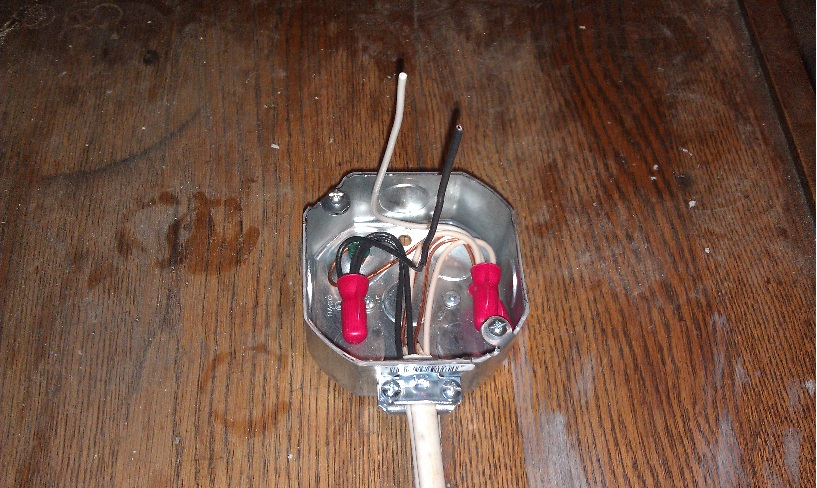
Twist-on wire caps
The Procedure
- Strip wires.
- Twist wires together.
- Trim wires.
- Install wire cap.
- Repeat for each group of wires.
The Result
3:03.2
Push-in Wire Connectors
The Procedure
- Strip wires.
- Insert into wire cap.
The Result
1:50.5
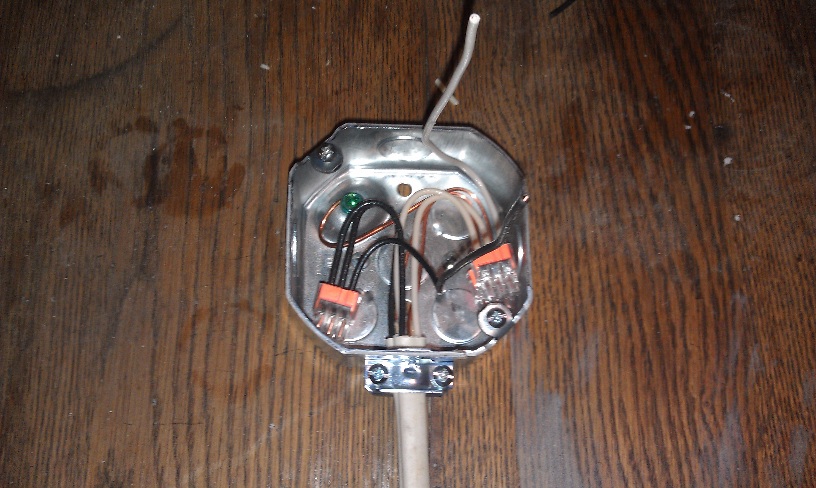
For each luminaire I could save over a minute, using push-in wire connectors. That could be quite a time saver, if I was installing 10-20 lights.
The only fault I could find is that the wires can easily be twisted out of the connector. I don’t think this is a major issue; since the wiring would likely not see that much motion, but it is a small issue that hopefully Ideal can work out. They do cost more than the run of the mill twist-on wire cap, but the installation time savings could easily render that moot. All in all, I’d say these are a pretty slick product. I give Ideal In-Sure™ Push-In Wire Connectors 4 Captain Constructions out of 5.
Tool Review: Milwaukee M12 Cordless Multi-Tool.
For a long time I’ve avoided purchasing an Oscillating Multi-tool. I thought they were gimmicky, flimsy, and not as useful as advertised. I used a cheap no-name brand multi-tool in the past, and was not impressed by its performance. Turns out the “Multi-tool” market has grown rapidly, and the products have gotten a lot better. I decided it was finally time for me to give this tool a second look, and I am fairly impressed by what I found.
Most every major power tool manufacture now has their own versions, and for the most part the name on the box is a good indication of how well the tool is built. Prices range from about $50.00 – $300.00; I opted for a middle of the road offering, and picked up the Milwaukee M12 Cordless Multi-Tool.
What’s in the box:
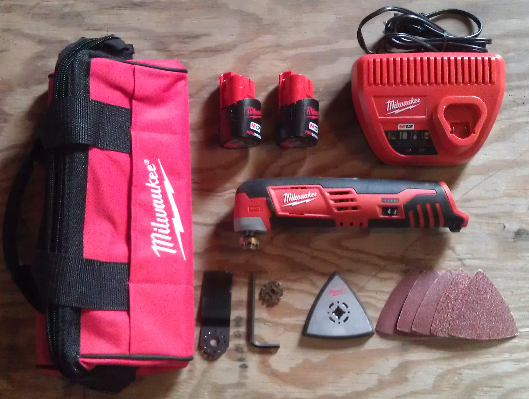
(The bag looks much pinker in this picture, it’s actually red).
The package I purchased contained:
- 2426 M12 Cordless LITHIUM-ION Multi-Tool
- Adapter
- Wood Cutting Blade
- Sanding Pad
- (5) Assorted Sanding Sheets
- (2) M12 RED LITHIUM Batteries
- 30-Minute Charger
- Contractor Bag
Technical Details:
| Voltage | 12V |
| Variable speed | 12 Settings |
| OPM (oscillations per minute) | 5,000 – 20,000 |
| Charge Time | 30 Min |
| Length | 10-7/8 in. |
| Weight | 2.1 lbs. |
At $99.00 (Home Depot) it was near the lower-middle end of the price range, but that doesn’t seem to be an indication of quality. The tool feels good in your hand; it has a little beef to it and doesn’t feel flimsy at all. The rubber coating provides a good surface for gripping the tool, so there is no chance the tool will slip from your hand while you work. It has a healthy whir when switched on, and doesn’t bog down at all when loading up. It gets to work cutting or sanding, without any hesitation at all. The included adapter allows it to work with accessories from most other companies, so there shouldn’t be any problems finding bits to extend the tools usefulness. The biggest selling point for me, however, was the lack of a cord.
It has a speed adjustment on the side, which was slightly stiff at first but loosened up after being used a bit. The speed adjustment wheel is not placed well, which makes it slightly awkward to adjust while in use. The On/Off switch is also poorly placed, and is difficult to interact with while holding the tool in a working position. A locking trigger switch near the bottom of the tool would be much more convenient and easier to use. Switching from bit to bit is slightly cumbersome, but this seems to be a poor design aspect of this type of tool. Another design aspect overlooked was a hook or loop, so the tool could be hung from a tool belt. It has a protrusion just above where the battery connects (underside of the tool), to house a screw. It’s too bad they didn’t design some type of metal ring that could connect here allowing the tool to be clipped to a tool belt. The design of the tool could defiantly use some improvements, but it seems to fall in line with most tools of this type.
I found the battery slightly difficult to load/unload, but once it’s in place there is no fear of it accidentally being dislodged. The battery indicator on the side of the tool is useful, letting you see how much use you have left. It also provides various indications that the battery is low, the tool is too hot, or that the tool has shutdown due to overload, binding, or stalling. The tool seems to throttle down when not under load; which I’m guessing is a battery saving mechanism, though I couldn’t find any documentation that described this behavior. It came with 2 batteries and a 30-minute charger (that actually charges that fast), so down time waiting for a charge is limited. The batteries don’t last long, however (15-25 minutes), so expect to make frequent trips to the recharger.
And by now you’re thinking, “That’s all well and good, but HOW WELL DOES IT WORK!”.
I used the tool first for repairing damage in a plaster and lath wall. If you’ve ever had to cut lath, you know what a pain it can be. This handy tool cut the plaster and lath no problem, and did it without damaging any of the surrounding plaster. Cutting the hole for a new gang box in a drywall patch was a breeze, it cut the hole faster and cleaner than a typical jab saw. With that job complete, it was time to search the garage for other things to cut and sand.
Once in the garage my eyes immediately set on a scrap piece of pressure treated 2×4, so I clamped it into the vise and got to work. It took a little bit, but I was able to cut through the 2×4 rather easily. I was really impressed at the quality of the cut, it was fairly smooth and would require little sanding if this was a finish cut. This tool is definitely at home around wood, and would be handy for lots of woodworking projects.
The next item up required a trip to the local hardware store, since the package did not include a blade for cutting metal. Once I acquired a blade, Bosch OSC312F 3-1/2 in. x 7/8 in. BIM Flush cut Wood and Metal Blade ($25.00! @ Home Depot), it was time to cut some steel.

I tried cutting a variety of nails, screws, and bolts; but found that anything thicker than a finish nail took quite a bit of effort to cut. I decided to try cutting out a hole in an aluminum soffit cover, for a receptacle I plan on installing in the future. It took a bit of effort, but once I made the original plunge cut the rest of the cut was fairly easy. Maybe there are better blades available for cutting metal, but with this blade, cutting metal was a chore.
The final challenge was sanding, and as expected it did a good job at it. As advertised, it fit into tight spots and corners fairly well. It may not be the best tool for large sanding jobs, but it is definitely useful for those small hard to reach jobs.
All in all, the Milwaukee Multi-Tool performed rather well in my testing. I couldn’t see it replacing any specialty tools: circular/jig/reciprocating saw, angle grinder, orbital/palm/belt sander. It is quite a handy tool, and would be a good addition to any tool box. It excelled when working with wood and drywall/plaster, but next time I have to cut metal I won’t be reaching for this tool. Despite a few minor design imperfections, it does have sturdy construction, is versatile, and performs fairly well. I’d rate the Milwaukee M12 Cordless Multi-Tool 3.5 Captain Constructions out of 5.
Home Improvement Blog on Google+
Home Improvement Blog on FaceBook
Bloggers Wanted
Latest Articles
Topics
- Electrical (8)
- Introductions (7)
- Plumbing (3)
- Projects (13)
- Repair (4)
- Safety (5)
- Tips and Tricks (5)
- Tool Review (5)
- Tools (6)
- Uncategorized (5)