![]()
This is a continuation of my previous blog post.
This blog posting was originally written in 2008 for a friend of mine who was unable to perform simple repair tasks around her house. The original purpose was to assist her in hanging shelves on her wall. It is intended for those people who know that the flat end of the nail is the end you hit with the shoe, and that butter knives make acceptable screwdrivers.
L- Bracket Shelves
So, let’s look at the simplest type of shelf to put up: Basically, we’re talking about a plank of wood, and two L-brackets. It’s not the prettiest type of shelf, but it is cheap and functional. I actually don’t recommend this type of shelving for all but the most utilitarian installations. BUT, this installation will demonstrate the essential properties of shelviness — The shelf is level, and it is strong enough for most small loads. The techniques used here are also applicable to hanging curtain rods and small bathroom shelves. My general principle is that you can’t possibly measure and pencil out the installation accurately. (See Golden and Silver rules in my previous article.) So we’re going to do this in a way that doesn’t require that.
Materials:
1 shelf 2 brackets 1 pencil 1 carpenter’s square (It’s called a square, but it might be triangular in shape) 8-10 screws – Often these will come with the brackets. You’re probably best off to get some longer wood screws for the wall mounting. Keep in mind that your drywall can be up to 3/4 of an inch thick, and we’ll want at least an inch in the wood. I’d get 2 inch wood screws with a countersunk head. 1 drill drill bits 1 level 1 helper – these can usually be found by offering a beer.
Step 1: Hold the shelf up to the wall where you want it to go. Take a pencil and mark the height about 6 inches in from one end. This is just a rough guide for now. You don’t need to mark the entire length.
Step 2: Find the studs. This can be tricky, but if you’re going to use it for books, then you need to find a stud. Sometimesyou can find them by tapping lightly with a small hammer and listening for a spot where the echo turns into a thud (a doctor’s knee tapper would be ideal). This might work if you have drywall and wood studs, but plaster and lathe seems to make the same sound no matter where you tap it. Borrow an electronic stud finder from a friend. I you can’t get a stud finder, then we have to resort to destructive testing. Find a long skinny nail, such as a two inch finishing nail. Bang it in where you think there might be a stud. Move over an inch and a half an try again. Repeat until you know you’ve hit wood. The problem with this technique is that you will be left with a plaster repair and paint touch up when done, but it is reliable.
Once you’ve found one stud, the other is easy. Studs are usually placed every 16 inches. Just measure over and tap again. Mark the studs with vertical pencil marks (lightly – You’ll want to wash it off later). I like a couple of ticks at the edge, and a longer line down the middle. .|. For shelves, it is imperative that you find a stud. Drywall plugs won’t support the weight of books.
Step 3: Place the board back up, center it on the studs, so there’s an even overhang on each end and mark on the board, ONE side where the stud line meets the board (ideally about 6 inches in from the end). Take the board down, and on the underside using a square (which is usually triangle shaped) mark the perpendicular right across the board.
Step 4: Balance the board on its back on a good solid flat surface so that the edge that will contact the wall is against the floor. Do your best to keep it straight up and down. Put one of the brackets against the board and the floor and press so the flex is taken out of the bracket, and the screw holes are directly over the line. Have your helper mark the screw holes on the board. (That 2 inch finishing nail works great! Stick it in the center of the hole and tap lightly with a hammer).
Step 5: Drill out the screw holes. The diameter of the drill bit should be slightly smaller than the inner diameter of the screw (The solid part inside the threads.) Attach the bracket to the board. NOTE: Your drill will usually tend to “Walk” away from the marked point when you start it up — particularly on hard materials. This is less than ideal. You can take a nail, and bang a dimple over the pencil mark to stop this. The small hole will grab the point of the bit and stop it from walking.
Step 6: Mount the shelf, lining it up with your previous marks, and mark only the upper screw hole where it meets the wall and stud. Drill. You can use a small bit, as you’re going into a 2×4 here. Screw in the upper hole, and lightly put a screw in. You’ll be taking it out in a minute.
At this stage, you’ve got one bracket, tightly secured to the board, and loosely secured to the wall.
Step 7: Level the shelf. This is fairly easy, as you have one fixed end to pivot around. Just move the other end up and down until the level bubble is centered. Mark the stud line on the board and mark the underside of the shelf against the wall (As per Step 3). Take the shelf down, and repeat 3-7 for the other bracket, and finally drive home the actual screws that will hold it up.
Hanging Shelves with Vertical Rails and Brackets
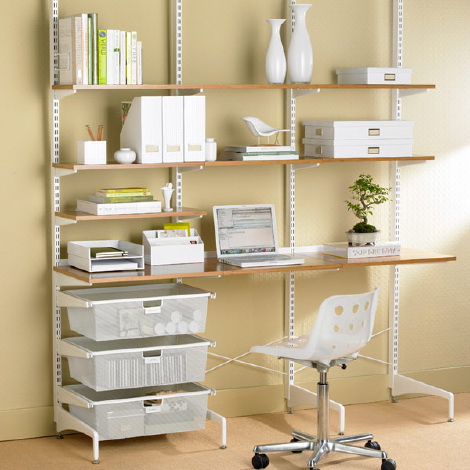
Shelves with vertical rails are a relatively cheap solution. They consist of two or three vertical rails that are screwed directly to the wall. Brackets clip into the rails, and the shelves lay across the brackets.
The IKEA version is functional, but rather pricey for what it is. You can buy the parts at any hardware store and build your own to fit your space. If you go this route, Laminated MDF is a good choice for the actual shelves as it is pretty stiff. However, it can be unattractive. Another choice is to buy some 12 inch pine boards at your local lumber yard. They will cut it to length for you there, so have the measurements ready. You can then stain or paint it yourself.
Canadian Tire has a two shelf 24″ kit for 19.99, (White, melamine laminated MDF) so this would be a cheap starter. You could replace the shelves later.
These instructions are written assuming the DIY route. If you buy a package, then some of the cutting and measuring can be eliminated.
Design and materials.
Typically, 3/4″ lumber storing books can span 36″ without significant sagging (according to the wisdom of the internet). However, studs are 16″ apart, so 32″ is a better choice. A 4 foot shelf can be problematic. The only mounting solution is three rails at 16″ spacing or 2 at 32″, leaving 8 inches of overhang at either end. The danger is that a partially loaded shelf might flip up like a teeter totter if there is too much overhang. I’d feel better with 3.5 foot shelf, which could be mounted on two rails at 32″ spacing and 4.5″ of overhang.
Leave about 6 inches of excess rail above the top shelf and below the bottom. This will help distribute the load nicely over the wall.
You might wish to take a measuring tape and a piece of chalk and actually draw your shelving on the wall before you head out to the store. It really helps to visualize the solution. (hint – find the studs now, as they are where the rails go.)
Materials: 2 or 3 rails. Buy them pre-cut. They typically come in 24, 30 and 60 inch lengths. 2 or 3 brackets for each shelf. Shelves. Screws. Drill, Bits. Driver. Helper. Level. Plumb Bob and chalk line (optional) Chairs or step ladder.
Getting to work:
Step 1: Preliminary Reconnaissance Figure out where you want the shelves to go, and hold up the upper one to the wall. Mark the end points so you know your boundaries. Now you need to find the studs. I’ve discussed that in the L-Bracket shelf instructions, so I’ll leave you to it. However, if you are hanging a 24 inch shelf on 16 inch studs, that leaves 4 inches of overhang at either side. You might have to move your ideal location over a bit so that the shelf is centered on the studs. Once you’ve found the studs, hang a chalk line and mark it. Alternatively, mark it with pencil in several locations and use the edge of a shelf, or even the rail itself to mark the studs.
Step 2: Like before, we’re going to do one side first, and then match the other to it. Figure out where the top of the rail needs to go. Mark the top screw hole, and drill. Again, the drill bit should be smaller than the screw. Lightly screw the rail to the wall using the top hole only. Let the rail hang loosely. Hopefully the rail will hang exactly over the line you drew earlier. If not, you have to decide now which vertical you want (i.e. Your studs aren’t vertical, or the gravity works differently in your house) . The likelyhood is that neither is correct. Check with the level if you need to. Once you are satisfied, mark the remaining screw holes. Tip: You probably won’t be able to get a pencil to touch the wall through the rail. Use a skinny nail, and give it a light tap with a hammer to mark the wall. Draw a circle around the marks so you can find them.
Step 3: Mount the first rail. Take out the single top screw, and take the rail down. Now drill out the holes you just marked. Put the rail back up, and screw the screws in until they are just tight. It’s best to do the top and bottom first, ensuring everything is lined up straight. Then fill in the middle ones.
Step 4: Mark the other rail CRITICAL STEP The first rail was easy, as we didn’t really care too much about the vertical placement. The second rail has to match the first exactly. There is really very little wiggle room here. If the rails are mis-aligned, the shelves will be sloping, which is not one of the properties of shelviness we desire. This can actually be very tricky. The obvious solution would be to measure down from the ceiling. THIS WOULD BE WRONG. Remember, everything in your house is wrong. There are no straight lines and no 90 degree corners in your house, and every time you pull out a tape, you’re introducing error into the equation. One might be tempted to try and line up the second rail by partially assembling the brackets and temporarily mounting a shelf using the brackets and a shelf. In my experience, this is more trouble than it’s worth. It might be a workable idea when you have 3 pairs of hands, but then communications between those hands becomes an issue. Hopefully you’ve bought pre-cut rails, so you can use this technique: Have your helper put a shelf, or other rigid straight body right across the top of the mounted rail. Make sure that it is flush to the wall and the rail. Now, using the level, level the shelf and mark the underside where it meets the other stud line. The person marking should be the person adjusting and watching the level. Now you can mount the second rail with its top just ever so slightly above this pencil line. (Keep in mind that the pencil mark takes a bit of space.) Follow step 2 and 3 for the second rail. It’s a good idea to measure the spacing at the top and bottom to make sure they are parallel. If you’re within an 1/8th of an inch, you’re probably ok.
Step 5: Mount the middle rail (if required) If you need a center rail you can mark the top just by balancing a shelf across the existing rails and matching the rail to it.
Step 6: Tighten screws another half turn. If you over tighten, you’ll damage the wood underneath, and the screw might pull out.
Step 7: Attach the shelves. This is a pretty straightforward task.
We’ve gone through some fairly basic tasks which demonstrate a few principles. The first and foremost being that measurement is rife with errors. What I have attempted to show is that we can do a whole lot of quality work while keeping this error prone task to a minimum. Also notice that we’re screwing directly into the studs here. That is why there are no drywall anchors. While anchors do carry significant weight, they’re not strong enough for shelving that is going to carry anything more than decorative items — and you’ll be wanting nicer shelves for that task.

Filed under Tips and Tricks
A laser level works well for getting a bunch of standards/rails lined up, and only requires one person. Of course, it requires purchasing a $30 piece of equipment. Affix the laser level to the wall, line up the tops (or bottoms, I suppose) of the standards with the laser line.
Also, if you’re at all worried about overtightening pulling the screws out of the studs, I dare say you haven’t used long enough screws. Mine are up with 3½” wood screws (~9cm), and overtightening would certainly deform the standard (making it impossible to get the shelf bracket in, I speak from experience here!), possibly force the standard through the drywall, and eventually rip the head off the screw, but they aren’t coming out of the stud.
What you say is true. But I was writing for a specific audience, and a laser level was not going to be found amongst the 3 tools in her kitchen drawer.
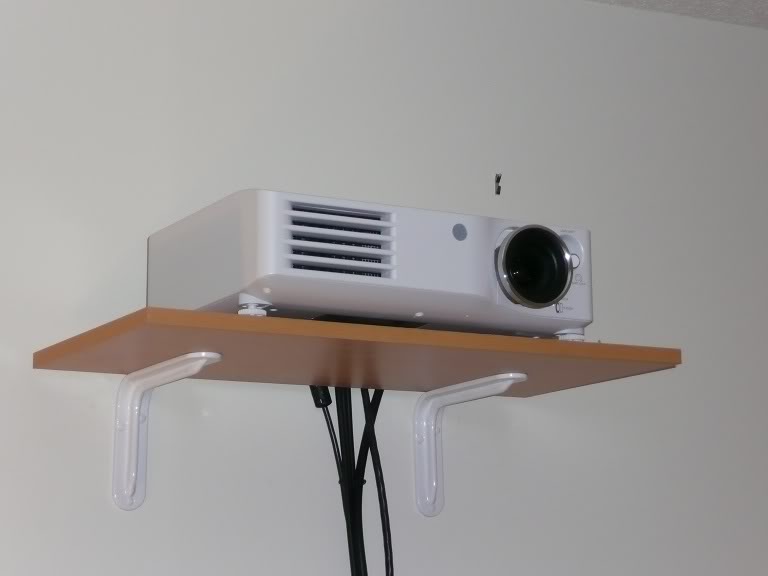
I’m curious. The “L” bracket shelf you have shown above, is there any way to attach this securely to a wall when you can’t use nails or screws?
The apartment I’m moving into will not allow holes of any sort, and I only need the shelf to support my router and modem, near my desk. I’ve seen the 3M sticky-hooks, but they have no options for shelving.
I assume with a ‘light load’ the same could apply with a shelf, but have no idea what I would look for, or where.
Any advice you could offer here would be much appreciated.
3M makes some very shallow shelves (think “depth of a soap dish”), but those probably won’t work for you. The basic problem is that the tape adhesive is fairly good at holding loads that attempt to pull down, but not away. If you think of the forces acting on a shelf, it actually is trying to pull both down and away from the wall, and further the shelf functions as a lever, increasing the force applied in the away direction the deeper the shelf.
One way to deal with this is to put the shelf in a corner. Then you can support the the front of the shelf along the two walls, as well as the back, now the force will only be downward. You’d use a rounded or triangular shelf, of course, because a rectangular one would have an unsupported corner.
Of course, you could use a table. But I’m sure you already know that.
Another thought: Small network equipment (routers, modems, etc.) are often designed to be wall mounted (as well as sit on a desk). Normally, you’d put screws into the wall, and hang it on the screws. You can’t do that, but I think you could find some of the 3M hooks you could use instead…
Final thought: They don’t allow holes of any sort, but have you asked for an exception?
I suggest asking a question on the main site (as opposed to the blog).