![]()
This blog posting was originally written in 2008 for a friend of mine who was unable to perform simple repair tasks around her house. The original purpose was to assist her in hanging shelves on her wall. I will post the follow-ups soon. It is intended for those people who know that the flat end of the nail is the end you hit with the shoe, and that butter knives make acceptable screwdrivers.
Golden Rule:
Measure twice, cut once.
Silver Rule:
You can’t measure anything accurately. Therefore, Always dry-fit the project and make sure it fits.
or
Reality often has it wrong, so you have to be wrong in the right way to make things work.
If you watch a professional, you’ll see that they’re constantly dry-fitting, adjusting and re-fitting pieces. However, you can reduce the number of measure/cut cycles you go through by reading BMitch’s excellent blog post on tape measures.
General tips:
Do I have Plaster or Drywall?
There are several types of plaster you might run across in homes built in the 1960’s and earlier. The most common type is Plaster and Lath. Lath is thin strips of wood nailed up to the studs in a diagonal pattern. Then Plaster is spread on top to make a smooth finish. In really old houses, the plaster contained horsehair to give it some tensile strength. The only advantage of a plaster wall is that you don’t need to find a stud for light loads — the lathe is everywhere. The major disadvantage of plaster is that it is brittle, and cracks propagate quickly. Put a piece of tape over the plaster before banging in a nail, and you can reduce much of the cracking.
Drywall is factory made gypsum plaster sandwiched between two sheets of thick paper. It comes in sheets (4 x8′ or longer) and is screwed directly to the studs. It is taped together with paper tape and a plaster like compound called Drywall Compound (or MUD) to hide the joins. It’s a lot faster to put up, and relatively easy to repair. However, It doesn’t support much weight at all. Usually light loads will be attached with a plastic drywall plug to spread out the downwards force so that your nail or screw doesn’t pull down the wall, opening a crack like a zipper would.
For houses built in the 50’s and 60’s you may come across a solution that is the worst of both worlds: Gypsum Lathe and plaster. Gypsum lathe is essentially thin sheets of drywall screwed to the studs. Then it was plastered over as if it were wood lathe. The major problem is you still get the brittleness of plaster without the additional support of wood lathe. Furthermore, the gypsum came in large sheets, so that the plaster doesn’t flow in behind and lock like it does with wood lathe. This can lead to de-lamination of the layers, particularly in cases of water damage.
ALWAYS drill before screwing.
ALWAYS! No exceptions. Select a bit so that the shaft of the screw is about the same size as the bits. This will remove the material that you would otherwise have to push aside (with a splitting risk) while still leaving enough material for the threads to grab.
Reject all screws except the Robertson (Square head).
It is the easiest to use, and it’s your patriotic duty as a Canadian to support this superior screwing technology. The only drawback is that you have to use the correct sized driver. Robertson screws save all sorts of heart-ache and pain. The greatest advantage of the Robertson is that the screw will stay on the driver. This means that you don’t need the other hand to hold the screw. This frees up the other hand for duties like holding onto the work of holding onto dear life as the case may be. The Phillips screw was designed so that the drive would twist out of the screw head if it got too tight. This is a perfectly acceptable design decision. However, usually, we don’t want our driver to torque out of the screw. (Exception: Drywall screws)
The job will take twice as long as you anticipate.
ALWAYS! No exceptions. Even when you take this rule into account.
Nothing in your house is built right.
There are no 90 degree corners. Nothing is flat, and parallel walls aren’t. Make no assumptions. Use a level and a plumb bob to determine horizontal and vertical.
Hanging light things on a wall
If you’re hanging something light, like a picture, or a bathroom medicine shelf, you don’t need to find a stud, you can use drywall plugs instead. Usually the package will tell you what drill bit to use (5/8 or 1/4 are pretty standard.)
Nails and screws are not interchangeable.
They each have specific uses. Other than tiny picture hangers and quarter round, you probably shouldn’t be using nails around the home.
Know your screws and what they are for:
These are the common screw types that you’ll see at the local hardware store. There are many more specialty types, but here are the basics.
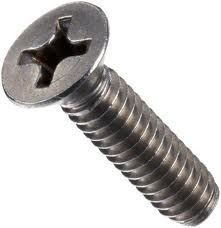
Wood Screws
 Wood screws are pointy, and may or may not have threads all the way to the head (usually not). Often the head has a conical profile allowing the head to be driven into the material and lay flat (or covered with a plug or wood filler.) When joining two pieces of wood together, you want the unthreaded portion of the screw to be about the same length as the thickness of the top piece of wood. This means that the threads will bite into the lower piece, and everything will pull tight together. If you were to use a drywall screw instead, it is quite likely that the screw will actually end up forcing the pieces apart slightly.
Sheet Metal Screw

Pointy, sometimes there’s a self-tapping notch near the point. Usually the head has a dome profile, but counter sunk does exist. Finer threading than wood screws, and the threads go all the way to the head.
Machine Screw
Dome profile. Flat point. Can take a nut or be screwed directly into a tapped hole in metal objects. (This means you have to have a threaded hole to screw into. Absolutely no good for wood)
Lag Bolt
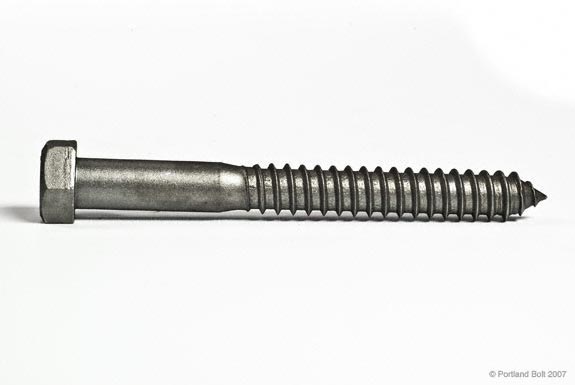
Not actually bolts, as they don’t take a nut. Usually quite large, and rather than taking a screwdriver, they usually have a hex head. Big coarse threads, that don’t go all the way to the head. This is a screw for joining big structural lumber.
Carriage Bolt

Basically a Machine screw, with a nut. Carriage bolts tend to be big, like a lag bolt. Often the name is used interchangeably with a Machine screw. Basically, these are used to join two pieces of metal together, often with washers to allow some motion. Think Meccano, but bigger. The can also be used to join beams together. A hole of appropriate size is drilled through the material, and the bolts are tightened so that the friction between the wood pieces prevent any movement. You can see this use in many pergolas and wooden backyard play sets.
Drywall Screw
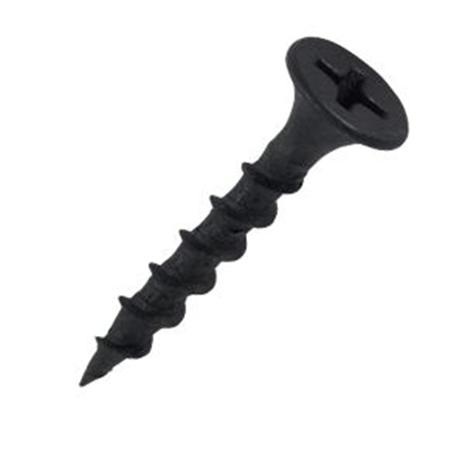
Skinny, sharp, long. Usually black or blue in colour. Use these only for putting up drywall, and nothing else. Usually only available in Phillips heads. People putting up drywall will usually buy a special tip for their drill that takes advantage of the Phillips driver’s tendency to slip out of the screw. This allows them to lightly dimple, but not break, the paper sheath. Drywall is the only application where I would recommend using a Phillips head.
Deck Screws

These look pretty similar to thicker drywall screws except that the are available in Robertson heads. They’re usually green in colour, and are treated to put up with the corrosive nastiness of pressure treated wood. If these are the only screws you have laying around, then it’s probably safe to use them for interior repairs.

Filed under Tips and Tricks
Interesting article — although I find it strange that most examples/pictures you gave were Phillips heads even when you weren’t condoning their use. I’ve never actually used a square head before and I’ve done quite a few projects. Most drills these days have a torque setting that will automatically slip for you so that seems like it may solve some of the stripping issues you mentioned.
Well, when you google screws, you get a lot of Philips. Yes, torque settings do help. What I omitted, as it was beyond the scope of the article was that there are actually two types of “Star” screwdrivers. There’s Philips, which was designed to cam out. If you look at the tip of a Philips driver, you’ll see that it’s tapered in that the arms of the star are narrower at the tip then at the base. There’s also something called a Posi-drive, which uses a more square profile, so it doesn’t cam out as much. But this is a less common screw. Perhaps much of the pain in this type of screw is cause by people using a Philips driver in a Posi-drive head.
Its pretty rare to see posidrive screws, But every screwdriver bit set seems to come with posidrive drivers, so its probably more common to go wrong the other way. Thankfully, its easy enough to identify the posidrive drivers, they have an extra 4 spikes, higher up than the normal philips ones.
The only time I’ve ever seen posidrive screws was on a piece of furniture I was assembling. It amazingly came with them. Of course, it instructed you to use a Phillips #2 driver, which didn’t work so well! But once I grabbed the posidrive bit, they work really well. No cam-out at all.
If you’re going to mention plaster, you should also mention the possibility of it containing asbestos. Between the 1940’s and 1980’s it was common to use asbestos in plaster. Asbestos is dangerous when it’s airborne, and it’s not something you should deal with on your own — if in doubt, have it tested, and if you need to remove it have a professional asbestos abatement team come in and do it safely.
I found this VERY helpful! Thank you!