Posts Tagged ‘lights’
Safer Than A One-Horse Open Sleigh
Electrical Safety
When preparing to put up holiday decorations, most people don’t think twice about plugging in all those twinkling lights. An open outlet just means room for more lights, an inflatable Santa, or dancing elves.
Then, you finish installing all the decorations, connect the final plug, and get 2 seconds of blinding Christmas glory followed by endless dark disappointment. You’re left standing in the snow holding the ends of two extension cords, mouth agape, wondering what just happened.
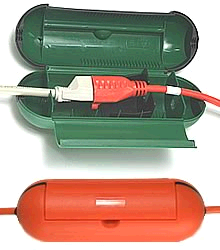
Well my friend, you know those things scattered around the house that look like this…?

They have limits, rules, and even hidden dangers.
1440
When planning your holiday display (you do have a plan don’t you?), you have to consider more than just if Santa should be on the left of the gum drop forest or the right. You have to determine how much electricity you need, and how it will get to where you need it.
If you’re planning to power your display with a single receptacle, you’ll want to remember the number 1440. 1440 is 80% of the total wattage supplied by a 15Amp circuit, and the total wattage your decorations should use. Don’t believe me? Lets do some math…
First, the typical residential receptacle (in the United States) is on a 15 Ampere circuit at 120 Volts. So…
15A * 120V = 1800 Watts
This is the total wattage that can be used, before bad things start to happen. (Think evil fire demons.) So, to be safe, we’ll stay below 80% of the total wattage.
1800 * 0.80 = 1440 watts
See, told you I didn’t make it up.
“So I can hook up 1,440 watts of decorations!?”.
Hold on a second there, Jack. Remember I said “the typical residential receptacle is on a 15 Ampere circuit“? Well, it’s not likely it’s the only receptacle on the circuit. So to determine how much power you have for your decorations, you’ll have to figure out how much power other stuff is using.
The first thing you’ll have to do is find out what else is on the circuit. You might get lucky and it will be written on the door of the service panel. (For those unfamiliar, that’s the big metal box with all the big, funny switches.) If not, then the easiest way to find out is to turn the breaker off and see what stops working.
Now that you know what else is on the circuit, you’ll have to determine how much power is being used. Light bulbs are easy; they have the wattage printed right on them. For other things, there should be a label on the cord or near where the cord enters the device. Wait… What? You took the label off? Why would you do that? No matter, you should be able to estimate the usage with a chart like this Power Consumption Table.
Or you can use an ammeter to measure the actual usage.

To use an ammeter, simply clamp it around the hot wire leading to the device. If you clamp it around both wires, you’ll read 0. (Or at least you better measure 0, otherwise you have a problem). This will tell you how many Amperes the device is drawing, which can be used to determine wattage thanks to Georg Ohm. Here we go with math again…
Ohm found that Current (Amperes) * Voltage = Watts. He even made this cool wheel thing to help us out. (Maybe he didn’t draw it himself. How should I know? I’m not Wikipedia.)
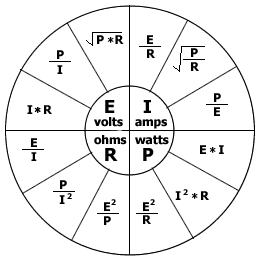
You can use this formula to figure out how many watts a device will use.
<device amps> * 120 volts = watts
Now that we know how much power is being used by other things on the circuit, we can figure out how much Christmas cheer we can plug in.
Simply subtract the total of all the devices from 1440.
1440 – <total wattage of other devices> = Remaining holiday joy.
Any Christmas decoration that consumes power, should have it’s power consumption listed on the box and/or the product itself. All you have to do is total up the consumption of the devices you want to use and subtract that from the remaining available wattage. This might be the hardest part, as you may have to decide which decorations are most important.
If you want to be able to connect more decorations, you could consider having a dedicated “seasonal” circuit installed. (You’ll need an electrician, and an empty space in the service panel for this.) I actually just did this myself.
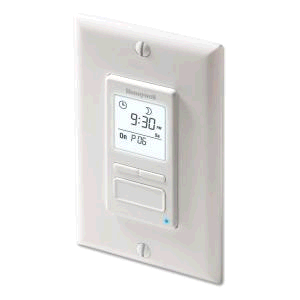
I installed a GFCI receptacle outside, in a weatherproof box (in the soffit of my porch). I decided to hook up to a 7 day programmable timer switch (for lights and motors), so I could control when the lights go on/off without having to remember to flip a switch (thanks to this question asked on DIY.StackExchange.com).
I had a new 15 Amp breaker installed in the service panel, and hooked the switch up to it.
Safely Connecting Santa
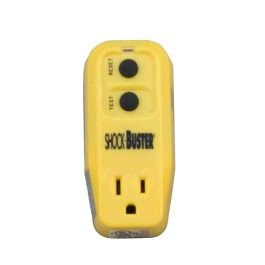
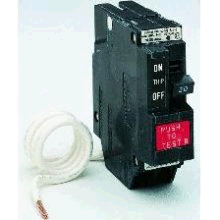
Now that we know how much stuff we can plug in, we have to be concerned with how we plug it in. To protect yourself and others from electric shock, all exterior Christmas decorations should be connected to a GFCI (Ground Fault Circuit Interuption) device. The GFCI will detect dangerous shock hazard situations, and turn the power off automatically.
Ground fault protection
If you have your decorations plugged into a standard receptacle, you can upgrade the receptacle to a GFCI receptacle.

If you are using a lamp socket to outlet type adapter, you could use a Plug in GFCI device.
Another option, is to have the breaker replaced (by an electrician) with a GFCI breaker. This option provides protection to the entire circuit.
Extension cord safety
If you are using extension cords to power decorations, there are Waterproof extension cord covers available, that will make junctions water tight, and prevent the cords from easily coming unplugged.
If you have extension cords running across paths, where people will be walking, then you’ll want to cover the cord to protect it from physical damage and to prevent a possible trip hazard. It’s also a good idea to mark where the cord enters the path, and where it leaves it with flags. If snow falls and covers the cord, you don’t want to hit the cord with the snow blower. (While it may entertain your neighbors, it won’t be much fun for you.)
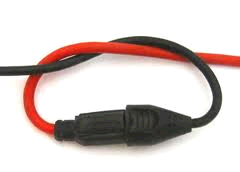
Wherever you have cord junctions (cords plugged into cords), you should take steps to prevent the junction from coming apart. This could be as simple as tying the cords together…
…or using a weatherproof device (see above), or physically attaching the cords to a structure using cable staples.
For more information on extension cord safety.
Protection at the plug
If cords are going to be plugged into a receptacle that is exposed to weather for an extended period of time, then you’ll want to get a outlet cover that is weatherproof, even when things are plugged in.

Summary
- Don’t use too much power.
- Protect yourself from ground faults.
- Run extension cords safely.
- Keep all electrical connections weatherproof.
Now that our plan is made. We know where everything will go, how it will connect, and where all the cords are. It’s time to get up on the ladder, and start hanging lights.
Ladder Safety
If you are using a ladder to hang holiday decorations, it’s important to follow a few safety precautions. Using a ladder unsafely could mean you’ll be spending the holidays on crutches or in a hospital bed.
Setting up the ladder
Height
The height of the ladder is the first point of concern. You want to make sure the ladder is tall enough so you can reach the work area comforatably, but not too tall that you won’t be able to position the ladder at a safe angle (discussed later). If you are going to be climbing onto the roof, you’ll want to make sure the ladder is long enough to reach at least 3 rungs (~36″) above the roof edge.
Stability
Make sure you place the ladder on a flat level surface, to prevent a tipping hazard. If you cannot find a level surface, you may be able to attach a ladder leveling product.

To make the ladder more stable, you can also purchase a ladder stabilizer.

These will not only make the ladder more stable, but also allow you to position the ladder against the house without crushing or damaging the gutters.
Angle
When positioning the ladder, you’ll want to make sure it’s at a 75° – 78° angle. The easiest way to determine if the ladder is at the proper angle is to stand with your toes against the bottom of the rails, then extend your arms strait out at shoulder height.

If your hands rest on a rung, your ladder is at a good working angle. If you can’t reach the rung, the ladder is at to shallow of an angle and you risk the bottom sliding out leading to a fall. If the rung is at your wrist or higher on your arm, the ladder is at too steep of an angle and you risk tipping backwards on the ladder.
Loads
Before stepping foot on the ladder, you want to make sure it is rated to hold your weight and the weight of any tools you may be carrying.
Working on the ladder
When working on the ladder you never, ever, want to overreach. Make sure you keep your torso between the rails at all times while working. If you can’t reach something, climb down, and reposition the ladder. It might be a little extra work, but it could save a trip to the emergency room.
If you are going to be getting on the roof, make sure the ladder extends at least 3 rungs above the roof edge. Always step onto the roof from a rung that is below the roof edge, and don’t ever step on a rung that is above the roof edge.
When working on ladders, it’s always good to have a partner, somebody to hold the ladder as you climb up/down. It’s also nice to have somebody around to set the ladder back up, if it happens to fall while you’re on the roof.
When climbing up/down the ladder, keep your hands free. Don’t climb the ladder with a hand full of tools; use a tool belt to keep your hand free.
For more information on ladder safety check out DIY.StackExchange How do I use an extension ladder to get onto my roof?, and visit Ladder Safety.org.
So! We safetly installed just the right amount of decorations without falling off the ladder, but how much will this awesome light display cost?
Calculating the cost of power consumption is fairly simple, especially since we’ve already determined how much power all the decorations use.
First we’ll start by figuring out how many kilowatts (kW) we are using, by dividing the wattage calculations from earlier by 1000 (1kW = 1000W).
<total wattage>/1000 = Total kW
Since the electric company charges by kilowatt hours (kWh), we’ll have to decide how many hours a day we’ll have the lights on. Then we simply multiply our kW calculation by the number of hours we have the light on.
kW * hours = kWh
Next we’re going to have to go looking for an old electric bill, so we can figure out how much the electric company charges per kilowatt hour (I’ll use the national average at the time of writing for examples below). If we multiply our kWh total from above by the $/kWh the utility charges, we’ll know how much it costs to run the lights for one day.
kWh * $/kWh = $ per day
Now that we know how much it costs for one day, we can simply multiply that by the number of days we’ll have the lights on.
$/day * days = Total cost
Lets figure out some examples, just to give you an idea of how much typical decorations can cost (calculations assume 8 hours per day, for 30 days).
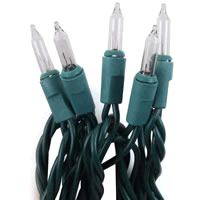 Incandescent mini string lights (50) = 20.4 Watts
20.4W / 1000 = 0.0204kW
8 hours * 30 days = 240 hours
0.0204kW * 240h = 4.896kWh
4.896kWh * $0.10 = $0.4896
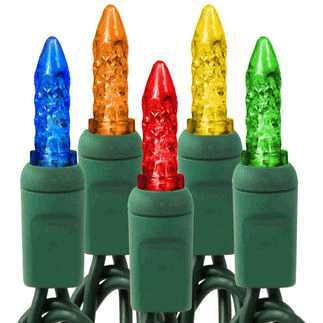 LED mini string lights (70) = 4.8 watts
4.8 / 1000 = 0.0048kW
8 hours * 30 days = 240 hours
0.0048kW * 240h = 1.152kWh
1.152kWh * $0.10 = $0.1152
 Oh yeah, we can’t forget the 12′ inflatable Santa Clause = 78 watts
78 / 1000 = 0.078kW
8 hours * 30 days = 240 hours 0.078kW * 240h = 18.72 kWh
18.72 kWh * $0.10 = $1.872
Just for fun, lets see how much it would cost if we maxed out our circuit.
1440 / 1000 = 1.44kW
8 hours * 30 days = 240 hours
1.44kW * 240h = 345.6kWh
345.6kWh * $0.10 = $34.56
Now that we’ve learned how to be safe while decorating for the holidays, the only thing left to do is enjoy the season.
Happy Holidays from all of us at DIY.StackExchange.com, and The DIY.SE blog team

Home Improvement Blog on Google+
Home Improvement Blog on FaceBook
Bloggers Wanted
Latest Articles
Topics
- Electrical (8)
- Introductions (7)
- Plumbing (3)
- Projects (13)
- Repair (4)
- Safety (5)
- Tips and Tricks (5)
- Tool Review (5)
- Tools (6)
- Uncategorized (5)