Posts Tagged ‘Tips’
Clutches, torque and you.
Many of us have drills, either corded or cordless that we use often. In fact, it’s the number one answer on the DIY Stack Exchange ‘What are the tools that every Do-It-Yourselfer must own’ question . They can be used both as screwdrivers, to put fasteners in things, or actual drills, to make holes in things. However, these two actions are actually a little bit different from each other. So, let’s take a look at the drill clutch and figure out how it helps us accomplish these tasks best.
First, let’s review exactly what a clutch (in the mechanical sense) is. According to Wikipedia, “A clutch is a mechanical device that provides for the transmission of power (and therefore usually motion) from one component (the driving member) to another (the driven member). ” It is most often used when one wants to control the amount of power being transmitted. Most of us are most familiar with a manual car’s transmission clutch. With the clutch pedal all the way in, no power goes from the engine to the wheels. With it all the way up, they are mechanically linked 100%. Anything in between, and they slip past each other and transmit some power.
On a power drill, the clutch setting is the amount of torque that the motor will pass through to the bit. With the setting at 1, it will pass very little power, and at the maximum setting, it will pass the most. Some have a numerical scale, 1-5 and then a symbol for a drill bit. In this case, the drill bit completely disengages the clutch, it will always pass the maximum amount of power.

So, you’re asking yourself, why would I ever want to use less power than I have available to me? Didn’t I buy this awesome drill for all the power it has? Well, the answer is “sometimes”. A common time you would want to dial this down is when driving Phillips-head screws into wood.
Let’s say you put your drill on maximum torque and drive that screw all the way in. When the screw reaches the depth you want, a couple of things might happen – 1) You might over-drive the screw. Remember, you’re on maximum torque and wood is generally soft. So you might put that screw in a bit more than you wanted, especially if it’s soft wood. 2) You might start stripping the head if it’s hard wood as the bit cams out of the head. Phillips-head screws are made to cam out, but this was in the days before there were torque limiting tools. The bit will rise up and out of the screw to avoid shearing the head off of the fastener. However, nowadays you’re most likely to just strip the screw slots and make it impossible to remove.
However, if you put it on one of the lower settings, the clutch will not transmit any more power to the bit once the power needed to turn the bit is more than the setting. More than likely, when driving our screw into wood, you want to set the clutch number at the number that will cause it to stop when the screw head reaches the surface. You’ll probably want to start low and maybe turn up a notch or two if it stalls out before the job is done. But when you have it right, you’ll have the best of both worlds – getting your fasteners all the way where you want them without having to worry about stripping the head because you didn’t let go of the trigger soon enough.
Another great place the clutch works for you is when driving in hex bolts into knockdown furniture. Typically a hex-head wrench is supplied with the furniture, but if one has a power tool, spinning that around by hand just gets tiresome after the tenth or fifteenth bolt. Luckily, since you have learned about the clutch, all you need to get is a hex-head bit for your drill, bring down the clutch to almost its lowest setting, and let ‘er rip! You’ll drive that bolt completely home and when it is full into the hole, the motor clutch will just disengage and you won’t damage the bolt, the piece of furniture, or anything else!

On the other hand, when using a drill bit or spade bit to make a hole in something (the “drill” part of drill./driver), you always want this on the drill setting so that you have the maximum amount of power available to you. Putting it on a smaller setting will just make your life difficult. For example, you might start OK, but if you run into a knot in the wood, this would require more power to get through it, and you wouldn’t be able to transmit that power – the motor would continue to spin, but the clutch would disengage and no power would get transmitted to the drill bit.
So now you know how to most effectively use your drill/driver for the two purposes it was designed – to put holes in things and also to put fasteners in things. Use it correctly, and you’ll get much more bang for your buck, and your proejcts will go smoother. Next time we’ll cover impact wrenches and what purposes they are used for.

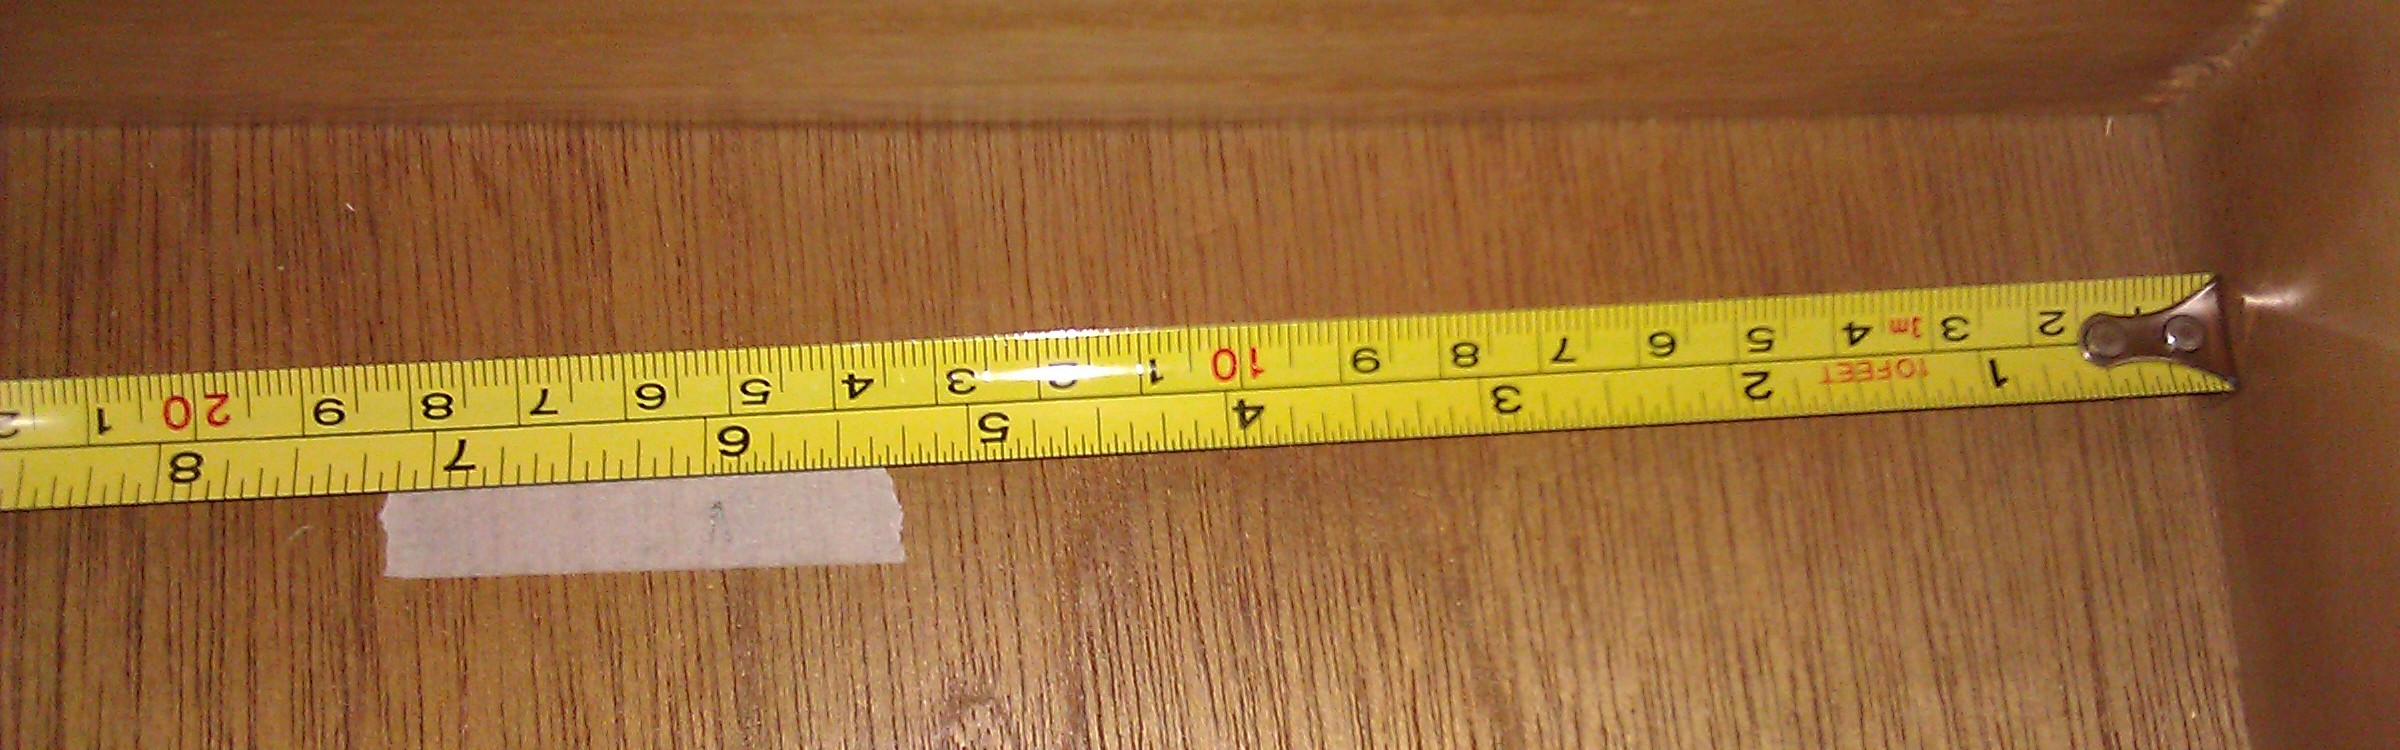
Secrets of the Tape Measure
We’ve all seen it, and hopefully everyone has used one, but there are a few tricks up the sleeve of your ordinary tape measure. And since they usually don’t come with an instruction manual, here are a few pointers that I’ve picked up over the years.
Disclaimer: I’m American, so for all the normal people with metric tape measures, this will be of limited use.
Size Matters
To start, when you buy a tape measure, wider is better. Cheap tape measures will be narrow and will lose their shape after a few feet or so when extended. If you do a lot of measuring on your own, or need to be able to reach the ceiling without a ladder, then get at least a 1″ wide, if not a 1 1/4″ wide tape measure.
Don’t Trust the End
The end of the tape measure will have a metal hook to grab onto a board or butt into a wall. These ends can get bent over time, and it’s easy to fix that by using a pair of pliers. They are designed to be adjusted, but should you break off the tip, it’s probably time to get a new tape measure. This time, get the extra wide model. To avoid having to recalibrate all the time, don’t allow your tape measure to retract at full speed and smack the hook against the case. I’m in the habit of stopping the end against my finger instead of the case itself, which is a good incentive to slow down before you take your finger off.
You can bend this to calibrate
Burn an Inch
If you are transferring measurements between people using different tape measures for precision work, and you haven’t had time to calibrate each of the tapes, you should burn an inch, or more. This is also useful when you need to measure something that you can’t hook the tape measure onto. To burn an inch, you just line up one end on the 1″ mark (or 10″ or 1′ depending on your preference) and then measure the span from that point. Then be sure to subtract the extra from your measurement or be consistent and burn the same amount everywhere.
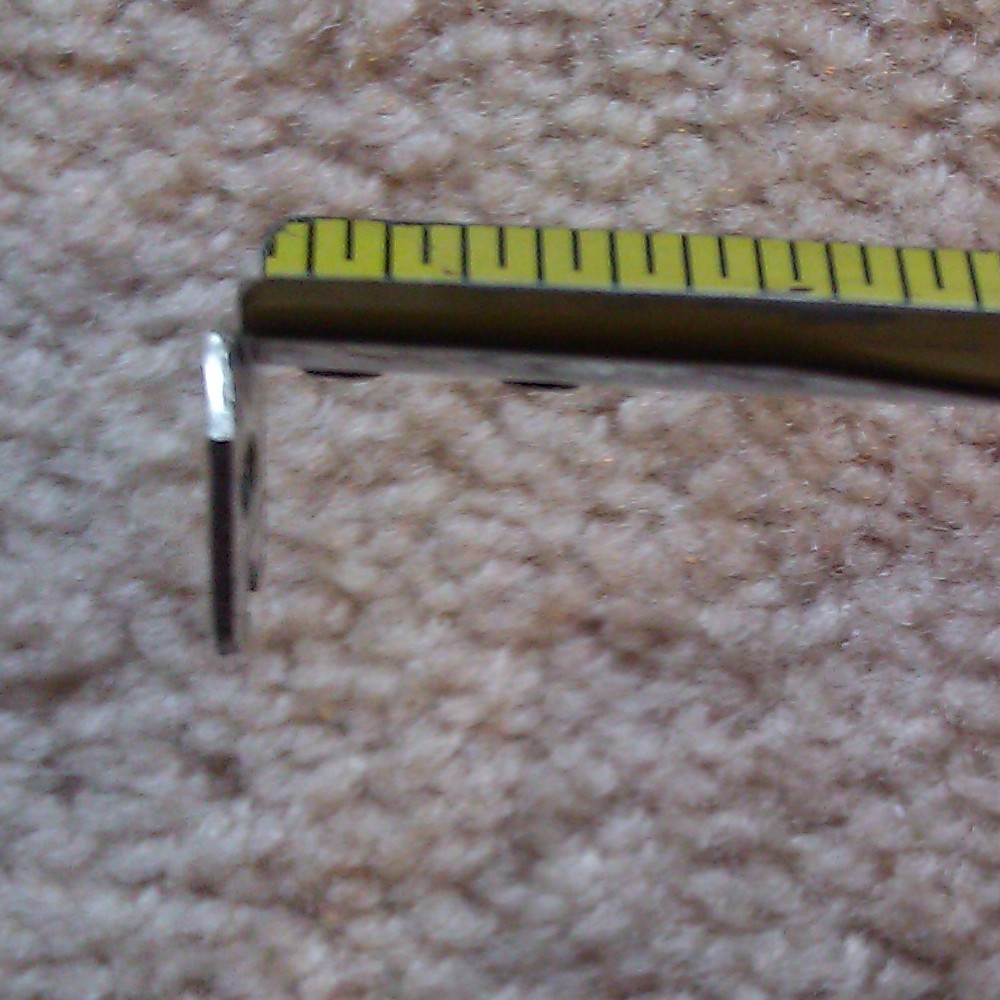
The Hook is Supposed to be Loose
I’ve seen many people that want to fix a bad tape measure because the end of it is loose. Well, it’s like that for a reason. When you butt the end of the tape against a wall for an inside measurement, that hook is compressing by the width of the hook itself. Or, conversely, when you hook it onto something for an outside measurement, it’s expanding by the width of the hook. So don’t get fancy and try to fix it, since then your tape would only work for one kind of measurement, at best.

Tab extended
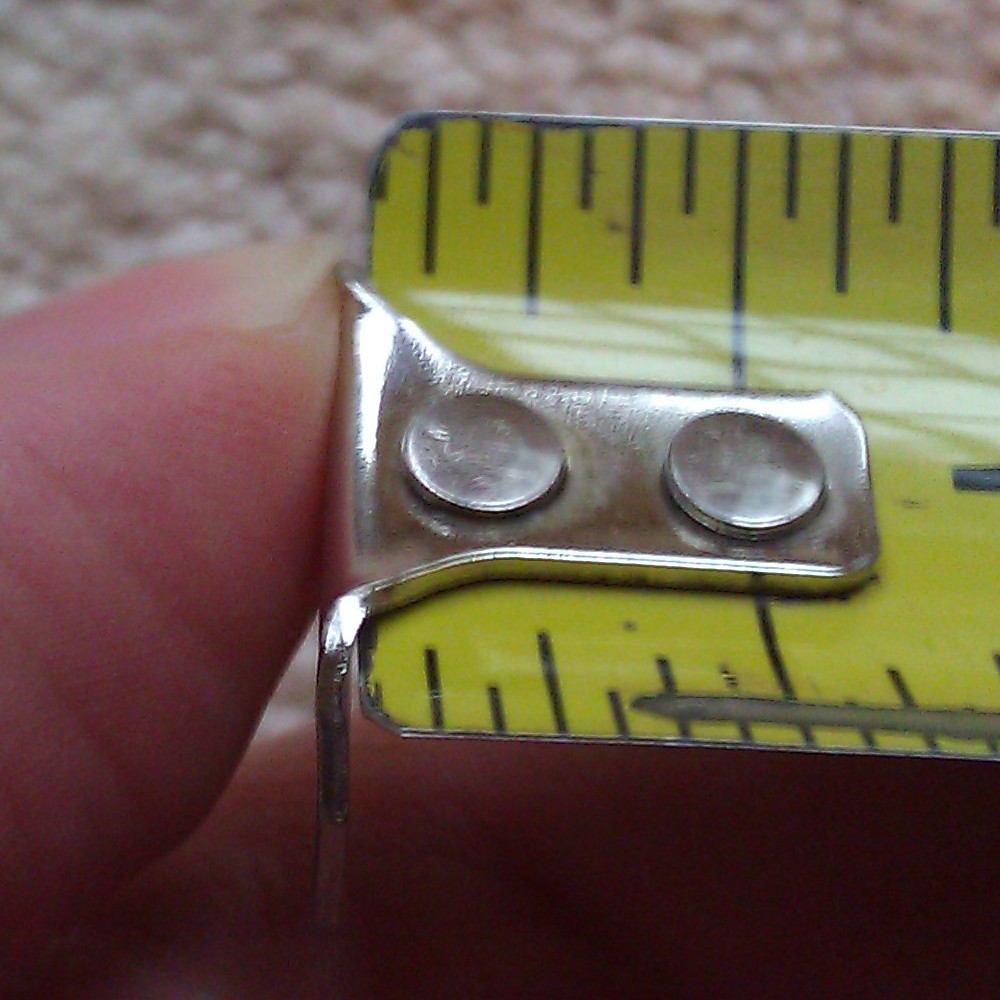
Tab compressed
What’s Up with the Studs and Diamonds
Ok ladies, get your minds out of the jewelry store. A lot of tape measures will have marks for measuring studs at 16″ and joists at 19.2″. Studs are typically spaced 16″ OC (that’s “on center” or from the center of one stud to the center of the next stud, not the gap between the studs). Note that the second stud in the wall is installed 16″ from the end of the wall, not from the center of the first stud. Also note that you may have additional studs at other points, like the opposite end of the wall, doors and windows, and where other walls intersect.

Studs are 16" OC
Lesser known than the studs is the 19.2″ joist measurement. Like studs, they are spaced with OC measurements. The reason for this odd 19.2″ measurement is similar to the reason for the 16″ stud measurement; it divides evenly into an 8′ span, which is typical for American building materials. A 4’x8′ piece of plywood or OSB will span 6 joists, and a 4’x8′ piece of drywall will span 7 studs (or 4 studs if you’re hanging vertically). If the math looks funny to you, make sure you remembered to count the first stud/joist at the 0″ mark.
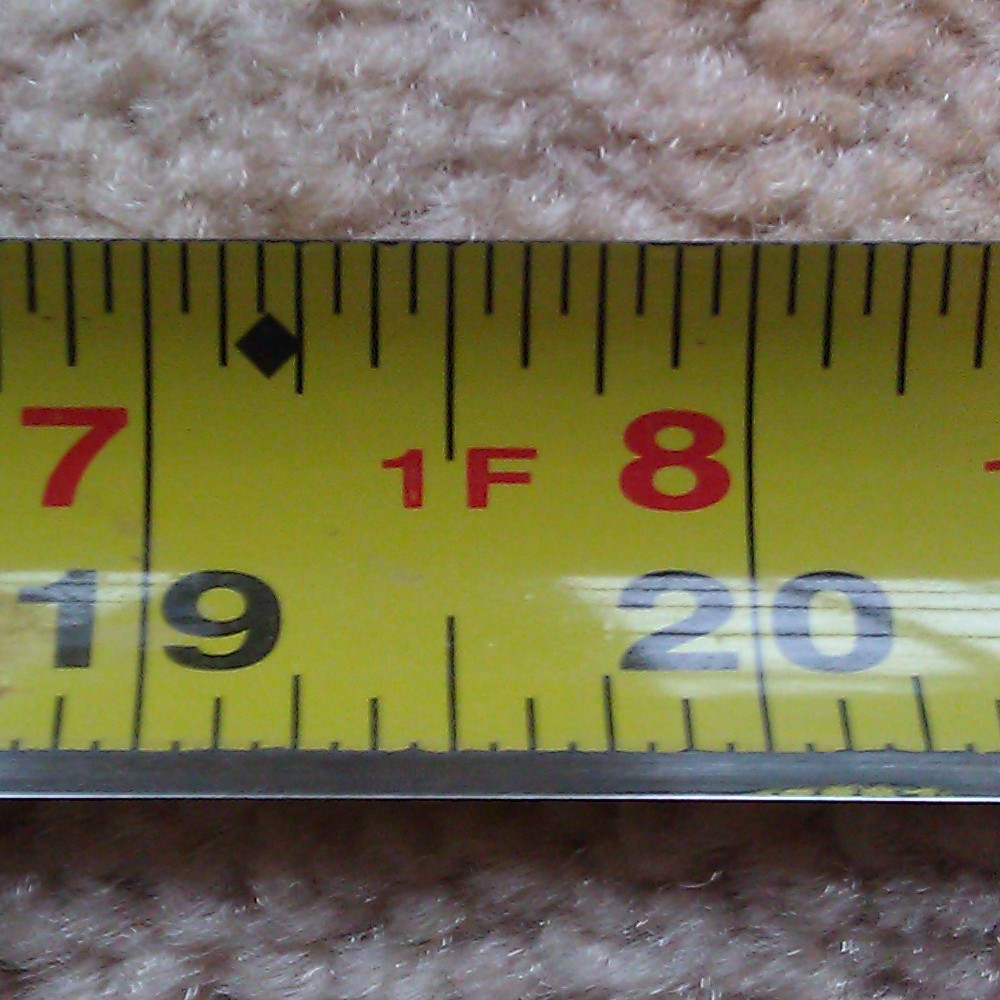
Joists are 19.2" OC (see the black diamond)
Half, Quarter, Oh Just Switch to Metric
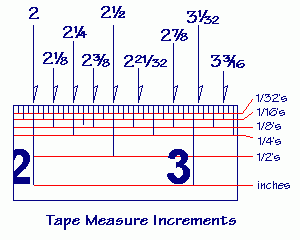
Ok, I won’t get into why Americans don’t just switch to metric, it really would make things easier. But until we do, all those lines between the inch mark are measuring fractions of an inch. That longest line in the middle, that’s a half inch. The next longest line, between the half mark and the ends of the inch are the 1/4″ and 3/4″ marks. Between the 1/4″ and 1/2″ mark, the next longest would be the 3/8″ mark, since the 2/8″ is 1/4″ and the 4/8″ is 1/2″. And while we are imperial measurements, I tend to give out all my measurements in inches and fractions, but some people read off feet. Most measuring tapes will have the inches within a foot marked in red.
Marking Your Measurements
When you make a measurement, and especially when you mark it, make sure the side of the tape is flat against the surface where you mark it. The tape is naturally cupped out from the surface, so just give it a twist to get one edge flag against the surface. Unless you’re using a square, I’d suggest marking your measurement on a board with a V point since you can be sure that this point is correct. Without the second line and the point, someone could use the wrong end of your mark and cut the wrong length. Also, since carpenter pencils are not designed for accuracy, my rule is “If I mark it, I cut it” since I’m the one that knows where in the mark is the spot that needs to be cut. Some people can be accurate with their pencil marks and will draw their line to have the line itself cut off. See this answer for more details on how to mark your measurement for accurate cuts.
Reading Upside Down
When possible, try to keep your tape measure right side up. When that’s not possible, realize that the 59″ you just measured may have actually been 65″, so double check. This goes double when you are adding on fractions of an inch, if you’re upside down, maybe you should be subtracting them?
Accurate Inside Measurements
When you are measuring between two inside corners, you can’t get the tape all the way into the corner for a good measurement. Many people will bend the tape into the corner as tight as they can and then guess what’s left. The easier way is to take two inside measurements. On one side, measure out a few inches and make a mark. Then measure from your mark to the other side and add the two measurements together.
Measure 6" from the right side and make a mark (yes, the tape is upside down)

And then measure from the left side to your mark
So the result is adding 6″ to 7 9/16″ which would be 13 9/16″ wide.
That’s All I Got
Do you have your own tape measure tips? Leave a comment below.

Repairing Stripped Out Wood Screw Holes
Occasionally things become worn out and require repair. Wood has a tendency to expand and contract as it gets wet, hot, or cold. This can cause various pieces to come undone.
One of the common problems is a stripped or damaged wood screw hole. I have used this technique to fix wooden fences and galvanized nail holes, so it does not only apply to wood screw holes.
The technique is not difficult to learn but requires you to have a few tools on hand.
1. Hammer

(image courtesy ReviewsHardware.com)
2. Punch
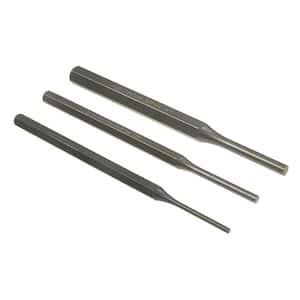
(image courtesy Home Depot.com)
3. Side cutters

(image courtesy Home Depot.com)
4. Thick toothpicks or match sticks (work best)
5. Leather work gloves
6. Safety goggles
Step 1. Starting with your hole, take the match sticks and cut off the strike points (red or blue round points) with your cutters. All match sticks should be about the same length after you cut the tips off. Use as many match sticks as you think you need to fill the hole. This step is not needed if you are using toothpicks.
Step 2. Coat your match sticks or toothpicks with wood glue. This will ensure that the sticks make a good bond with the surrounding wood.
Step 3. Insert the match sticks into your stripped out hole as far as you can with your hands. Use the hammer to lightly tap them into the hole further.
Step 4. Use your side cutters to trim the match sticks so that it is as flush with the adjacent wood surface as possible.
Step 5. Use a punch tool with your hammer to tap the match sticks in further.
Step 6. Allow about 5 minutes for the wood glue on the sticks to dry before re-drilling your wood screw or hammering in your nail.
Step 7. Re-drill your hole with the wood screw or nail in your nails. If you drill almost completely but leave a bit of the screw out, you should be able to tug on the screw to feel that it is tight and does not move around. The same goes for the nail. Finish drilling your screw and you are done.
The below video also demonstrates this method (courtesy mymilescity.com):
Additional links:
How to Fix Stripped Out Wood Screws
Repairing a stripped screw hole
How to Repair a Loose Wood Screw Hole for a Hinge

Ground Pin Up or Down? That is the question

Many people do not consider the positioning of US two prong plus ground pin outlets in their homes. Most prefer the two prongs on the top with the ground pin on the bottom. Maybe it is because it makes a surprising looking face that they can relate.
But the decision can be a matter of safety. In a supplement to one of my Popular Mechanics magazine, another DIYer asked this question and the response made sense:
“…A receptacle outlet can be installed either way….I’ve seen two instances in which thin metal objects fell across the hot and neutral prongs of a card plugged into an outlet…”
A child could also possible put a fork across the two prongs and create a dangerous short. However, for large plugs, having the ground at the top could create unnecessary stress on the plug and cause it to prematurely come out of the socket.
Another option would be to place the socket sideways, but that does not work in some installations. I have seen this in some commercial settings.
As always, remember to check with a certified electrician before performing any electrical work and obtain any permits necessary.
Using the right tool is important
One thing that always seems to ring true, usually in hindsight, is that you should use the right tool for the job.
The reasons are varied but usually amount to reducing the amount of effort to get a job done (e.g. frustration) or ensuring you don’t damage your work surface or yourself (e.g. patience).
While recently replacing my kitchen faucet with this model by American Standard , I came upon two black discs which were threaded very tightly onto the old faucet to the point that no amount of force by my hands could loosen these black discs.
Never having to replace a kitchen faucet before, I figured it would all be straightforward: turn off the water supply, undo some nuts, pull the old faucet out, and put the new one in.
Unfortunately for me I have no formal plumbing training and I have not read any plumbing books.
After fussing with the old faucet for about 30 minutes and trying to get these black disc-like nuts off, I managed to break the plastic fins off to the point that I could not even attempt to turn these discs anymore without cutting some blood vessel in my hands.
I did get it off albeit messily using my dremel. Hot, black pieces of plastic flew into my face. Here’s another tip: Wear safety glasses.
While I do wear prescription eyewear normally, they are no substitute for real safety googles. A few black hot pieces came inches from hitting my eyes. Ouch.
At any rate, I did get off the old faucet and installed the new one with all the right teflon tape on the joints and had no leaks.
As it turns out, there is a tool called the Basin Wrench that I should have used. The Basin Wrench would have allowed me to remove these plastic disc-like nuts from under the sink easily to install the faucet. My 1 and half hour job could have been just 45 minutes had I used the right tool for the job and I wouldn’t have created a huge mess to vacuum up later.
Home Improvement Blog on Google+
Home Improvement Blog on FaceBook
Bloggers Wanted
Latest Articles
Topics
- Electrical (8)
- Introductions (7)
- Plumbing (3)
- Projects (13)
- Repair (4)
- Safety (5)
- Tips and Tricks (5)
- Tool Review (5)
- Tools (6)
- Uncategorized (5)