Tool Review: Werner MT-22 Telescoping MultiLadder

2012-10-02 by . 9 comments

Every homeowner at one point feels the need to either get up on their roof or reach something really high off the ground.  The problem with large ladders is just that – they’re large.  An extension ladder capable of reaching the roof of a typical 2-story house is likely to be 10′ long when stored, which at a minimum may make transporting it back from the store difficult.  Also, it cannot work as a stepladder, as it has to be braced against something solid, typically your house.  The industry has come up with a solution to this issue, and it is known as a telescoping multiladder.

There are several brands of this style of ladder available, and most of them work in a very similar way.  In this article, I’ll be reviewing the Werner MT-22.


There are 4 main ways to use this ladder, and we’ll look at them one at a time.  First, though, we’ll look at the hinges and locks and see how they operate.

Here’s the hinges in the locked position.  The blue plastic knob is sticking out from the ladder, and you can’t see the pins.  In order to move them to the open position, you simply push the blue plastic ends so they are flush with the ladder.  They are pretty solid, but you can move them easily by pushing with the palm of your hand.

Then, you can see the 3 pins pop out of the ladder frame.  You’ll do this on either side, and then the ladder will swing freely until it reaches one of 3 positions – extension ladder, or 180 degrees, stepladder, which I would estimate around 20 or so degrees, and storage, where the legs are right next to one another and the ladder is not particularly stable.  Once it reaches one of those positions, the hinges snap back into place, locking solidly.

The second set of locks are the ones that go into the ladder rungs when they are extended.  They are solid metal pieces that are spring-loaded, and at the end they have a “U” shape.  To unlock them, pull them out and then rotate them away from the ladder.

To lock the rungs, just do the same thing in reverse – pull out the metal U, turn it so the end goes into the rung, and let it slide ino the rung.


The whole system is fairly easy to use, and if there is not any weight on the elements, they slide and go into place quite freely.  If you’re trying to unlock a hinge and it’s under some weight, it might take some wiggling, however.  They can be left half locked (in the outer set of holes) and then when you slide the inner ladder to match up the holes, it’ll spring fully engaged.  There is a tiny bit of a ridge around the inner hole, so it might not catch perfectly every time, but it works most of the time.

Now that we’re familiar with the special parts of this ladder, we’ll go on to review the different ways it can be used.

The first usage method is as a traditional stepladder:

The ladder used this way has a weight rating of 300 pounds per side.  You can lock the rung hinges on any particular rung, so it can be used for a short reach or a long reach.  This is great in a backyard if you want to get up to a high tree branch with pruning shears.  Next is the usage as a stair stepladder:

This method is extremely useful when the thing you are trying to get to is above a staircase.  If you have a larger home, you may have a very large foyer, with some lights in the ceiling above a staircase.  Now you can get to them to work on them, and as a bonus, 2 people can do this – one from either side.

3rd is the primary reason I bought the ladder, the extension ladder:

As you can see, it reaches up to the roof of the second story house, allowing me to clean the gutters.  The top two steps are not meant to be stepped on.  Instead, you’re supposed to hold onto the rungs above you for stability, so I don’t think I could get on top of the roof with this ladder easily, but that is likely to be another project.  This way of using the ladder brings me to its one drawback – the weight.  This ladder is fairly heavy, weighing in at 42 pounds.  The difficulty comes in maneuvering the ladder when it is in extension mode.  I’ve found the best way to use it this way is to extend the top section fully first.  Second, place it against the wall, hold the inner rungs of the bottom section, and undo the hinges.  Lastly, pull it back towards you a bit, just so can pull the inner part up.  I was able to move it a couple of rungs up each time before I leaned it back against the wall and reset my arms to pull it up another 2 rungs.  It gets much easier with practice.  It’s simply very difficult to push it straight up right while keeping the ladder up, and if you extend it fully on the ground, it’s difficult to pull the ladder to an upright position – it is 19 feet long.  This is where one area where a competitor’s ladder, if it is lighter, could be much more useful.  Bonus points for commenting and  describing the unsafe application of the ladder in this picture.

The last method, and the least useful for me, is the scaffold method:

Imagine the pole is a scaffold plank:

This method is used when you are working either on a wide high piece and don’t want to continually move the ladder, or if you are working directly above a hole in the ground (a basement storm cellar outside entrance, for example)  For this method, you simply slide off the inner rungs on both sides, and then lock them together, then insert the plank between the two separate ladders.  I simply don’t have a lot of need yet for this sort of activity, but it’s nice to know that it can be used in that way.

Werner also makes several accessories for the ladder, including a work/tool platform as well as a stand-off/stabilizer that can be used to either allow you to work across a window, or just to give you more stability at the top.

Overall, I am very satisfied with the ladder.  The main problem I have with it, as I noted earlier,  is that it is heavy, but it’s also made out of steel instead of aluminum – you could buy a lighter one, but you’d pay more for it.  It stores easily, and it can be transported in a typical sedan, both of which are things that a “normal” extension ladder is not capable of.  Also, there’s no rope or pulleys involved, which is another plus.  I would give this product a solid 4 out of 5 Captain Constructions, especially if you cannot get an extension ladder home yourself.

4 Captain Constructions

Filed under Tool Review

Installing Laminate/Engineered wood Floating Floors

2012-09-11 by . 20 comments

Recently my wife and I, being sick of Lego all over our living room, decided that it was time to finish our basement. I considered doing it myself, but really didn’t have the time, or the vehicle to haul materials in. We decided to hire a contractor (and got very lucky with a personal recommendation) to provide us with ready-to-paint drywall, and to come back later for trim and drop ceiling.

After installing the drywall and rough-ins, the contractor went off to Bahamas for a week’s pre-arranged vacation (with my deposit I presume), leaving me to install the flooring. I was left with a painted concrete floor (22′ x 15′), and lots of mopping to get the drywall mud and dust off of it.

Before he left, She Who Makes the Design Decisions and I went shopping for the flooring materials.

Our options:

Hardwood

Hardwood Floor Board

Hardwood Flooring is a very attractive and durable solution. Typically, a board is 3/4″ thick, and comes in random lengths from 18″ to 6 or 7′. It’s a tongue and groove board, which needs to be nailed down to the sub-floor at an angle through the tongue. A special nailing tool is used to do this. However, we’re over concrete in this installation, and don’t want to go through the cost and effort of laying a 3/4″ plywood sub-floor or, more properly, dricore. So hardwood is out of the picture.

Engineered Wood

Engineered wood

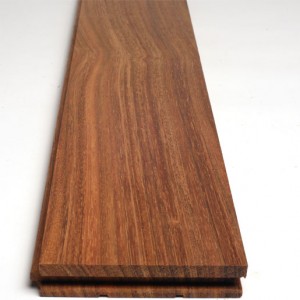
There are two basic types of engineered wood. Nail/Glue down, which is simply three plies of wood, staggered to make a tongue and groove shape like hardwood, and a final finish layer of actual hardwood. This is installed like hardwood, or it can be glued along the tongues to make a floating floor.

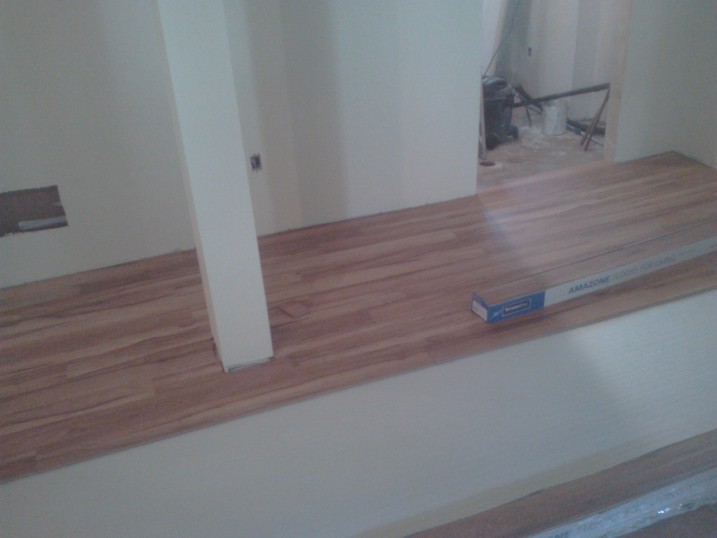
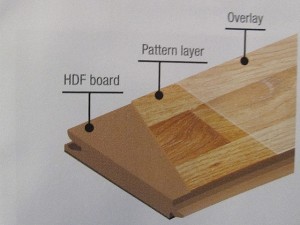
Alternatively, there is click-lock flooring, (pictured above) which requires no glue or nails. Typically, the base layers will be plywood or HDF (High Density Fibreboard – Think sawdust and glue pressed into a board), with a 3/16 layer of hardwood on top. This stuff is relatively easy to install, and slightly cheaper than hardwood. This is the product we were originally looking at. Engineered wood typically comes in random lengths.

Laminate

Laminate Flooring

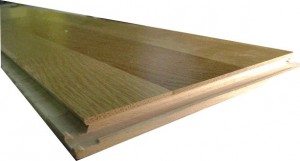
Laminate is essentially the same as Engineered, except instead of glued hardwood top layer, there is a printed surface covered in melamine. This means that a good quality laminate can be more durable than any natural wood product. Laminates that have a melamine bottom layer are also less susceptible to moisture, which makes them perfect for a basement. Furthermore, they tend to be significantly cheaper than both engineered wood and hardwood — Which is a major consideration in a basement, where there is the remote, but real, possibility of flooding resulting in a complete replacement of the flooring.

diy.stackexchange.com user Shirlock Homes makes a case against laminate here. There is a lot of merit to what he says. Laminate cannot be re-finished, and cheap laminate tends to wear our quickly, leaving you with bare HDF. Notwithstanding his expert advice, I do believe it is the correct, economical choice for a basement. Just make sure the Skil-Saw blade has stopped spinning before you put it down.

Laminates come rated AC-1 to AC-5, with 5 being the highest quality.

Rating Usage
AC-1 Bedrooms
AC-2 Living/Dining Rooms, Kid’s Rooms
AC-3 Hallway, Living Room, Office (rolling chairs!)
AC-4 Office, Cafe, low-traffic retail
AC-5 High traffic public areas – Retail, Banks, large offices


The product we ended up purchasing was AMAZONE Canadian Maple, by KRONOTEX. This is an AC-4 rated product, which means it should be more than sufficient for our basement. This product comes in fixed lengths.

Preparation

Now that we’ve selected our product, and loaded it into the job site it’s time get the prep work done.

  1. Ensure the floor is level, and flat. If it isn’t, you have to decide whether you want to grind down any lumps, level the floor with Self Leveling Compound, or live with some imperfection. Our floor had some variation, and we probably should have leveled it, but the cost was prohibitive. We decided to accept the imperfection.
  2. Remove baseboards, and undercut door trim. (Not required in this installation, as it hadn’t been installed).
  3. Clean the floor – This is critical. You don’t want any lumps of mud or any organic material on the concrete – this is food for mold!
  4. Stack your material on the wall you are going to finish LAST. Leave it there for a few days to acclimatize to the moisture level of your room.
  5. Lay the underlay. Some say that the underlay should run perpendicular to the flooring. However, this means that you have to do all the underlay in one go, and keep it clean while you work (an impossible task!). Since it comes in 3′ widths, I prefer to run it the length of the room, lay the flooring on top, and lay the next section when I get near the edge.

The Installation

Tools

  1. Mitre Saw -for cutting boards to length
  2. Table Saw – for ripping your final boards to the appropriate width.
  3. 4 x diy.stackexchange.com Carpenter’s Pencils.  You’ll need one at each saw, one behind your ear, and one left on the floor near the end of the run.  Beware of inferior pencils. Only the official diy pencil will work.
  4. 2 x Measuring tape – one in the work area, and one by the table saw.
  5. Undercut saw – for cutting under door trim (if necessary)
  6. Broom and Dustpan
  7. Shop Vac
  8. Jigsaw

Since the end of each run will require a cut, I prefer to chop my boards in the work space.  This necessitates lots of cleaning and vacuuming, but saves many trips up and down the stairs.  The table saw can be set up in any convenient location out of the work area, such as a nearby garage.

STOP! There’s one last bit of thinking!

One thing we need to avoid is a skinny little space left over after our final run. Since my boards were nominally 3 inches wide, I need to know how much space will be left over for my final course. Ideally, I’d love it if the final board just clicked into place leaving me a 1/4 inch of space to be covered by the skirting. THIS WILL NOT HAPPEN! The reality is that you need to rip (length cut) the final course to make it fit. We could just blindly plunge ahead and deal with that issue at the end. But, we could end up with a 3/4″ space, which will just look awful. We need to estimate this gap before we begin.

  1. Measure the room width as accurately as possible. You want to find a maximum and minimum width, to the 16th of an inch.  See http://diy.blogoverflow.com/2011/12/secrets-of-the-tape-measure/, BMitch’s excellent post on measuring.  Subtract 1/2 an inch (you need 1/4 inch gap on either side)(I ended up with 15 ft, 2 12/16 inches)
  2. Snap 3 or 4 boards together, and measure the width to the nearest 16th of an inch. Divide by 3 (or 4) to get the board width (3 1/16).
  3. Convert everything to 16ths of an inch. Room =(15 x12 + 2) x 16 + 12 = 2924 16ths.  Board = 3×16  + 1 = 49 16ths.
  4. Divide the Room width by the board width 2924/49 = 59.67346939 (keep all significant figures)
  5. Subtract the integer part, and multiply by the board width (.67346939 x 49 = 33 16ths)  This is more than half a board, so I’m good.
  6. In the event that you end up with less than a half board (lets say 15 16ths)  the solution is to rip 1 inch off the tongue side of the starting boards, so that you’ll end up with an approximately 2 inch board at either side of the job.


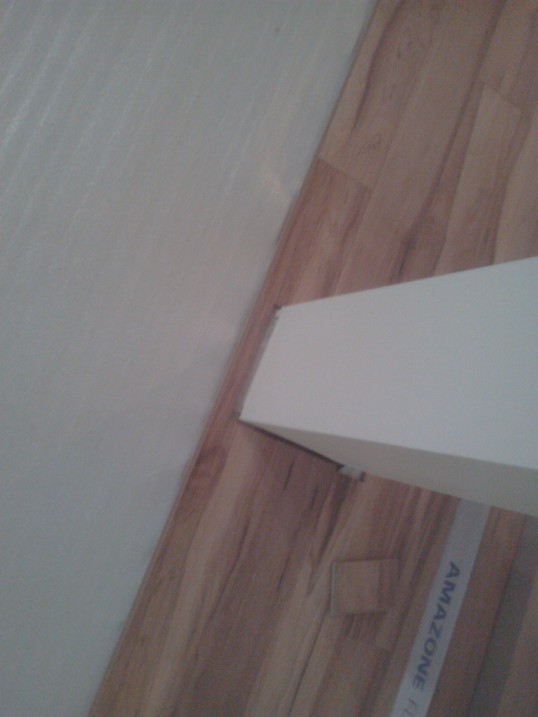
Before we get started, lets define some terminology. Unlike hardwood, you lead with the groove, and snap the tongue of the next board into it. This picture explains what I mean:
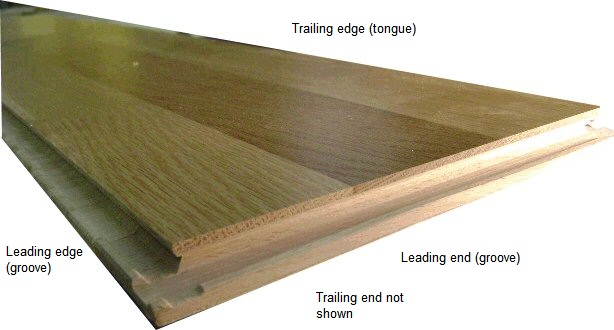
Let’s go!

Take a piece of flooring (ripped if necessary), and lay it in a corner, over your underlay, parallel to the longest wall. Remember to leave a 1/4 gap around the walls. The trailing edge, and the trailing end go up against the walls. It will move, so don’t worry.

Continue down the wall, butting the next board to the one before, and the trailing edge should click into the leading edge of the previous board. This is going to move, so again don’t worry.

When you get to the end, your piece of wood will be too long. (If you have random lengths, pick one that is significantly longer), it’s time to make our first chop.

Interlude: Cutting Boards to Length

We need to cut a board to fit the remaining space AND leave a quarter inch gap. We could mess around with measuring and calculating, but I’ve figured out a better way.


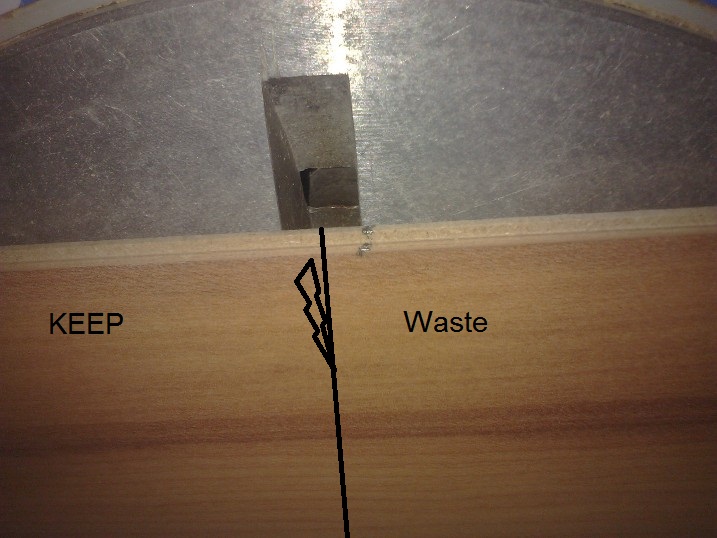
  1. Lay the board upside down trailing edge (the edge you want to keep!) butted tight to the wall over the last board you installed.:
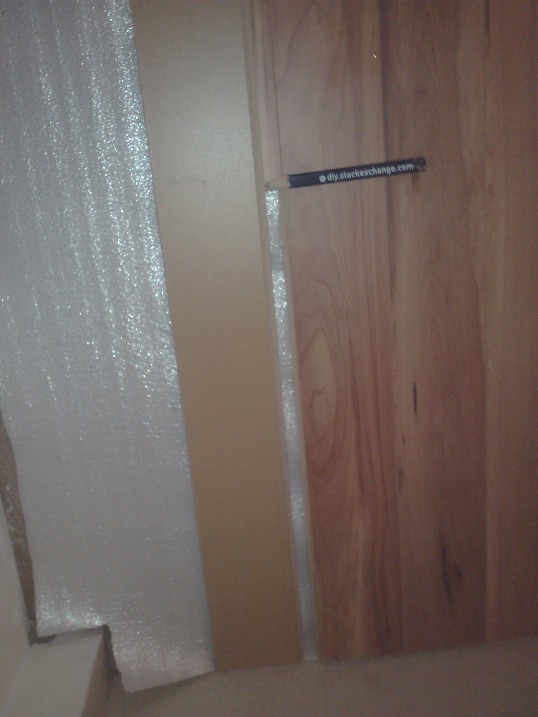
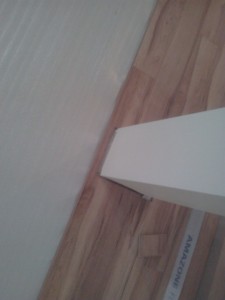
  2. Using your diy.stackexchange.com carpenter’s pencil (as seen in the image above!), mark the tongue exactly even with the previous board. (This gives us the full length – we still need to remove 1/4 inch)
  3. Lay the mark on the board right on the edge of the slot of your mitre saw and cut.  This should be close enough to 1/4 short of what we marked.  As long as the skirting/quarter round covers the gap, we’re good.)


Carrying on…

Slip the piece marked KEEP into the end of the row.  The piece marked waste, if really short can be thrown out. But! hopefully it’s pretty long, and we can use it to start the next row. If you have random lengths,  pick your end piece to leave enough for the next row.

The next row is probably the most difficult.  You need to slip the  trailing edge of the current row into the leading edge of the previous while making sure the butt joins of the first row are perfectly aligned.  If the board doesn’t slip in easily and click into place, your butt joins are misaligned OR there’s crud in the groove.  I find that the  corner of the trailing edge and end grooves often gets a bit munged up.  It’s easy enough to remove any imperfections with your fingers, or a utility knife.

Carry on with the second row, making an end cut when necessary.

Now that everything is locked together, the third row is much easier.  Notice however, that the floor is still moving.  Don’t worry about it until you have 4 or 5 rows down.  Then the floor should be heavy enough to hold itself in place.  Just remember to check the 1/4 inch gap against the starting wall every once and a while, and slide the laid flooring around to correct it. Once you’ve got halfway, move your material from the finishing wall to a convenient location on the completed portion of the floor.  This will help hold it down, and get the material out of your way.

Hopefully, you can continue on until the last course, laying a new row of underlay as required,  rip a few boards at the end, and slip out for a beer. (Not Bloody Likely!)  What’s likely to happen is you run into something like this:

or into a closet door, a run-out to a stairwell or some other obstacle. You’re going to have to cut.

Dealing with obstructions

You have two choices here. You can  measure the distance,  and cut the first board of the row so that your seam ends up in the middle of the obstruction, and make a join like this:

or you can cut out the middle of the board with the jigsaw.  The trick with the second option is getting the width of the cut.  Here’s how you do it:

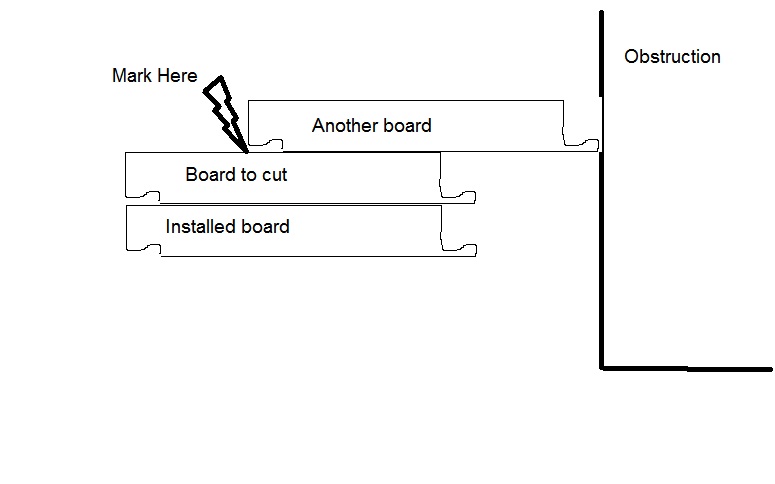
If you do it right, your end result should look like:

Note, that this measuring technique is extremely useful for measuring the rips for your final row.  Remember your 1/4 inch gap!

Another obstruction you might run into is a closet.  This takes a bit of doing, but it isn’t that hard.

The problem here is that I was working left to right, and had to then work right to left in the closet, which is difficult as the material is designed to be worked in one direction.  However, it is possible to clip in a piece from the rear.

When I got to the opening of the door, I cut the board out  in the middle as above, and ran it to the back of the closet.  I then removed this board, and put it aside for later.

I laid the floor in the closet just as if I was starting fresh, making the first board a whole board. until I got past the opening.  I then removed the FIRST board, and laid the piece that I had cut out, connecting it to my closet boards.  Now I’ve got something I can measure!   Rip the first piece, and try to slip it in from the back. Alternatively, I could have undone the last few feet of work in the closet, and relaid it fresh, starting with the ripped piece.

The Last Row

If you’re still with me, you can probably figure it out for your self.  We’ve got a gap at the end, which is too narrow for a course of boards.  In an ideal world, we should be able to measure, set up our saw and rip 4 or five boards at once. This might work for you, if you can verify that the gap is a consistent width the entire length.  It probably isn’t.  Remember that nothing in your house is parallel or perpendicular to anything else in your house.  There is error in everything constructed.  You’ve got to measure each board by itself.  Use the stacking technique in the dealing with obstructions section to figure out the widths.

Once you’ve ripped and installed the boards, you can reinstall the skirting boards and quarter round, or decide to leave that for another day.

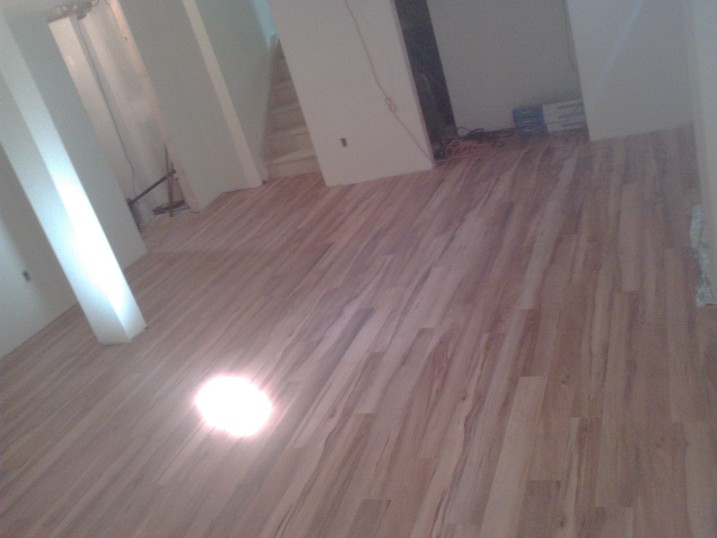
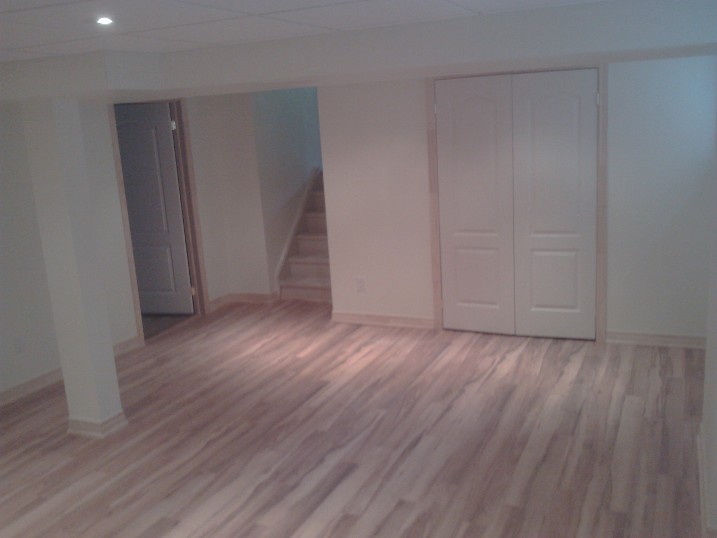
Hopefully your final product will look as good as this:


Total Time: 7 hours for 330 sq. ft.

Summary:

  1. Do your prep work. In particular, measure accurately to avoid a 1 inch rip at the end.
  2. Keep your work area clean. Dust and bits of cardboard packaging in the grooves make the job tough.
  3. Slow and steady wins the race.  You can’t rush this.
  4. Deal with obstructions properly.  Measure twice cut once.
  5. This really is a one person job.  Helpers get in the way.  Although an extra hand on the broom or clearing packaging is appreciated if someone pops in for a few minutes.
  6. This job is hell on the knees and back.  You will need a liberal application of “muscle relaxants” after completion.  Don’t make any plans for the evening.
  7. Only @aarthi approved diy.stackexchange.com Carpenters Pencils will do.  To get some, write a blog post on a project, or a tool review, and @aarthi will send you some!  Talk to @tester101 about your blog account.


profile for Chris Cudmore at Home Improvement, Q&A for contractors and serious DIYers

Filed under Projects

Building a brick pizza oven into an existing space.

2012-08-07 by . 4 comments

When we purchased our house about 3 years ago, a nice feature was a lovely brick grill area on the back patio. Inside of it was a natural gas grill insert. Unannounced to us, this grill was severely weathered; rusted through and generally not very appealing to look at.

I disconnected the natural gas line, scraped the grill and thought for a few years on what to do with the space. Do I tear down the brick and turn this covered patio into a room? Turn the brick enclosure into an oven? We both had our own ideas – the wife said do nothing; I wanted to gut it and make it an office.

We have increasingly been making our own pizzas and breads and the gas oven in the house just isn’t cutting it anymore. We use a pizza stone and already broke one because we tried cooking at too high of a temperature.

“Let’s build a pizza oven!”, I proclaimed. You can make bread in there as well and maybe we’ll cook some vegetables to go on the pizza.

3 days and $600 (ish) later, I’m finished, and this is my story.

After removing the grill, I had this big, gaping 36inch x 36inch hole. First, I built a frame from 2x4s, added a center support, and covered it with plywood. This would fill in the hole without spending a ton of money on cinder block or other brick material.

I cut and screwed in a 2×6 onto the front of the brick enclosure to act as a mold for the concrete base. To prevent cracking, I placed 8 24inch 1/2 inch rebar rods into the middle of the 3-4inch thick concrete base.

I mixed the concrete per the directions and let it set up and dry. While it was drying, we took a trip to the brick yard. We initially purchased 120 fire bricks, or, refractory bricks, 2 bags of Heat Stop 50 mortar, a trowel and a 2 foot level. I also needed a 4 inch masonry chisel and later I would purchase two 4  1/2 inch masonry cutoff wheels for my grinder (more on this later).

After 2 days of the concrete curing, I was ready to lay some brick. I watched numerous youtube videos on different methods and read websites from others that have built brick ovens.

One website said to use a 1/4 inch trowel and lay a base of mortar for the floor fire bricks to lay on. As I had no experience in doing this, I tried that, only to find out the mortar was drying too fast for me to work with it and my concrete base was not as level as I had liked it to be. I began to apply the mortar only to the bricks I was laying (as I would with tile) and level everything as I moved along. This worked well and soon I was done with the base.

Next were the walls. There are primarily 2 types of ovens you can build. The first is a Pompeii oven. This is a traditional dome oven, sometimes with a flu, sometimes without. I shied away from this type only in that it would require many cuts to build the dome and I wasn’t that experienced.

The 2nd common type is an arch style- this is just a simple arch from left to right with a straight brick wall in the back. This is easier to build as it requires less cuts, can be done in stages and is generally easier to construct. This is the option I went with.

I knew I had a limited amount of vertical space to work with as I was building this oven in an already enclosed space. I needed to consider how high I would make the walls, If I’d be able to get my hand inside to lay the top bricks of the arch and how tall the arch would be.

I decided to go with 4 rows of bricks for the oven side walls. This would leave me with roughly 16-18 inches for the oven arch.

**** You want to keep the oven as small as possible while still being functional. The bigger the oven is, the more energy required to heat and keep it heated.

On the front of the oven, I left the top brick out on each side as I knew I would do a 2nd arch for the opening of the oven. Again, the bigger the opening is, the more heat can escape. I had a pizza peel already in my kitchen, so I took a measurement of it. It measured 14 inches across the width. Using just 1 brick on each side of the front left me with an 18 inch opening. Perfect! Plenty of room to get the peel in and out with the pizza on it.

With the walls built, I needed to build a form to support the arch as it dried. This form can be made out of any rigid material and is just a temporary support until the arch dries. Having run out of plywood (and not particularly enjoying working with a circular saw) I opted to use scrap drywall. I was remodeling a bedroom this week anyway and had scrap left over.

I took the interior measurement between the side walls, and cut a piece of drywall to width.

I used 11 bricks on the floor of the oven side to side, so I took 13 bricks and began laying them on the drywall in an arch pattern. I used a small piece of drywall to space the back of the bricks for the mortar gap and worked to make both sides of the arch consistent.

Once I was happy with the arch shape and having researched different arch types online, I traced the outline of the bricks onto the drywall and cut it out. I left a 1 inch gap at the bottom to fit in between the walls to give it left to right rigidity. This 1 inch gap, sitting on top of 4 stacked bricks made up the mortar gap in the wall and put the arch where it needed to begin at the top of the wall.

I traced this initial arch onto 5 other pieces of drywall. I then cut 4 inch blocks from 2x4s as spacers and screwed 2 arch supports on either side. This would give the templates a means of standing up right. I decided on 4 inches for the 2×4 because a fire brick is 9 inches long. 4 inches would allow a 2 piece template to span 2 bricks lengthwise (giving the dome more stability as it built it).

I placed the arch templates into the oven, propped up on 2 stacks of 4 bricks and spaced the arch supported front to back to cover the depth of the arch.

Once I was happy with placement, I began to dry fit some bricks for the arch to make sure everything would work out the next day. I knew the first brick of the arch would need to lean back against something. I decided to place a brick on its short end on top of the wall. This would leave me with half the space of a brick left; leaning the first arch brick against it put the brick at a 45 degree angle. Perfect!

I would fill in the void of the 45 degree angle with mortar. Some people that had built brick ovens online put 1 brick right after the other. This is not the correct way to do it. You want to stagger your joints on the arch just like you would on the walls. This of course, takes more time as you need to cut a few bricks in half (re: masonry cut off wheel) but ultimately leads to a stronger arch.

So, the arch is done. I left the front 2 bricks of the center of the arch out to provide ventilation into the existing chimney stack. 2 keystone bricks were cut to match the angle of the arch and maintain the structural integrity of the arch. I was left with an opening of roughly 1 half brick which will eventually have a steel door installed into it to allow the oven to retain more heat.

The main arch was allowed to dry over night and I began work on the front fascia. Another form was made from drywall; this time using 7 half bricks cut with the grinder. The rest of the front fascia was built as a normal wall would be. When I could I tried cutting bricks to fit gaps around the arch. 2 gaps exist on either side of the arch which were filled in with mortar. I’m not sure a pro could cut bricks to fit those gaps but I think it gives the oven a bit of character.

The very top, last row was a tight fit. To small for a full brick by all means; to small for a split brick as a lintel supports the rest of the original structure. We had originally thought to take scrap broken pieces and do a mosaic but the wife came up with the idea to cut 1/2 inch strips from the splits and mortar them in place. This was a fantastic idea and was how we finished the build.

Snags and things to keep in mind along the way:

  • Had this not been built into a pre-existing space, I believe it would have been much easier to complete. I could have worked on any part of it from any direction. As it was, I could only work on it from the front, having to contort my body to reach some spots of the arches along the way.
  • I bought a brand new 4 in brick chisel for $10 at Home Depot. Great tool, but what saved the day in the end was the $3 masonry cut off wheel for the grinder. Mark a line on the brick, cut into the brick with the grinder as deep as I could. Put the chisel in the cut and tap twice with a hammer. Perfect, clean cut. This was done on all of the front arch pieces for a nice clean cut.
  • Don’t even think of trying to cut a brick length wise; go buy some splits from the brick yard and use them. I shattered 3 bricks thinking I could slice down the middle with the chisel.
  • At 8am when I started, it was about 70 degrees outside and my mortar just slightly loose. At 10am it was 82 degree’s out and my mortar was getting firm and I had to add water. No big deal, but realize the mortar is not on your side. It will wait for no one and will dry without notification. Keep your tools clean; clean tools work better and last longer.
  • Take your brick count and add .5 to it. Double your mortar amount also. The Heat Stop 50 bag said I should be able to lay 100 bricks with one 50lb bag. Yeah, not a chance.
  • If you’re trying to split a brick with a hammer and chisel, make sure the brick is on firm, flat ground. Once or twice I split the brick with a small pebble under it and the brick split in the wrong place. They can be that sensitive.
  • Mix only the mortar you need. Do not mix the entire 50lb bag. I made about 4 batches per bag. I chose to mix the batches by hand with a gardening trowel instead of a drill and paddle mixer so I could control the water amount and consistency better. On the walls I wanted the mortar a little looser so I could get my joints as close to 1/16th as possible like the instructions said. On the arches, I wanted it a little firmer so it would hold the brick better.
  • Double check your forms. I placed 1 backwards and my arch was a touch off. I had to shim those bricks with wooden shims. No big deal and I had the shims on hand, but a pain in the butt that could have been avoided.
  • Dry fit everything that you can. It’ll give you a nice visual on how things will fit. In my case where my space was confined, it let me see beforehand if something had to be cut, how thick my mortar lines had to be to account for any unlevelness, etc…
  • Put the level on everything. 1 brick being off by 1/16th isn’t a big deal. 10 of them is. I used a 1 foot level and a 2 foot level side by side on all bricks where I could.
  • Take your time and do not rush.
  • A brick is not terribly heavy. Picking up bricks one at a time, holding it with one hand while applying mortar and then trying to put the brick into a confined space and a brick weights a ton. Take your time, drink lots of water (or Gatorade and coffee) if its hot out and you’ll be fine.
  • Wear gloves if you value your skin.
  • Keep your eyes on the chisel. I hit my hand thumb once (fortunately) with the hammer. At the force you need to hit the chisel with the hammer to crack a brick, It’s not a pleasant experience.

All in all, 150 full bricks were used. 5 split bricks, 3.5 bags of mortar and 5 bags of concrete were used. I plan to do a test burn the day before the 4th of July and if everything goes well and nothing comes crashing down on me, to make some pizza on the 4th of July. Articles I have read online say the oven should get up to 700-900 degrees and can spit out a thin crust / New York style pizza in just under 2 minutes. We’ll just have to capture this on video.


profile for Mario at Home Improvement, Q&A for contractors and serious DIYers

Filed under Projects

Hanging Shelves

2012-07-31 by . 4 comments

This is a continuation of my previous blog post.

This blog posting was originally written in 2008 for a friend of mine who was unable to perform simple repair tasks around her house. The original purpose was to assist her in hanging shelves on her wall. It is intended for those people who know that the flat end of the nail is the end you hit with the shoe, and that butter knives make acceptable screwdrivers.

L- Bracket Shelves

So, let’s look at the simplest type of shelf to put up: Basically, we’re talking about a plank of wood, and two L-brackets. It’s not the prettiest type of shelf, but it is cheap and functional. I actually don’t recommend this type of shelving for all but the most utilitarian installations. BUT, this installation will demonstrate the essential properties of shelviness — The shelf is level, and it is strong enough for most small loads. The techniques used here are also applicable to hanging curtain rods and small bathroom shelves. My general principle is that you can’t possibly measure and pencil out the installation accurately. (See Golden and Silver rules in my previous article.) So we’re going to do this in a way that doesn’t require that.

Materials:

1 shelf 2 brackets 1 pencil 1 carpenter’s square (It’s called a square, but it might be triangular in shape) 8-10 screws – Often these will come with the brackets. You’re probably best off to get some longer wood screws for the wall mounting. Keep in mind that your drywall can be up to 3/4 of an inch thick, and we’ll want at least an inch in the wood. I’d get 2 inch wood screws with a countersunk head. 1 drill drill bits 1 level 1 helper – these can usually be found by offering a beer.

Step 1: Hold the shelf up to the wall where you want it to go. Take a pencil and mark the height about 6 inches in from one end. This is just a rough guide for now. You don’t need to mark the entire length.

Step 2: Find the studs. This can be tricky, but if you’re going to use it for books, then you need to find a stud. Sometimesyou can find them by tapping lightly with a small hammer and listening for a spot where the echo turns into a thud (a doctor’s knee tapper would be ideal). This might work if you have drywall and wood studs, but plaster and lathe seems to make the same sound no matter where you tap it. Borrow an electronic stud finder from a friend. I you can’t get a stud finder, then we have to resort to destructive testing. Find a long skinny nail, such as a two inch finishing nail. Bang it in where you think there might be a stud. Move over an inch and a half an try again. Repeat until you know you’ve hit wood. The problem with this technique is that you will be left with a plaster repair and paint touch up when done, but it is reliable.

Once you’ve found one stud, the other is easy. Studs are usually placed every 16 inches. Just measure over and tap again. Mark the studs with vertical pencil marks (lightly – You’ll want to wash it off later). I like a couple of ticks at the edge, and a longer line down the middle. .|. For shelves, it is imperative that you find a stud. Drywall plugs won’t support the weight of books.

Step 3: Place the board back up, center it on the studs, so there’s an even overhang on each end and mark on the board, ONE side where the stud line meets the board (ideally about 6 inches in from the end). Take the board down, and on the underside using a square (which is usually triangle shaped) mark the perpendicular right across the board.

Step 4: Balance the board on its back on a good solid flat surface so that the edge that will contact the wall is against the floor. Do your best to keep it straight up and down. Put one of the brackets against the board and the floor and press so the flex is taken out of the bracket, and the screw holes are directly over the line. Have your helper mark the screw holes on the board. (That 2 inch finishing nail works great! Stick it in the center of the hole and tap lightly with a hammer).

Step 5: Drill out the screw holes. The diameter of the drill bit should be slightly smaller than the inner diameter of the screw (The solid part inside the threads.) Attach the bracket to the board. NOTE: Your drill will usually tend to “Walk” away from the marked point when you start it up — particularly on hard materials. This is less than ideal. You can take a nail, and bang a dimple over the pencil mark to stop this. The small hole will grab the point of the bit and stop it from walking.

Step 6: Mount the shelf, lining it up with your previous marks, and mark only the upper screw hole where it meets the wall and stud. Drill. You can use a small bit, as you’re going into a 2×4 here. Screw in the upper hole, and lightly put a screw in. You’ll be taking it out in a minute.

At this stage, you’ve got one bracket, tightly secured to the board, and loosely secured to the wall.

Step 7: Level the shelf. This is fairly easy, as you have one fixed end to pivot around. Just move the other end up and down until the level bubble is centered. Mark the stud line on the board and mark the underside of the shelf against the wall (As per Step 3). Take the shelf down, and repeat 3-7 for the other bracket, and finally drive home the actual screws that will hold it up.

Hanging Shelves with Vertical Rails and Brackets

Shelves with vertical rails are a relatively cheap solution. They consist of two or three vertical rails that are screwed directly to the wall. Brackets clip into the rails, and the shelves lay across the brackets.

The IKEA version is functional, but rather pricey for what it is. You can buy the parts at any hardware store and build your own to fit your space. If you go this route, Laminated MDF is a good choice for the actual shelves as it is pretty stiff. However, it can be unattractive. Another choice is to buy some 12 inch pine boards at your local lumber yard. They will cut it to length for you there, so have the measurements ready. You can then stain or paint it yourself.

Canadian Tire has a two shelf 24″ kit for 19.99, (White, melamine laminated MDF) so this would be a cheap starter. You could replace the shelves later.

These instructions are written assuming the DIY route. If you buy a package, then some of the cutting and measuring can be eliminated.

Design and materials.

Typically, 3/4″ lumber storing books can span 36″ without significant sagging (according to the wisdom of the internet). However, studs are 16″ apart, so 32″ is a better choice. A 4 foot shelf can be problematic. The only mounting solution is three rails at 16″ spacing or 2 at 32″, leaving 8 inches of overhang at either end. The danger is that a partially loaded shelf might flip up like a teeter totter if there is too much overhang. I’d feel better with 3.5 foot shelf, which could be mounted on two rails at 32″ spacing and 4.5″ of overhang.

Leave about 6 inches of excess rail above the top shelf and below the bottom. This will help distribute the load nicely over the wall.

You might wish to take a measuring tape and a piece of chalk and actually draw your shelving on the wall before you head out to the store. It really helps to visualize the solution. (hint – find the studs now, as they are where the rails go.)

Materials: 2 or 3 rails. Buy them pre-cut. They typically come in 24, 30 and 60 inch lengths. 2 or 3 brackets for each shelf. Shelves. Screws. Drill, Bits. Driver. Helper. Level. Plumb Bob and chalk line (optional) Chairs or step ladder.

Getting to work:

Step 1: Preliminary Reconnaissance Figure out where you want the shelves to go, and hold up the upper one to the wall. Mark the end points so you know your boundaries. Now you need to find the studs. I’ve discussed that in the L-Bracket shelf instructions, so I’ll leave you to it. However, if you are hanging a 24 inch shelf on 16 inch studs, that leaves 4 inches of overhang at either side. You might have to move your ideal location over a bit so that the shelf is centered on the studs. Once you’ve found the studs, hang a chalk line and mark it. Alternatively, mark it with pencil in several locations and use the edge of a shelf, or even the rail itself to mark the studs.

Step 2: Like before, we’re going to do one side first, and then match the other to it. Figure out where the top of the rail needs to go. Mark the top screw hole, and drill. Again, the drill bit should be smaller than the screw. Lightly screw the rail to the wall using the top hole only. Let the rail hang loosely.  Hopefully the rail will hang exactly over the line you drew earlier. If not, you have to decide now which vertical you want (i.e. Your studs aren’t vertical, or the gravity works differently in your house) . The likelyhood is that neither is correct. Check with the level if you need to. Once you are satisfied, mark the remaining screw holes. Tip: You probably won’t be able to get a pencil to touch the wall through the rail. Use a skinny nail, and give it a light tap with a hammer to mark the wall. Draw a circle around the marks so you can find them.

Step 3: Mount the first rail. Take out the single top screw, and take the rail down. Now drill out the holes you just marked. Put the rail back up, and screw the screws in until they are just tight. It’s best to do the top and bottom first, ensuring everything is lined up straight. Then fill in the middle ones.

Step 4: Mark the other rail CRITICAL STEP The first rail was easy, as we didn’t really care too much about the vertical placement. The second rail has to match the first exactly. There is really very little wiggle room here. If the rails are mis-aligned, the shelves will be sloping, which is not one of the properties of shelviness we desire. This can actually be very tricky. The obvious solution would be to measure down from the ceiling. THIS WOULD BE WRONG. Remember, everything in your house is wrong. There are no straight lines and no 90 degree corners in your house, and every time you pull out a tape, you’re introducing error into the equation. One might be tempted to try and line up the second rail by partially assembling the brackets and temporarily mounting a shelf using the brackets and a shelf. In my experience, this is more trouble than it’s worth. It might be a workable idea when you have 3 pairs of hands, but then communications between those hands becomes an issue. Hopefully you’ve bought pre-cut rails, so you can use this technique: Have your helper put a shelf, or other rigid straight body right across the top of the mounted rail. Make sure that it is flush to the wall and the rail. Now, using the level, level the shelf and mark the underside where it meets the other stud line. The person marking should be the person adjusting and watching the level. Now you can mount the second rail with its top just ever so slightly above this pencil line. (Keep in mind that the pencil mark takes a bit of space.) Follow step 2 and 3 for the second rail. It’s a good idea to measure the spacing at the top and bottom to make sure they are parallel. If you’re within an 1/8th of an inch, you’re probably ok.

Step 5:  Mount the middle rail (if required) If you need a center rail you can mark the top just by balancing a shelf across the existing rails and matching the rail to it.

Step 6:  Tighten screws another half turn. If you over tighten, you’ll damage the wood underneath, and the screw might pull out.

Step 7:  Attach the shelves. This is a pretty straightforward task.

We’ve gone through some fairly basic tasks which demonstrate a few principles. The first and foremost being that measurement is rife with errors. What I have attempted to show is that we can do a whole lot of quality work while keeping this error prone task to a minimum. Also notice that we’re screwing directly into the studs here. That is why there are no drywall anchors. While anchors do carry significant weight, they’re not strong enough for shelving that is going to carry anything more than decorative items — and you’ll be wanting nicer shelves for that task.

profile for Chris Cudmore at Home Improvement, Q&A for contractors and serious DIYers

Filed under Tips and Tricks

First Time DIY: How to Attach Wooden Shutters To Brick

2012-07-24 by . 7 comments

Hey all! Here’s a fun project you can do over a weekend or two! I say “or two” in case you’re like me and this is the first time you’ve ever done something like this. HAHA!

My wife hated the shutters we had on our house… and rightly so…

Maxwell Shutters 1

So, we decided to build some board & batten shutters. FUN! Now, if I only knew what board & batten shutters were…

Board & Batten Shutters – “Board & batten” usually refers to vertical siding where wood strips (or battens) hide the seams where other boards are joined. Here’s a site that has a lot of examples of the different styles of board & batten shutters.

After figuring out what they were exactly, I looked up a design and built them. I’m not going to go into detail on how to build them, because frankly, I screwed up too much to properly teach you. But, if you’re interested, here’s a tutorial from Lowes that matched with the style that I built.

Maxwell Shutters 3

Again, I had never done anything like this so, like a good lad, I went to where the experts were: DIY.StackExchange.com! This post is actually based on my question to them. Now, onto the process:

  1. Measure, level and mark boards, appropriately aligning the future holes with the mortar between bricks.
  2. Drill pilot holes into the wood shutters, including a 1/4″ countersink to cover the screw heads up with wood filler.
    • What I learned: Unlike screwing wood to wood, where you can sink the screws into the wood easily without a countersink, when attaching wood to mortar, if you do not provide the countersink hole already and attempt to perform said action, you will strip the mortar and the screw will just spin and stay loose. Not good.
  3. Next, re-level shutters and mark the mortar with the masonry drill bit through the pilot holes. I found that only drilling the top two holes worked best for me. I’ll get to why in a minute. An extra set of hands comes in handy here.
  4. Set the shutter down and drill the top two mortar holes completely.
    • What I learned: Be sure to drill into the mortar enough to where the screw tip won’t hit a dead-end (Most recommended a 1/16″ or 1/4″ of extra room beyond the screw tip). If you don’t give a little extra space at the tip, you’ll encounter a great deal of resistance, the screw will not go in all the way and you’ll have to get the masonry bit out again.
  5. Attach the shutter to the house using the top two holes.
  6. Now, we’ll finish the bottom two holes: with your masonry bit, drill into the mortar through the board.
    • What I learned: I found this process to be the easiest for me, as my pilot holes didn’t always match up completely when I attempted marking then drilling all four at the same time. Less margin of error on my part. But, this is became a personal preference. Decide for yourself.
  7. Finish attaching the shutter to the mortar at the bottom with your screws.
  8. Use wood filler to patch the holes, lightly sand filler.
  9. Paint/stain/seal accordingly.
    • What I learned: I had already applied a sealer to the back of the shutters before attaching them. I taped off my house using wide painter’s tape after they were up and it saved me a huge headache of cleaning sealer off my house with mineral spirits.
Maxwell Shutter

click to enlarge

Overall, I also learned:

  • I marked & drilled all of the pilot holes into the shutters at one time which saved me on having to switch between the masonry & wood drill bits. HINT: If you forget to take out the masonry bit and attempt to drill into wood, you very likely could start a friction fire! Haha!
  • Having two drills is a life-saver: I had my hammer drill set up with my masonry bit and my cordless drill had my Phillips bit in it ready for the screws.
  • Having a second pair of hands throughout the entire process was also a great deal of help. Thanks, Seymour!
  • The DIY.SE community is of great help!

Thanks for your help folks! I hope this walk-through helps someone else, too!

profile for joshmax at Home Improvement, Q&A for contractors and serious DIYers

General Tips for Household Repairs.

2012-07-17 by . 5 comments

This blog posting was originally written in 2008 for a friend of mine who was unable to perform simple repair tasks around her house. The original purpose was to assist her in hanging shelves on her wall. I will post the follow-ups soon. It is intended for those people who know that the flat end of the nail is the end you hit with the shoe, and that butter knives make acceptable screwdrivers.

Golden Rule:

Measure twice, cut once.

Silver Rule:

You can’t measure anything accurately.   Therefore, Always dry-fit the project and make sure it fits.

or

Reality often has it wrong, so you have to be wrong in the right way to make things work.

If you watch a professional, you’ll see that they’re constantly dry-fitting, adjusting and re-fitting pieces. However, you can reduce the number of measure/cut cycles you go through by reading BMitch’s excellent blog post on tape measures.

General tips:

Do I have Plaster or Drywall?

There are several types of plaster you might run across in homes built in the 1960’s and earlier. The most common type is Plaster and Lath. Lath is thin strips of wood nailed up to the studs in a diagonal pattern. Then Plaster is spread on top to make a smooth finish. In really old houses, the plaster contained horsehair to give it some tensile strength. The only advantage of a plaster wall is that you don’t need to find a stud for light loads — the lathe is everywhere. The major disadvantage of plaster is that it is brittle, and cracks propagate quickly. Put a piece of tape over the plaster before banging in a nail, and you can reduce much of the cracking.

Drywall is factory made gypsum plaster sandwiched between two sheets of thick paper. It comes in sheets (4 x8′ or longer) and is screwed directly to the studs. It is taped together with paper tape and a plaster like compound called Drywall Compound (or MUD) to hide the joins. It’s a lot faster to put up, and relatively easy to repair. However, It doesn’t support much weight at all. Usually light loads will be attached with a plastic drywall plug to spread out the downwards force so that your nail or screw doesn’t pull down the wall, opening a crack like a zipper would.

For houses built in the 50’s and 60’s you may come across a solution that is the worst of both worlds: Gypsum Lathe and plaster. Gypsum lathe is essentially thin sheets of drywall screwed to the studs. Then it was plastered over as if it were wood lathe. The major problem is you still get the brittleness of plaster without the additional support of wood lathe. Furthermore, the gypsum came in large sheets, so that the plaster doesn’t flow in behind and lock like it does with wood lathe. This can lead to de-lamination of the layers, particularly in cases of water damage.

ALWAYS drill before screwing.

ALWAYS! No exceptions. Select a bit so that the shaft of the screw is about the same size as the bits. This will remove the material that you would otherwise have to push aside (with a splitting risk) while still leaving enough material for the threads to grab.

Reject all screws except the Robertson (Square head).

It is the easiest to use, and it’s your patriotic duty as a Canadian to support this superior screwing technology. The only drawback is that you have to use the correct sized driver. Robertson screws save all sorts of heart-ache and pain. The greatest advantage of the Robertson is that the screw will stay on the driver. This means that you don’t need the other hand to hold the screw. This frees up the other hand for duties like holding onto the work of holding onto dear life as the case may be. The Phillips screw was designed so that the drive would twist out of the screw head if it got too tight. This is a perfectly acceptable design decision. However, usually, we don’t want our driver to torque out of the screw. (Exception: Drywall screws)

The job will take twice as long as you anticipate.

ALWAYS! No exceptions. Even when you take this rule into account.

Nothing in your house is built right.

There are no 90 degree corners. Nothing is flat, and parallel walls aren’t. Make no assumptions. Use a level and a plumb bob to determine horizontal and vertical.

Hanging light things on a wall

If you’re hanging something light, like a picture, or a bathroom medicine shelf, you don’t need to find a stud, you can use drywall plugs instead. Usually the package will tell you what drill bit to use (5/8 or 1/4 are pretty standard.)

Nails and screws are not interchangeable.

They each have specific uses. Other than tiny picture hangers and quarter round, you probably shouldn’t be using nails around the home.

Know your screws and what they are for:

These are the common screw types that you’ll see at the local hardware store.  There are many more specialty types, but here are the basics.

Wood Screws

Wood Screw Wood screws are pointy, and may or may not have threads all the way to the head (usually not). Often the head has a conical profile allowing the head to be driven into the material and lay flat (or covered with a plug or wood filler.) When joining two pieces of wood together, you want the unthreaded portion of the screw to be about the same length as the thickness of the top piece of wood. This means that the threads will bite into the lower piece, and everything will pull tight together. If you were to use a drywall screw instead, it is quite likely that the screw will actually end up forcing the pieces apart slightly.

Sheet Metal Screw

Sheet metal screw

Pointy, sometimes there’s a self-tapping notch near the point. Usually the head has a dome profile, but counter sunk does exist. Finer threading than wood screws, and the threads go all the way to the head.

Machine Screw

Machine Screw

Dome profile. Flat point. Can take a nut or be screwed directly into a tapped hole in metal objects. (This means you have to have a threaded hole to screw into. Absolutely no good for wood)

Lag Bolt

Lag Bolt

Not actually bolts, as they don’t take a nut. Usually quite large, and rather than taking a screwdriver, they usually have a hex head. Big coarse threads, that don’t go all the way to the head. This is a screw for joining big structural lumber.

Carriage Bolt

Carriage bolt

Basically a Machine screw, with a nut. Carriage bolts tend to be big, like a lag bolt. Often the name is used interchangeably with a Machine screw. Basically, these are used to join two pieces of metal together, often with washers to allow some motion. Think Meccano, but bigger. The can also be used to join beams together. A hole of appropriate size is drilled through the material, and the bolts are tightened so that the friction between the wood pieces prevent any movement. You can see this use in many pergolas and wooden backyard play sets.

Drywall Screw

Drywall Screw

Skinny, sharp, long. Usually black or blue in colour. Use these only for putting up drywall, and nothing else. Usually only available in Phillips heads. People putting up drywall will usually buy a special tip for their drill that takes advantage of the Phillips driver’s tendency to slip out of the screw. This allows them to lightly dimple, but not break, the paper sheath. Drywall is the only application where I would recommend using a Phillips head.

Deck Screws

These look pretty similar to thicker drywall screws except that the are available in Robertson heads. They’re usually green in colour, and are treated to put up with the corrosive nastiness of pressure treated wood. If these are the only screws you have laying around, then it’s probably safe to use them for interior repairs.

profile for Chris Cudmore at Home Improvement, Q&A for contractors and serious DIYers

Filed under Tips and Tricks

Knowing when to say when

2012-06-13 by . 7 comments

One of the most important skills a do it yourselfer can have, is knowing what you can do yourself and what you can’t. While doing work yourself can often save you a bit of money, doing things wrong can cost you more than you might think. Admitting to yourself that you can’t do something is often a very difficult and frustrating task, but realizing you shouldn’t have done something yourself can be much worse.

Trying new things is one of the best ways to learn what you can and cannot do, so you should never be afraid to try things. Learning a new skill or finding that you can do more than you thought, can be a great feeling. The best way to try and learn new things, is to do so under the supervision of a person who already knows how to do those things. Most community colleges; and some big box hardware stores, offer courses that can teach you how to do things yourself in a safe environment. Learning a new trade can be much easier in a risk free environment, where failure only means that you have to try again. Maybe you have a friend or family member who is knowledgeable in this field, and is willing to teach you what they know.

The worst place to learn a new trade is in the dark, crawling through mud, at 4:00 A.M., in a cramped space, with your family yelling at you because the water has been shut off for 12 hours. Learning in a situation like this only leads to mistakes, frustration, and failure, so you should make sure you’re comfortable with the work you’re about to do, and confident in your ability to do it, before you begin.

While almost any job around the house can be a do it yourself task, some jobs require more training and a good understanding of the underlying system to be completed successfully.

Plumbing

While some plumbing jobs require only a small amount of skill (changing a faucet, unclogging a drain, fixing a leaky toilet, etc.), others require training, planning, skill, and experience. Some aspects of plumbing can be done by almost anybody, but may only be done well by an experienced tradesman. Soldering joints, for example, is a task that can be done by almost anybody, but only a true master can do it artfully.

Plumbing is one of those things where you might think “You just connect pipes, how hard can that be”, until you end up with a stream of never ending water flooding your basement.

Plumbing is one of the vital systems in your home, which goes unnoticed most of the time but can cause a lot of grief when it’s not working. You might think “I’ll just shut off the water, make this connection, and I’ll be done”. Then you find yourself 6 hours later, standing in a puddle, dripping wet, with your legs crossed trying not to soil your pants.

The best way to learn how to plumb, is to do it where there are little to no consequences. Soldering scrap pieces of pipe in the garage, is a great safe way to learn to solder. Practice these skills before you start working on such a vital system in your home. Spend some time figuring out exactly what you’ll have to do to complete the job, then make a good plan and stick to it. Do as much work as you can before you shut off the water supply, this will minimize the systems down time (and help you avoid soiling your pants).

Electrical

This field of work requires at least a slight understanding of how electricity behaves in order to be able to complete simple tasks  such as replacing receptacles, changing light fixtures, replacing switches, and other small activities. However, most jobs require a fairly good grasp of electrical concepts, electrical codes and best practices, and some form of training. This is not a trade for novice do it yourselfers, and in most cases work should be completed by; or at least inspected by, a capable, licensed Electrician.

Becoming capable of doing electrical work yourself will require fairly major investments in both learning and tools, so be prepared to spend a lot of time and money if you are thinking of tackling these types of jobs.

The basics of electrical work can be learned relatively quickly, but the knowledge required to complete tasks grows exponentially as you become more involved with larger sections of the electrical system. Learning to replace a light fixture can be quick and easy. Learning to install and troubleshoot whole circuits, can take a long time and require a lot of specialized tools.

Electrical work can be very dangerous, and can cause personal injury, death, and/or property damage if done incorrectly. This is why training, and a good understanding of the basic concepts is so important. Do it yourselfers should have a fairly good understanding of how electrical systems work, and what tools are required, before deciding if they should complete any electrical work themselves.

HVAC

Heating ventilation and air conditioning jobs often require both plumbing and electrical skills, and apart from minor jobs (replacing a thermostat, changing filters, etc.) they should not be preformed by unqualified persons. HVAC systems can cause personal injury, death, and property damage, if not installed and maintained properly. It requires an in-depth knowledge of the systems involved to safely complete HVAC jobs, which often means this type of work should be avoided by a do it yourselfer.

This type of work will require training, specialized tools, and a solid understanding of electricity, plumbing, fluid dynamics, thermal dynamics, high and low pressure systems, and electronics.

While there are other dangerous systems and jobs throughout the house, electrical, plumbing, and HVAC can be the most hazardous for do it yourselfers. With the high prices that professionals in this field charge, it’s often tempting to try and avoid these expenses. In most cases, however, it’s safer and more cost effective (in the long run) to simply allow a professional to complete this type of work. Saving a few dollars, is never worth risking your families safety and well being.

profile for Tester101 at Home Improvement, Q&A for contractors and serious DIYers

Filed under Safety

Clutches, torque and you.

2012-04-25 by . 10 comments

Many of us have drills, either corded or cordless that we use often.  In fact, it’s the number one answer on the DIY Stack Exchange ‘What are the tools that every Do-It-Yourselfer must own’ question .  They can be used both as screwdrivers, to put fasteners in things, or actual drills, to make holes in things.  However, these two actions are actually a little bit different from each other.  So, let’s take a look at the drill clutch and figure out how it helps us accomplish these tasks best.

First, let’s review exactly what a clutch (in the mechanical sense) is.  According to Wikipedia, “clutch is a mechanical device that provides for the transmission of power (and therefore usually motion) from one component (the driving member) to another (the driven member). ”  It is most often used when one wants to control the amount of power being transmitted.  Most of us are most familiar with a manual car’s transmission clutch.  With the clutch pedal all the way in, no power goes from the engine to the wheels.  With it all the way up, they are mechanically linked 100%. Anything in between, and they slip past each other and transmit some power.

On a power drill, the clutch setting is the amount of torque that the motor will pass through to the bit.  With the setting at 1, it will pass very little power, and at the maximum setting, it will pass the most.  Some have a numerical scale, 1-5 and then a symbol for a drill bit.  In this case, the drill bit completely disengages the clutch, it will always pass the maximum amount of power.

A drill with clutch settings 1-5 and drill.

So, you’re asking yourself, why would I ever want to use less power than I have available to me?  Didn’t I buy this awesome drill for all the power it has?  Well, the answer is “sometimes”.  A common time you would want to dial this down is when driving Phillips-head screws into wood.

Let’s say you put your drill on maximum torque and drive that screw all the way in.  When the screw reaches the depth you want, a couple of things might happen – 1) You might over-drive the screw.  Remember, you’re on maximum torque and wood is generally soft.  So you might put that screw in a bit more than you wanted, especially if it’s soft wood.  2)  You might start stripping the head if it’s hard wood as the bit cams out of the head.  Phillips-head screws are made to cam out, but this was in the days before there were torque limiting tools.  The bit will rise up and out of the screw to avoid shearing the head off of the fastener.  However, nowadays you’re most likely to just strip the screw slots and make it impossible to remove.

However, if you put it on one of the lower settings, the clutch will not transmit any more power to the bit once the power needed to turn the bit is more than the setting.  More than likely, when driving our screw into wood, you want to set the clutch number at the number that will cause it to stop when the screw head reaches the surface.  You’ll probably want to start low and maybe turn up a notch or two if it stalls out before the job is done.  But when you have it right, you’ll have the best of both worlds – getting your fasteners all the way where you want them without having to worry about stripping the head because you didn’t let go of the trigger soon enough.

Another great place the clutch works for you is when driving in hex bolts into knockdown furniture.  Typically a hex-head wrench is supplied with the furniture, but if one has a power tool, spinning that around by hand just gets tiresome after the tenth or fifteenth bolt.  Luckily, since you have learned about the clutch, all you need to get is a hex-head bit for your drill, bring down the clutch to almost its lowest setting, and let ‘er rip!  You’ll drive that bolt completely home and when it is full into the hole, the motor clutch will just disengage and you won’t damage the bolt, the piece of furniture, or anything else!


On the other hand, when using a drill bit or spade bit to make a hole in something (the “drill” part of drill./driver), you always want this on the drill setting so that you have the maximum amount of power available to  you.  Putting it on a smaller setting will just make your life difficult.  For example, you might start OK, but if you run into a knot in the wood, this would require more power to get through it, and you wouldn’t be able to transmit that power – the motor would continue to spin, but the clutch would disengage and no power would get transmitted to the drill bit.

So now you know how to most effectively use your drill/driver for the two purposes it was designed – to put holes in things and also to put fasteners in things.  Use it correctly, and you’ll get much more bang for your buck, and your proejcts will go smoother.  Next time we’ll cover impact wrenches and what purposes they are used for.

profile for Aaron at Home Improvement, Q&A for contractors and serious DIYers

Filed under Tools

Intro: First-time Homeowner/DIYer

2012-04-11 by . 0 comments

My wife & I purchased this house almost three years ago with enthusiasm and dreams of what it could be some day. We were wide-eyed and drunk on our dreams!

That was three years ago…

By the way, we took that tree in the foreground out after another tree fell on our fence!

It’s been an adventure and quite the learning experience ever since. You thought I was going to say “And, it’s been hell!” didn’t you? Well, I’m not going to say that (although, it has felt like it sometimes).

Buying this house has been one of the best decisions I’ve made in my life (besides marrying my wife, of course!).

My name is Josh and I plan on sharing my First Timer’s Experience with you as I turn this house into a home!

profile for joshmax at Home Improvement, Q&A for contractors and serious DIYers

Filed under Introductions

Ground Fault Current Interrupters

2012-03-27 by . 2 comments

Ground Fault Circuit Interrupters (GFCI) have been part of the NEC code for over 40 years now and just like your car, things have changed. Over the years the code has changed but also makers of GFCI and Underwriters Laboratories (UL) have made a lot of good changes. Life saving changes that probably nobody except a few electricians have noticed. Today, most people just think of the GFCI in their bathroom or kitchen and will probably never know all the great GFCI that are available.

Today, the sGround Fault Circuit Interruptertandard GFCI that you see in your wall is either 15 or 20 amp and the most noticeable feature you see is a light, usually a little green light. If you don’t see the light or the light has changed colors then your GFCI will not work. What you don’t see is that GFCI are self testing every 15 minutes. A trip can be reset, but a failed GFCI will not reset and you will have to replace the GFCI. Another feature is that the GFCI comes from the factory in the tripped position and if it is mis-wired you will not be able to reset the GFCI until it is corrected.

Tamper Resistant GFCIDid you know there are tamper resistant receptacles and GFCI? Now manufacturers make tamper resistant GFCI for your children’s bathroom. These meet the same stringent requirements of a standard GFCI, but now somebody cannot just stick something conductive into any slot of the GFCI. Now you can sleep better at night knowing your kids are safer. The tamper-resistant receptacles and GFCI have been NEC code since 2008 but not all municipalities are enforcing it yet.

Now you can buy weather resistant GFCI. It will still have to go in a weather resistant cover or even a bubble cover. Weather-resistant GFCI are made to go outside, being able to take extreme temperatures, UV and moisture. The weather resistant GFCI are also made with the tamper resistant feature.

FacelesFaceless High Current GFCIs GFCI are also made. This is just GFCI made with only the test and reset buttons, no receptacle built in, like it’s name implies.

Another faceless GFCI is the high current GFCI which can handle up to 80 amps at 240 volts. These feature a current sense transformer called a donut which is powered by 120 volts. If you need a GFCI for your spa or equipment and cannot find a breaker, then these will come in handy. The high current GFCI should only be installed by a licensed electrician.

Do you need a night light or a guide light? GFCI are made with a receptacle and a light. A photo sensor turns the light on and off. How about a pilot light with your GFCI? The light comes on when there is a load on the GFCI. Comes in handy in basements with sump pumps. All the lights are LED for low power consumption and long life.  Do you need a switch and the only room is a GFCI? Replace the GFCI with a combination switch and GFCI. The switch is independent of the GFCI and can turn on that vent or light. These combination devices can also be purchased with the tamper-resistant feature and no safety feature has been removed.

There are other GFCI made like extension cords with GFCI, or GFCI that can be wired in as the plug of an extension cord.  Panel mount GFCI are available for sump pumps, generators or temporary power.

Assorted GFCI

Night Light GFCI, Pilot Light GFCI, another Night Light, Switch Combo, and Cord GFCI

While this might not have been the most exciting read you’ve had today, I hope that this might help on your next DIY Home Improvement Project.

profile for Lqlarry at Home Improvement, Q&A for contractors and serious DIYers

Enjoy the blog? What to be a part of the action? There are many ways to Contribute to the Blog.

Filed under Electrical, Safety