Author Archive
Tool Review: Werner MT-22 Telescoping MultiLadder
Every homeowner at one point feels the need to either get up on their roof or reach something really high off the ground. The problem with large ladders is just that – they’re large. An extension ladder capable of reaching the roof of a typical 2-story house is likely to be 10′ long when stored, which at a minimum may make transporting it back from the store difficult. Also, it cannot work as a stepladder, as it has to be braced against something solid, typically your house. The industry has come up with a solution to this issue, and it is known as a telescoping multiladder.
There are several brands of this style of ladder available, and most of them work in a very similar way. In this article, I’ll be reviewing the Werner MT-22.
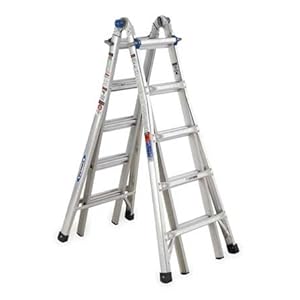
There are 4 main ways to use this ladder, and we’ll look at them one at a time. First, though, we’ll look at the hinges and locks and see how they operate.
Here’s the hinges in the locked position. The blue plastic knob is sticking out from the ladder, and you can’t see the pins. In order to move them to the open position, you simply push the blue plastic ends so they are flush with the ladder. They are pretty solid, but you can move them easily by pushing with the palm of your hand.

Then, you can see the 3 pins pop out of the ladder frame. You’ll do this on either side, and then the ladder will swing freely until it reaches one of 3 positions – extension ladder, or 180 degrees, stepladder, which I would estimate around 20 or so degrees, and storage, where the legs are right next to one another and the ladder is not particularly stable. Once it reaches one of those positions, the hinges snap back into place, locking solidly.

The second set of locks are the ones that go into the ladder rungs when they are extended. They are solid metal pieces that are spring-loaded, and at the end they have a “U” shape. To unlock them, pull them out and then rotate them away from the ladder.

To lock the rungs, just do the same thing in reverse – pull out the metal U, turn it so the end goes into the rung, and let it slide ino the rung.

The whole system is fairly easy to use, and if there is not any weight on the elements, they slide and go into place quite freely. If you’re trying to unlock a hinge and it’s under some weight, it might take some wiggling, however. They can be left half locked (in the outer set of holes) and then when you slide the inner ladder to match up the holes, it’ll spring fully engaged. There is a tiny bit of a ridge around the inner hole, so it might not catch perfectly every time, but it works most of the time.
Now that we’re familiar with the special parts of this ladder, we’ll go on to review the different ways it can be used.
The first usage method is as a traditional stepladder:

The ladder used this way has a weight rating of 300 pounds per side. You can lock the rung hinges on any particular rung, so it can be used for a short reach or a long reach. This is great in a backyard if you want to get up to a high tree branch with pruning shears. Next is the usage as a stair stepladder:

This method is extremely useful when the thing you are trying to get to is above a staircase. If you have a larger home, you may have a very large foyer, with some lights in the ceiling above a staircase. Now you can get to them to work on them, and as a bonus, 2 people can do this – one from either side.
3rd is the primary reason I bought the ladder, the extension ladder:

As you can see, it reaches up to the roof of the second story house, allowing me to clean the gutters. The top two steps are not meant to be stepped on. Instead, you’re supposed to hold onto the rungs above you for stability, so I don’t think I could get on top of the roof with this ladder easily, but that is likely to be another project. This way of using the ladder brings me to its one drawback – the weight. This ladder is fairly heavy, weighing in at 42 pounds. The difficulty comes in maneuvering the ladder when it is in extension mode. I’ve found the best way to use it this way is to extend the top section fully first. Second, place it against the wall, hold the inner rungs of the bottom section, and undo the hinges. Lastly, pull it back towards you a bit, just so can pull the inner part up. I was able to move it a couple of rungs up each time before I leaned it back against the wall and reset my arms to pull it up another 2 rungs. It gets much easier with practice. It’s simply very difficult to push it straight up right while keeping the ladder up, and if you extend it fully on the ground, it’s difficult to pull the ladder to an upright position – it is 19 feet long. This is where one area where a competitor’s ladder, if it is lighter, could be much more useful. Bonus points for commenting and describing the unsafe application of the ladder in this picture.
The last method, and the least useful for me, is the scaffold method:

Imagine the pole is a scaffold plank:
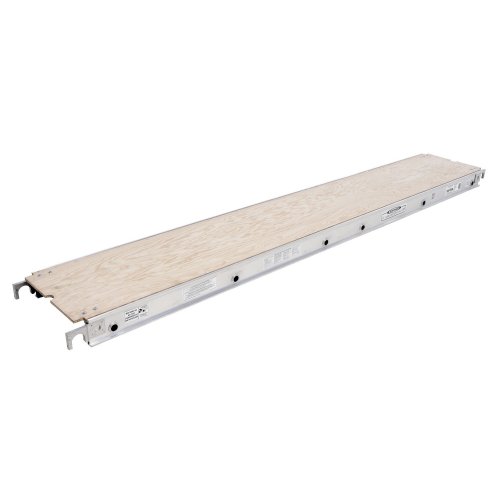
This method is used when you are working either on a wide high piece and don’t want to continually move the ladder, or if you are working directly above a hole in the ground (a basement storm cellar outside entrance, for example) For this method, you simply slide off the inner rungs on both sides, and then lock them together, then insert the plank between the two separate ladders. I simply don’t have a lot of need yet for this sort of activity, but it’s nice to know that it can be used in that way.
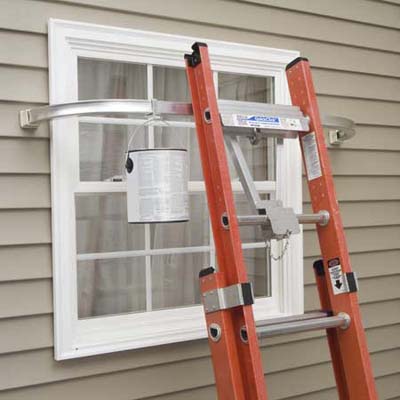
Werner also makes several accessories for the ladder, including a work/tool platform as well as a stand-off/stabilizer that can be used to either allow you to work across a window, or just to give you more stability at the top.
Overall, I am very satisfied with the ladder. The main problem I have with it, as I noted earlier, is that it is heavy, but it’s also made out of steel instead of aluminum – you could buy a lighter one, but you’d pay more for it. It stores easily, and it can be transported in a typical sedan, both of which are things that a “normal” extension ladder is not capable of. Also, there’s no rope or pulleys involved, which is another plus. I would give this product a solid 4 out of 5 Captain Constructions, especially if you cannot get an extension ladder home yourself.


Clutches, torque and you.
Many of us have drills, either corded or cordless that we use often. In fact, it’s the number one answer on the DIY Stack Exchange ‘What are the tools that every Do-It-Yourselfer must own’ question . They can be used both as screwdrivers, to put fasteners in things, or actual drills, to make holes in things. However, these two actions are actually a little bit different from each other. So, let’s take a look at the drill clutch and figure out how it helps us accomplish these tasks best.
First, let’s review exactly what a clutch (in the mechanical sense) is. According to Wikipedia, “A clutch is a mechanical device that provides for the transmission of power (and therefore usually motion) from one component (the driving member) to another (the driven member). ” It is most often used when one wants to control the amount of power being transmitted. Most of us are most familiar with a manual car’s transmission clutch. With the clutch pedal all the way in, no power goes from the engine to the wheels. With it all the way up, they are mechanically linked 100%. Anything in between, and they slip past each other and transmit some power.
On a power drill, the clutch setting is the amount of torque that the motor will pass through to the bit. With the setting at 1, it will pass very little power, and at the maximum setting, it will pass the most. Some have a numerical scale, 1-5 and then a symbol for a drill bit. In this case, the drill bit completely disengages the clutch, it will always pass the maximum amount of power.

So, you’re asking yourself, why would I ever want to use less power than I have available to me? Didn’t I buy this awesome drill for all the power it has? Well, the answer is “sometimes”. A common time you would want to dial this down is when driving Phillips-head screws into wood.
Let’s say you put your drill on maximum torque and drive that screw all the way in. When the screw reaches the depth you want, a couple of things might happen – 1) You might over-drive the screw. Remember, you’re on maximum torque and wood is generally soft. So you might put that screw in a bit more than you wanted, especially if it’s soft wood. 2) You might start stripping the head if it’s hard wood as the bit cams out of the head. Phillips-head screws are made to cam out, but this was in the days before there were torque limiting tools. The bit will rise up and out of the screw to avoid shearing the head off of the fastener. However, nowadays you’re most likely to just strip the screw slots and make it impossible to remove.
However, if you put it on one of the lower settings, the clutch will not transmit any more power to the bit once the power needed to turn the bit is more than the setting. More than likely, when driving our screw into wood, you want to set the clutch number at the number that will cause it to stop when the screw head reaches the surface. You’ll probably want to start low and maybe turn up a notch or two if it stalls out before the job is done. But when you have it right, you’ll have the best of both worlds – getting your fasteners all the way where you want them without having to worry about stripping the head because you didn’t let go of the trigger soon enough.
Another great place the clutch works for you is when driving in hex bolts into knockdown furniture. Typically a hex-head wrench is supplied with the furniture, but if one has a power tool, spinning that around by hand just gets tiresome after the tenth or fifteenth bolt. Luckily, since you have learned about the clutch, all you need to get is a hex-head bit for your drill, bring down the clutch to almost its lowest setting, and let ‘er rip! You’ll drive that bolt completely home and when it is full into the hole, the motor clutch will just disengage and you won’t damage the bolt, the piece of furniture, or anything else!

On the other hand, when using a drill bit or spade bit to make a hole in something (the “drill” part of drill./driver), you always want this on the drill setting so that you have the maximum amount of power available to you. Putting it on a smaller setting will just make your life difficult. For example, you might start OK, but if you run into a knot in the wood, this would require more power to get through it, and you wouldn’t be able to transmit that power – the motor would continue to spin, but the clutch would disengage and no power would get transmitted to the drill bit.
So now you know how to most effectively use your drill/driver for the two purposes it was designed – to put holes in things and also to put fasteners in things. Use it correctly, and you’ll get much more bang for your buck, and your proejcts will go smoother. Next time we’ll cover impact wrenches and what purposes they are used for.
Home Improvement Blog on Google+
Home Improvement Blog on FaceBook
Bloggers Wanted
Latest Articles
Topics
- Electrical (8)
- Introductions (7)
- Plumbing (3)
- Projects (13)
- Repair (4)
- Safety (5)
- Tips and Tricks (5)
- Tool Review (5)
- Tools (6)
- Uncategorized (5)