![]()
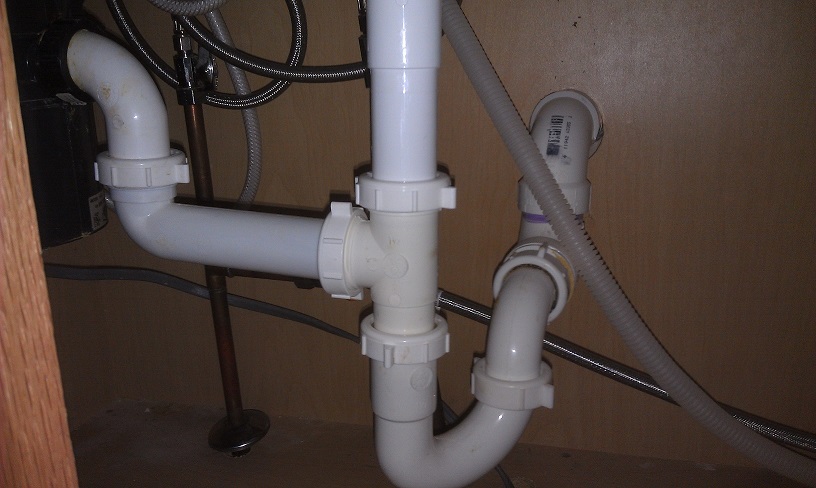
When I was inspecting the home that I recently purchased, I took a look under the kitchen sink and noticed this…
Typically, traps have a trap seal between 2 – 4 inches. This amount of water allows waste water and debris to flow down the drain, while still providing enough force to prevent sewer gases from pushing past. The problem you find with a deeper trap, is that the waste water; and in particular the debris, does not have enough force behind it to escape the trap. This leads to a nasty, dirty, stinkin’, slow flowing trap. Which leads to your wife saying “Dang, this sink stinks!”. If Google Nose BETA worked, I would have saved the smell from when the old trap was removed. Then you’d smell what I’m talking about.
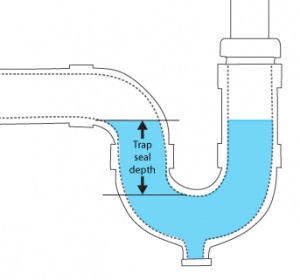
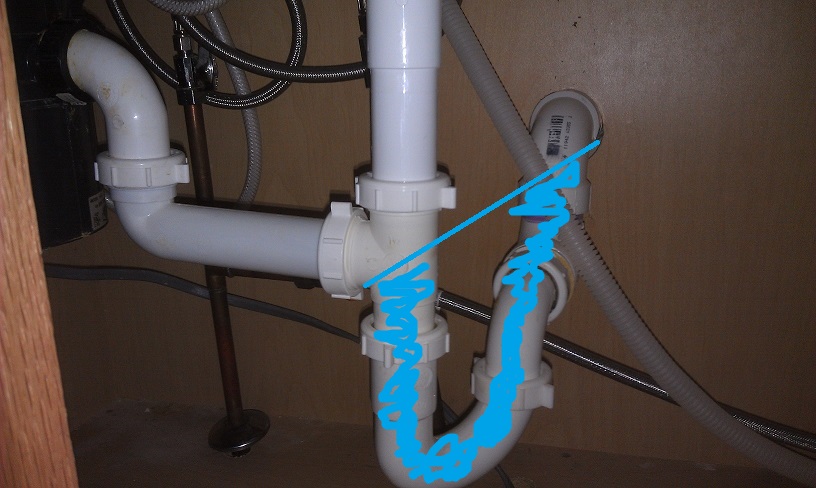
If you take a look back at the first image, you’ll see that the trap seal is simply too large. The entire pipe below the disposal drain line, all the way to the lower dip of the elbow coming out of the wall will be filled with water. Where in a normal situation, only the lower bend of the P-trap will be filled with water.
Usually this situation is fixed easily by purchasing the correct fittings, and connecting them in a way that allows proper drainage. In my case, however, some genius glued a downward facing elbow at the outlet connection. As soon as this elbow was glued in place, the fate of this trap was sealed. It would forever be WRONG!
To fix this problem, my only choice was to cut the offending elbow off. Once removed, new pipes could be connected, and a proper trap could be arranged. So I set about cutting the elbow off, as close to the back of the elbow as possible. The idea was to leave enough pipe behind the elbow, to allow me to attach new fittings. Unfortunately; as with most home improvement projects I ran in to problems and, this was not possible.

To leave the maximum amount of pipe, I used a hacksaw blade (removed from the hacksaw) to cut the pipe. If you attempt this, don’t forget to wear a good pair of leather gloves, or to wrap the ends of the blade with duct tape to make makeshift handles.
As it turned out the stub was just too short, so there was no way I was going to attach anything to the exposed pipe. My only option was to move back one more fitting, and cut the pipe beyond that. In this situation, this involved opening up the wall a bit. Fortunately I was working under a sink, in a cabinet, so a limited amount of damage was acceptable. I grabbed my trusty Milwaukee multi-tool, and cut a hole in the back of the cabinet and the drywall.
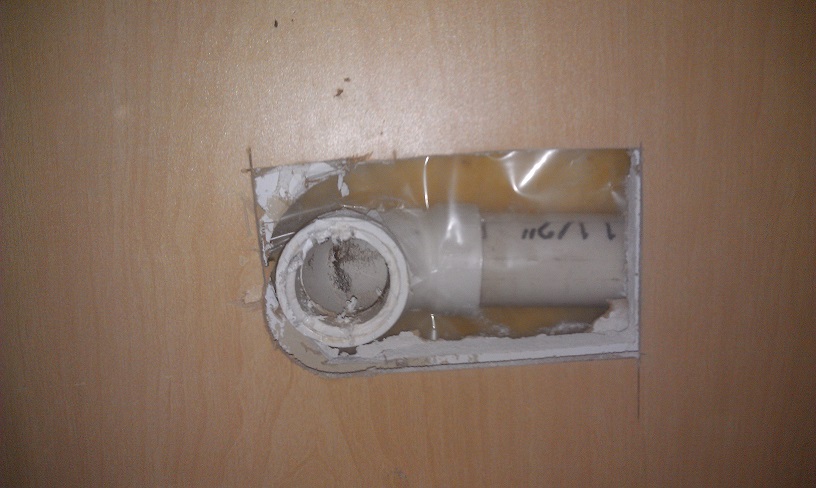
In a lot of instances this fitting will be a tee connecting the sink drain to a drain-waste-vent stack, which may require a bit more damage to the back of the cabinet and wall. In my situation, I was lucky it was a simple elbow.
Using my hacksaw blade. I cut off the tee, glued on a new tee, glued on a short stub, and finally glued on a PVC DWV trap adapter.
Once that was done, it was a simple matter of installing the remaining bits of pipe.
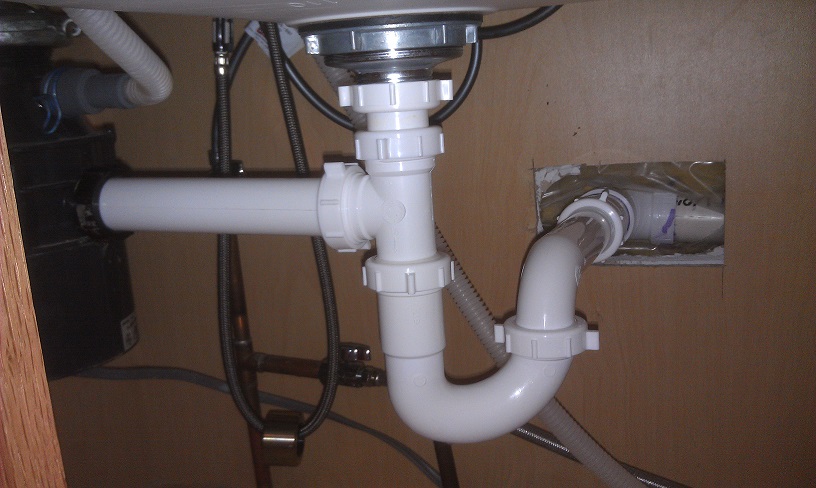
Now my trap is just the right depth, and the waste is flowing as it should.


It’s possible to remove the inner piece of PVC pipe from a fitting using heat. The pipe itself becomes soft and flexible, and the glue will lose its bond. They even make special tools for this that you may be able to find at a tool rental shop, e.g. this one (no affiliation, just saw it demonstrated on an episode of This Old House): http://www.pipedebonder.com/products.html
Once the fitting and glue has been heated, you use a screwdriver or other sharp tool to wedge between the fitting and pipe, and then twist out the inner pipe (it should be soft bend over on itself), leaving a fitting that’s ready to be reused.
Shouldn’t the T joint coming in from the disposal have an angle downward to allow it to flow better?
Ideally, yes. However, as far as I know they don’t make a tee-wye tailpiece.
Needed to post you one tiny note to be able to thank you very much over again for all the remarkable suggestions you have debated in this article. All those ideas in addition worked to turn into easy way to fully grasp that some people have a similar desire the same as mine to recognize more and more with regard to this matter. This has been so incredibly generous of people like you giving unhampered just what most of us might have promoted for an ebook to earn some dough on their own, particularly observing that you could have attempted it in the event you desired. I’m sure-enough you will find several more enjoyable occasions ahead for those who examine your blog.
Doesn’t a hacksaw cut on the pipe result in extremely uneven edges?
Great job by the way, the before/after pictures are almost poetic 🙂
We have a gas odor in bathroom sink. I lengthened the trap about 1/2″ down to make it a little deeper. It reduced the odor somewhat. Your explanation above does not seem to work for me. Our trap install looks like the “proper” example you picture. Any suggestions?
Is there a sich thing as a p trap below a old model home