![]()
I’ve done some finish carpentry in the past, but I’m really more of a framer because I like to just throw things together quickly and make them as strong as possible. With garage shelves, in my opinion, they don’t need to look fancy, but they do need to be sturdy – I’ve seen far too many saggy garage shelves that look like they’re going to come tumbling down at any moment. In fact, I’ve actually had a pet killed by some pre-built garage shelves that collapsed.
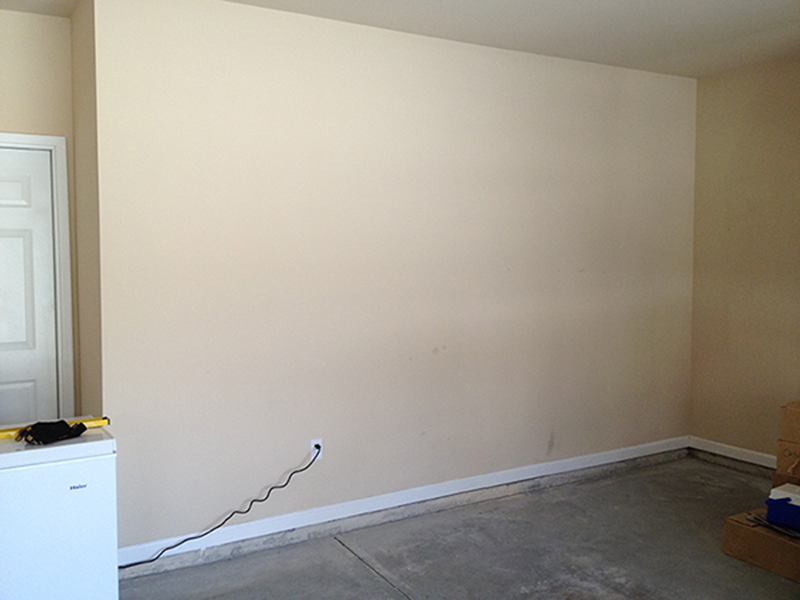
I recently built some new garage shelves in the home we have been living in for a couple years now. I had always planned to build some, but only got around to it a few months ago. I wanted to share my experience to give other DIY-ers an idea of a simple shelving design that is built to last. The pictures in this post are only of one of the walls I built shelves on. The total cost for wood, nails and screws for both walls was just under $200.00. My goal was to build the strongest shelves as possible, without spending too much money. For the amount of sturdy shelf space we now have in our garage, $200.00 was well worth it.
Tools Needed:
- Hammer and nails (preferably a nail gun if you have one)
- Screws and a screw gun. I used 3 ½ inch wood screws.
- Some kind of saw. a chop saw would be best for this, but technically you could use a skill saw, a jigsaw, a table saw, or even a hack saw if you had to.
- Tape measure
- Stud finder
- Long level (at least 4 feet)
- Pencil
- Small ladder
- Chisel (if you have baseboard in your garage)
Prep Work
Measuring
- Know what you’re going to store on the shelves and their dimensions. Once you know the height of the tallest item you plan on storing on the shelves,
- Measure the distance between the floor and the ceiling. Divide this distance by the height of the tallest item you will be keeping on your shelves. For example, if you have a cooler that is 20 inches tall, and the distance from your ceiling to your floor is 108 inches tall, you would divide 108 by 24 1/2 (I’ll explain why it needs to be 4 ½ inches taller than your tallest item later). This would equal roughly 4.4, which means that you have enough room for 4 rows of shelving with 21 inches of usable height.
 Obviously you don’t have to make all the shelves be the same height, but make sure to have at least one of two rows of shelving tall enough for all of your tallest items. I made our bottom two shelves taller to hold the larger, heavier items (like food storage), and made the upper shelves a little bit shorter to hold the smaller, lighter items. I would also recommend storing all of your DIY chemicals like herbicides, pesticides, or cleaners on the top shelf, so your children cannot reach them (easily…).
Finding and Marking the Studs
- You will need a stud finder for this part. What I did was mark all the vertical and horizontal lines that my shelves would follow. Take your stud finder across the wall horizontally (twice), once up higher, and once down lower and mark each stud. Then take a 4 ft (or longer) level and trace a straight vertical line between the upper and lower marks. Use that line to extend the vertical line all the way up the wall. This vertical line will be your guide to help you see where to screw the boards to the wall.
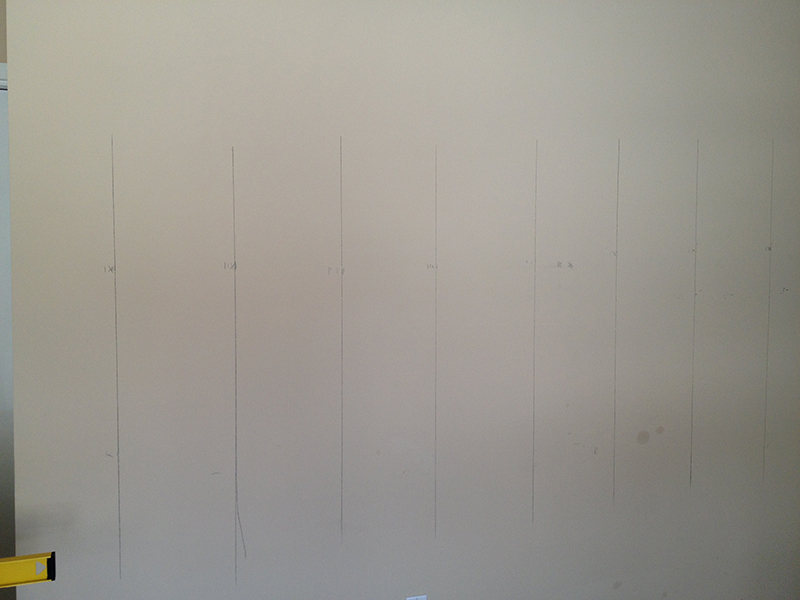
- Next draw the horizontal lines by measuring from the ground up. If your bottom shelf will have a 21 inch space under it, measure up 24 ½ inches and use your level to draw a horizontal line all the way across the wall. The next horizontal line should be 24 ½ inches above that line (assuming all of your shelves will be the same height). The reason you have to go up 24 1/2 inches to build a 21 inch space is because you have to account for the 1/2 inch plywood on top, and the 3 inch tall frame board.
Calculating Amount of Wood Needed
- Given the length of the walls I was building my shelves on, I bought my wood in the 8 foot lengths. I used a combination of 2x4s (for the vertical support posts), and 2x3s (for the main horizontal framework, including the boards tacked to the wall). I also used ½ inch thick plywood for the shelving surface, with the smoother side of the plywood facing up. Lowes will rip cut the 8×4 ft sheets of plywood for you to save you some time. My shelves were about 21 inches deep so I was able to get two, 8 foot long pieces out of each sheet. I found this depth to be good for most tubs and other large items you would store, and plenty of room for storing several smaller items.
- The wall I built these shelves on was about 14 feet long, so I needed two 8 foot sheets of plywood for each row. I had to cut off the extra two feet with my chop saw.
- Once you know the length of the wall, it’s fairly straightforward as far as counting up how many 2x3s and sheets of plywood you need. For a 14 foot wall, I used 5 2×4 vertical posts, two on the end and three in the middle, each spaced about 3 ½ feet apart. You can do whatever you want here, but make sure you don’t go too far between the posts so you have enough strength.
Building the Shelves
Once you have all of your lumber, it’s time to start building. This is the fun part and if you’ve already measured and marked everything, the building portion should go fairly quickly (with this design).
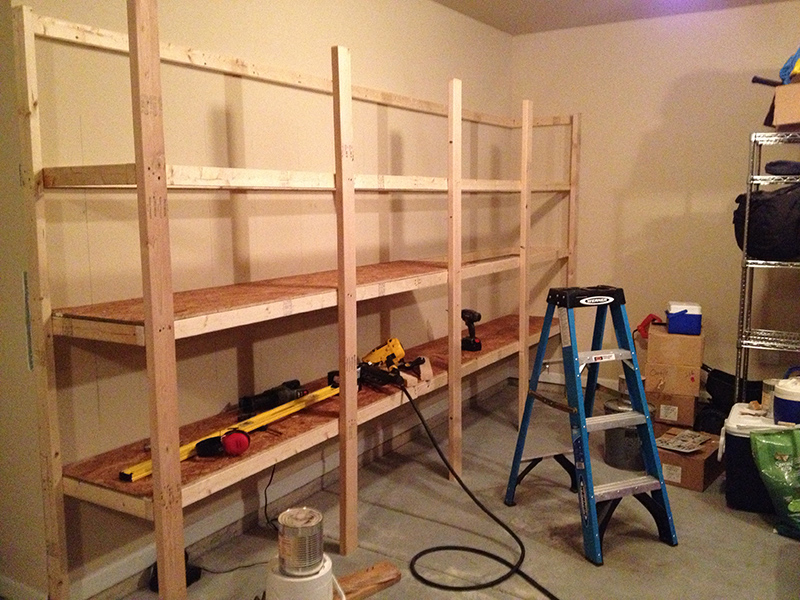
- The first step is to tack the 2x3s to the wall. Place them over the horizontal lines you drew and put a nail in at each vertical line (where the studs are). I used both screws and nails for this part. Screws offer the horizontal strength, and nails provide the vertical strength.
As you can see in the picture below, I also used the perpendicular wall for increased support. I would recommend this as it provides horizontal strength.
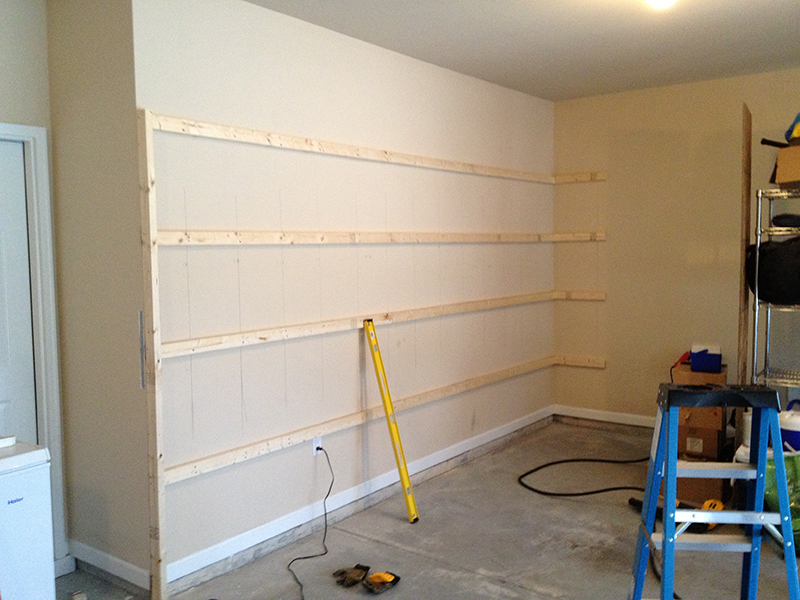
- After screwing and nailing the boards up on to the wall, you can put up the end boards (2x4s). Measure and cut these boards (and all the other vertical support 2x4s) to be ½ inch taller than the highest board against the wall. This is so that when you lay the plywood down on the top shelf it will fit into the frame for additional support.
- For those with some kind of baseboard in your garage, you will need to take a chisel and notch out a spot for the vertical 2×4 boards that will go on the ends, against the wall. You can also notch out a space on the support beams themselves, instead of the baseboard.
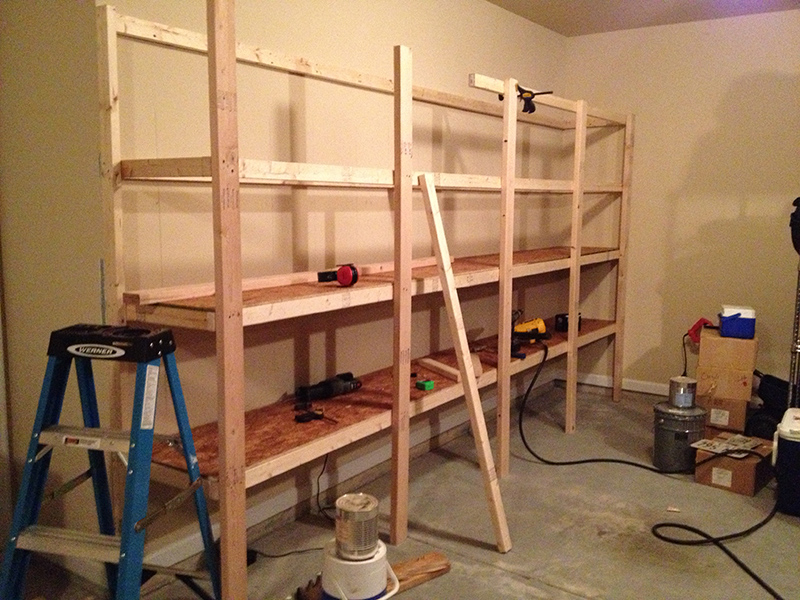
- The next step is to put up the outer 2×3 boards on each row. Start at the bottom and place something under one end, while you nail the other end to the perpendicular board that is against the wall. Replace whatever you were using to support the other end with the first vertical support 2×4. Nail it into place with only one nail so you can still pivot the board side to side and level it. See image below.

- Continue moving across, putting the next horizontal 2×3 into place and nailing the next vertical 2×4 to it.
- Repeat this process with the next row up, but before you nail the vertical 2×4 to the second row, make sure to level it vertically with your long level. After you have leveled the 2×4 and nailed it to the second row, the remaining rows will go quickly. I would still check each row with the level as some boards can be warped and will need to be bent into place.
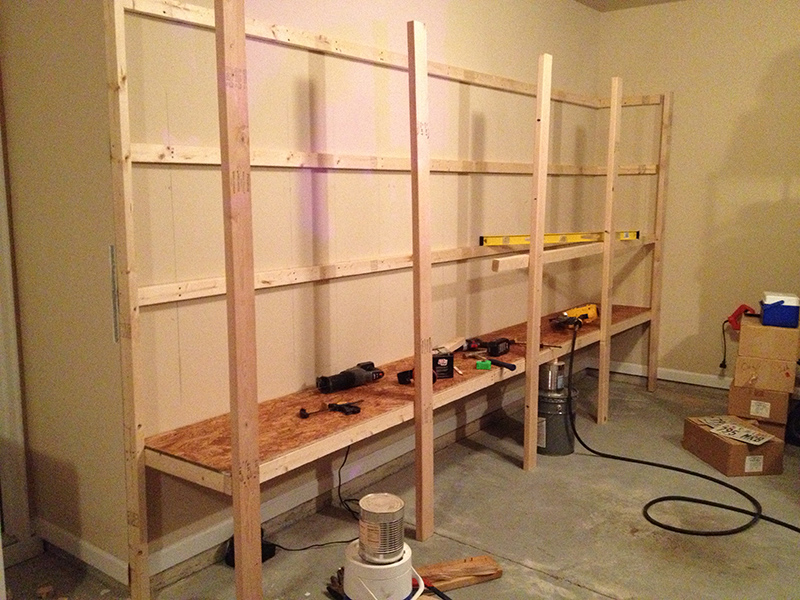
It’s a little difficult to see in these pictures, but I have also tacked in some support boards between the horizontal beams, coming out perpendicular to the main wall.
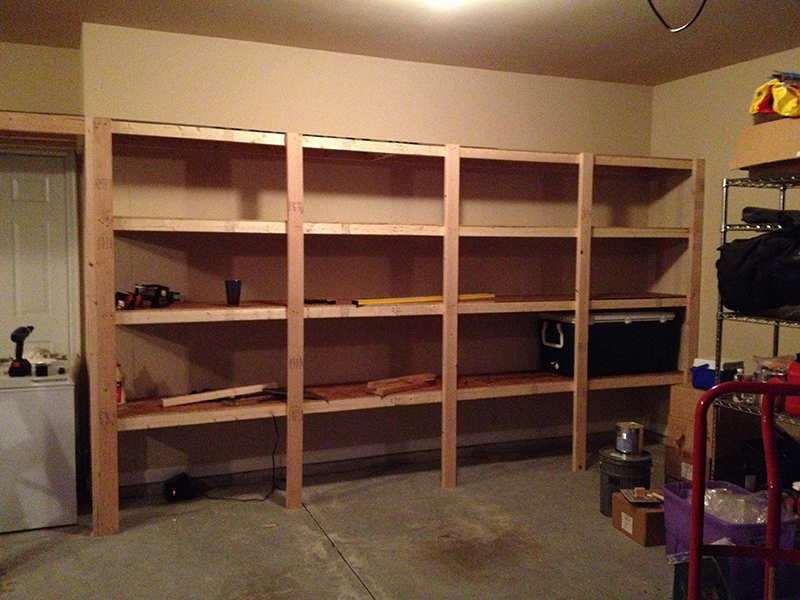
The final step is to lay in the plywood pieces. They should fit right into your frame and once nailed down will offer additional strength coming out of the wall, as well as side to side. I nailed them down roughly every 12 inches.
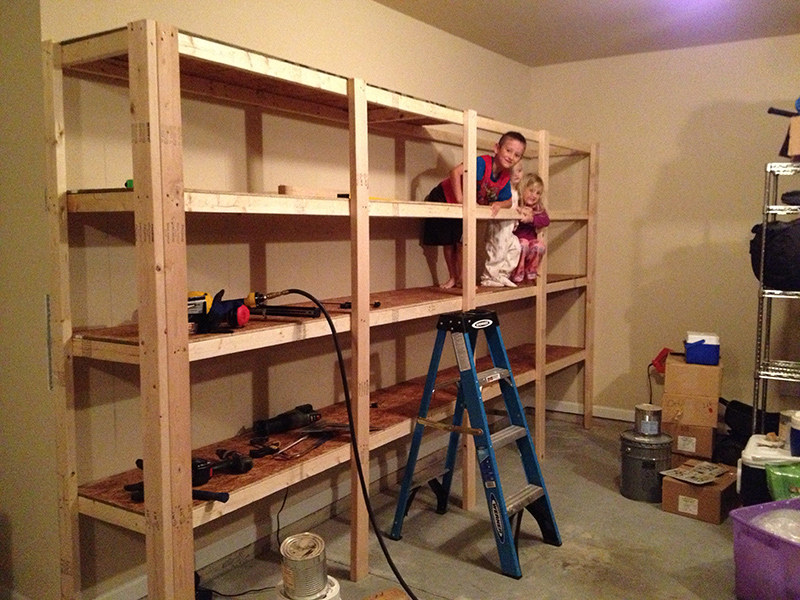
As you can see in the picture below, your garage shelves should be strong enough to double as a jungle gym for your kids!

Filed under Projects Tips and Tricks
Tagged: garage, garage shelves, storage shelves, storage space
You did a really good job on those shelves. With the budget you have, you can actually do a lot of things with it but make sure to canvass for cheap but quality materials.
Thanks Peggy! My main goal was to build shelves that wouldn’t sag and would hold up well in the long run. I guess I should have mentioned that $60 of that $200 was buying a new box of screws and a nails for my nail gun, which I obviously didn’t use all of them. So my cost was actually lower overall.
its ok but steel shelves is better. Specially which is compile with bolts and it can be remove easily and shifted.
@AD – I think Michaels main reason for building these wooden bespoke shelves is that they can be whatever size you want. The flat pack metal shelves you can buy will not always fit in the gap you have.
@Matt – yes, thanks for clearing that up. Using wood allowed me to customize my shelving to maximize the space I had. I also wanted to use wood because it’s cheaper and I already had all the tools to do it easily.
Agreed! It’s not that expensive… and yes, the extras may be kept for future use. Thanks for sharing how it is done step-by-step. I personally go for wood than any other material for shelves because 1) it is easy to work with 2) it is exudes a classic warm appeal.
Wow those look very nice. I recently helped a friend build up and entire garage workshop. I didn’t have the heart to tell him that he’d rarely be using half the stuff we put in there. Though he is planning to redo his kitchen by himself but after than then what!? It was a lot of fun though, I’ll give it that. A major pain though, and I will demand use of it if I ever need it hah! Thanks for the post!
Michael – I borrowed your design and played with the measurements a bit. I’m about 1/2 way done, but after 2 rows, I’m really surprised at how strong they are. This thing could withstand a tornado. The garage would probably be gone but not the shelves. Thanks alot for the excellent instructions. I’m relatively new @diy and have had NO trouble building these.
Hi Aric,
I’m glad this design is working out for you! Thanks for the comment!
How difficult would this be for a novice diy-er? We have lots of wooden panels from broken/discarded cabinets, etc. Instead of buying a shelving system, I thought it might be more price-efficient to try and reuse the planks we have.
Hi Anrie,
One of my goals with this design was that it would be simple enough for almost anyone to build (including myself). Let me know if you have any questions – I’ll do my best to help.
Great job, having sold steel shelving for the last 25 years, your system makes great use of the available space, you don’t have to try and fit standard steel shelf bays into the gap. Is there any way you could make the shelves within your system adjustable to give you even better use of space ?
Great idea. I can definitely envision some kind of design where the basic frame is static, but the individual shelves themselves could be moved up or down to create different heights of space…
Hey Michael,
I am not easily impressed but that is a great job! What a money saver, plus there is nothing like homemade shelves…
I completely agree about homemade shelves. Thanks for the comment!
@Michael – Exactly what I envisioned doing in my garage and this crystallized it for me. Thanks for posting..
No problem, I’m glad you found this helpful!
Any advice for making shelving that is free standing from a wall? This is actually going in my basement and I am not able to secure them to the concrete foundation, but want a sturdy but easy to make shelf so storage similar to what you have shown here. Thanks for any advice.
A gun that shoots nails into concrete is not that expensive. With the correct length of nail, and the correct 22 caliber charge, you can permanently mount horizontal two-by-fours in minutes.
I’m working on the same thing right now. If you haven’t already, consider Tapcons. I’ve used them on a few other projects and they work really well. Just remember that you need a hammer drill.
Hi Patrick, good question. I would think that you could use this same design, just duplicate the back and front sides with the vertical beams, and then make sure to include some kind of diagonal support beams that go from the top left to bottom right, and top right to bottom left corners to maintain the horizontal strength.
I can, however, see this being very heavy if you ever have to move it. This design is meant to be permanent. You might want to go with an entirely new design for your situation, however, since this design gains most of its strength from being attached to the wall. Hope this helps!
Also, if you want to try and connect them to the wall you could use concrete screws. These should work since you don’t need the vertical strength from the wall, just horizontal. It would be a lot of work to pre-drill the holes with a hammer drill, however.
Michael,
Nice plans, thanks! I used this blog to build the same shelves measuring 12ft long x 8 tall this weekend. And for about $100, you can’t beat it. Keep posting!
Ryan
Hi Ryan,
Thanks for the comment, I’m glad this post helped! It’s hard to resist a good opportunity to build something yourself and save some money!
This looks great! I am building shelves for my garage but my wall is drywall attached to cynderblocks. How can I attach the shelves in this situation? Thanks.
Hi Nick,
I would suggest trying concrete screws since you really only need the horizontal strength from the wall. You will have to pre-drill the holes with a hammer drill and a concrete drill bit, but concrete screws should work, in my opinion. Some concrete screws come with a concrete drill bit that is the right diameter for the screws you are buying. Hope this helps!
What was the spacing you used on the support boards between the horizontal beams, coming out perpendicular to the main wall and did you toe nail at the wall side?
Hi Dave,
I actually only used one perpendicular (from the wall) support piece for the entire length of the shelf because when you nail down the plywood shelving you gain plenty of perpendicular strength and the shelves are not deep enough to warrant perpendicular support beams. If you decided to use thinner plywood than I did then you might need to add in more support beams. If you did that then I would say putting them every 24 inches would be sufficient.
The only reason I put one in the middle was to help connect the spot where I had to splice the length of the shelf, and to hold it in place during the framing stage. And yes, I did toe nail that one piece at the wall side.
Thanks for the question!
Great job! Your site is very helpful. Keep posting. Actually, I just bought a steel shelves in touchpointworldwide.com with a low price. I love it though.
With respects to the screws and nails: “Place them over the horizontal lines you drew and put a nail in at each vertical line (where the studs are). I used both screws and nails for this part. Screws offer the horizontal strength, and nails provide the vertical strength.
Where do you put them? How are the outer boards fastened? Screws or nails? 3″ framing nails OK?
I’m planning to do my own shelves and found these to be pretty similar to what I had in mind. The one thing I’m still working through is sizing of the horizontal and vertical supports – as my garage ceiling is about 12′ high. I’d like to have 5 shelves with the top shelf to be 10′ up, and wondering if the vertical 2x4s and horizontal 2x3s would be enough with a 4′ span between vertical posts, or if I need to increase the verticals to 2×6 and horizontal to 2×4. Thoughts?
oops, one modification — ceiling is 10′ high, so top shelf is intended to be 8′ high
With a 4 foot span I’m not sure the 2x3s would be sufficient, especially if you plan on storing a lot of heavy items on them. It might be, I’m just not sure so to be safe I would at least use 2×4 for the horizontal beams. As far as vertical strength is concerned, I personally think the 2x4s are good enough for your situation.
Thanks for this guide! My garage has wood paneling on the walls. Do you think I should remove the paneling from the wall that I’m building shelves on? Or just screw/nail through it?
If you want to keep the paneling to match the rest of the garage you should be fine to leave it up. Just be sure you are screwing and or nailing into a stud behind the wall and not just into the panelling.
Good luck!
Do your vertical 2x4s match up with the studs or are they at a specific distance apart? Trying to replicate this with a 7′ section on one wall and a 10′ section on the adjoining perpendicular wall (L shaped). How often should I place a vertical 2×4?
No, my vertical 2x4s do not match up with the studs. One or two might, but not intentionally. I spaced them about 3 to 3 1/2 feet apart, if I remember right. I wanted the spacing to be large enough so I could get large tubs in and out, but still have enough support.
Hello, Nice Job..
One question.. Did you secure the vertical 2X4’s to the concrete garage floor?
Thanks, Ajay
Thanks Ajay!
No, I did not secure the vertical 2x4s to the floor. Since those were secured to each horizontal shelf they really don’t move down on the floor. I will say that you should make sure they are all the way down on the floor before tacking them into place up above, to ensure that they are supporting the vertical weight of the shelf. I guess you could secure them for additional strength, if you wanted.
I love the design however I want to center my shelves on a wall and not have them attached to another perpendicular wall on the end like yours are. Will I be sacrificing a lot of the stability or should they be ok?
Hmm, I’m not sure, to be honest. The strength of this design is reliant on a perpendicular wall. At the same time, it might work just fine since each of the vertical beams would be attached to more than two horizontal shelves, hindering that side-to-side movement. Having it attached to the wall should also help to prevent it from collapsing to the side, but again, I’m really not sure.
Anyone else have any ideas on this?
Just built this today after seeing your post last night. Took about 4 hours. I had to rent a hammer drill since I was fastening to masonry. Total cost includng the $45 rental was $207. Thanks for instructions.
Nice! I’m glad it worked out for you.
Great job! I just did this in my garage, love the storage space. Do you plan on sealing or painting the wood? I love the wood look but not sure how untreated wood will hold up over the years.
Thanks Kevin! I wasn’t planning on painting or sealing them… I guess maybe I could put something on them to protect them from the humidity in my garage.
You really made a good job Michael having shelves like this in our garage can make all stuff in one place, my dad tried the steel before but measuring the gap really took a long time. And this shelves are cheaper, thanks for the step-by-step tutorial.
Michael, Thanks for the great plans. I just finished building these shelves in the center of a wall in my garage, there is no wall to attach to at either end. They are rock solid. After having spent many dollars and many frustrated days with the eventually flimsy “pop-metal” shelving sold these days my wife and I are happy to have shelving that will actually work. I plan on building more as time permits.
Paul, I’m glad this worked out for you! It’s also good to hear that your shelves are sturdy without being connected to any side walls – some of the other readers had questions about that. Thanks for sharing!
Our garage has a concrete “baseboard” roughly 6″ high. How would you go about those since I cant notch out the concrete?
Hi Daniel,
I would first try to notch out the support beams instead, like this: http://img.diynetwork.com/DIY/2011/02/23/RX-DK-DIY104002_mark-notch_s4x3_lg.jpg
How far does the concrete baseboard stick out from the wall? If it is thicker than the 2×4 I would cut the support beam short, so the 2×4 sits on top of the concrete baseboard.
-Michael
Finished my shelves this weekend. For less than $100 I built a 5 1/2′ shelves using this design. Could not have gone better. thanks!!
I’m glad it worked out for you, Brad!
Im going to follow your instructions on my garage shelving. I like your process. Question: What is the maximum distance I can spread the vertical 2 x 4’s apart from eachother? Thanks!
Thanks Brandon, I hope everything goes well for you. For the spacing of the vertical beams, I would try not to go beyond 4ft, unless you plan on using thicker horizontal beams. I spaced mine at 3 1/2ft apart and find it to be wide enough for most things. I do wish I had a few more inches when storing some of my larger coolers, but I am still able to get them in. If you plan on spacing your vertical beams at 4ft, or longer, I would at least upgrade your horizontal beams to 2x4s instead of 2x3s.
Good luck!
Hello Michael,
I had build a wall of shelves 8 years ago and have to disassemble them do to water leakage into my basement. the wall the shelves were built for is the only one with studs (I live in a duplex) the other 3 walls are masonry walls and 3/4 under ground. I need free standing very sturdy shelves and do not want to attach them to those walls. Do I use 2 2×4 for each end at a 90 degree angle? Do you have any ideas for me?
thanks Heike
Thank you for sharing your garage shelving!
I am looking to make bookshelves with a similar style but more shallow. My problem is that outer walls are concrete block with very small shams that have the drywall attached and interior walls have aluminum. Any ideas of how I can make a solid frame structure as an anchor and not have horizontal strength compromised?
I keep thinking about the square dimensions of the posts used in decking but believe I may be underestimating how strong wood can be.
Thanks! TK
Hi TK,
In your case I would probably add some vertical beams to your interior wall in addition to the ones on the outside of the shelves. You could then cut all of the horizontal beams, that are to attach to the interior wall, to fit in between the vertical beams. Does that make sense?
As far as your concrete block wall is concerned, I would just use a concrete drill bit to pre-drill some holes and use concrete screws to attach the boards. You should have enough strength.
Good luck!
Thanks for sharing your design!
I looked at several shelf designs but I liked yours the best. I recently built my own garage shelves based on your design, and it worked out great. Mine are 10′ long and 2′ deep. It did not take long and it came in under budget. I am now working on building shelves in the boiler room as well.
Thanks for the post.
Hi Stephen,
Thanks for sharing your success story – I’m glad to hear it worked out for you!
Thank you for posting these plans. I just made these by myself and they worked out great. I made a 13’x2′ and a 3’x2′ for about $130. I don’t think an earthquake will take these things down! It was fun and easy and I’m dying to build something else now!
Thanks for sharing Sarah! It’s always nice to hear success stories like this. I’m with you – I’m always looking for an excuse to build something new! 🙂
Thanks Michael for sharing. I can’t wait to start building this. I do have questions. If you’re using a nail gun, what size of nail did you use? Not sure if that was mentioned. Also, to know the width of the shelve, did you simple measure the width of the plywood?
Also, did you have a total of 4 horizontal 2X3s for support underneath the plywood?
Hi Phillip,
I believe I used 2 1/2 inch nails in my gun. For the width (or depth) of the shelves, I just measured the the widest item I knew I would be storing on the shelves and then made them an inch or two wider than that. If I remember correctly, I made mine about 20 – 22 inches deep. Once I knew that depth I wanted, I pre-cut all my plywood to that width so those pieces would just lay right into the frame.
Good luck!
Michael. How did you do the corner? Did you bring the 8ft 2×3 board all the way to the corner of the wall? If you did that, is there enough room on the stud to insert another 24″ 2×3 foot board that goes on the other wall?
Hi Jared,
If I understand your question correctly, I think you could do it either way – meaning, you could either place the 24 inch board on the perpendicular wall first and cut the 8ft board an inch and a half short to join into the 24 inch perpendicular board, or the other way around. Either way you are still nailing the 24 inch board to the horizontal support beam on the outside of the shelves so it has plenty of strength.
Does that answer your question?
Just built my garage shelves today as per your instructions. Went extremely well, and I’m not really all that handy. The only difference from yours is mine is only 10′ long so I had to use 2X4s instead of 2X3s since Home Depot didn’t have 2X3s in 10′ lengths. Also, the 1/2″ plywood seemed a bit flimsy so I doubled it up since I had extra. Extremely sturdy shelves! Thanks for your great tutorial!
Thanks for sharing Steve, I’m glad it worked out for you. It sounds like your shelves are now tornado proof! 🙂
These instructions are just great – easy to understand and follow.
Thanks Emma!
How did you connect the back horizontal beams? 8 foot beams going across 12 feet. The horizontals need to be connected together somehow?
Can you do this without the side wall?
Is using wood screws alone ok? Will it hold up structurally?
Thanks
I should have clarified the above comment. Will using only screws and no nails be ok? Will it hold up structurally?
Thx
I built this weekend. Turned out great. Sturdy as hell. I used only screws
How did you tack on the vertical pieces? With screws through the side?
Hey mate did you just use pine wood?
Heya Mike!
I followed your instructions, with a small change. I added a thin wooden layer in the back to protect the walls from random hits. I’m aware this can cause mould to appear, though. Tips on what to do? Should I just remove the backside? Great tips by the way!
Thanks!
Hi Mike, Thanks you for sharing your project. I have one layer of cinder block around the perimeter of my garage (4 inches sticking out from the wall). Do you think I can still build shelves following your instructions? Thank you!
What about doors what kind of wood? Need light as I’m not strong.
Excellent post! I’m curious, how exactly are you using nails AND screws?
“After screwing and nailing the boards up on to the wall, you can put up the end boards (2x4s). Measure and cut these boards (and all the other vertical support 2x4s) to be ½ inch taller than the highest board against the wall. This is so that when you lay the plywood down on the top shelf it will fit into the frame for additional support.”
Tip and trick which is very nice to shorten the time and place
Michael. Just want to say thanks. These shelves are rock solid. What a fun DIY project. Everyone I showed were very impressed. All the neighbors are ready to transform their garages.
I love these shelves, and it is a great idea that you show how can anybody do them on their own. I will definitely try to make some shelves in the garage because I can’t stand the chaos. Regards!
Thank you for posting these directions. I used them to build 16ft shelves. The only thing I did different was that I used all screws since I didn’t have a nailer. They turned out great. I wish I could post a picture.
Because I did not want these shelves to be permanently mounted, I attached the horizontal wall framing member to the studs with 4 x 1/4-inch lag screws/washers (one screw per stud) and attached the outer vertical studs to the outer horizontal framing members with 4 x 1/4-inch machine bolts/washers (again, one bolt per stud). I drilled a 5/16″ pilot hole in the inner wall horizontal member and the outer vertical stud. If one wants the screw/bolt heads to be flush with the framing members, use a speed bit slightly larger than the screw/bolt head to create the necessary recess.
My shelving is 14 feet long so I used 2x3x16′ beams to avoid 2×3 joints falling on the stud centers.
Monk
wow…that’s great. Wooden shelves are more suitable for the industrial purpose…and it looks more sophisticated. Industrial shelving units uk is best idea for your office..
Thanks for this post – I built by own 16′ by 21″ – they look great and I’ll be organizing my garage this week!
Thanks to your step-by-step instructions for sturdy garage shelves, I was able to construct 21 feet of variable height shelving in an unfinished corner storage area. Probably didn’t save any $$ when I factor in buying a 10″ compound miter saw and stand, renting a hammer drill for mounting supports on foundation walls, plus splurging on MDF instead of plywood, but I ended up with some really nice shelves. Your instructions and the many comments gave me the confidence to proceed. Thank you!!
I have a 30×50 metal building ,and need shelving.i like to save money ! I have an old warehouse with lots of wood pallets ,not the kind you see now but vintage industrial kind .do you think they would make guide shelves or are they too heavy? I really like to repurpose and have prob over 100 of these .any ideas ? Thanks