Archive for January, 2012
Holding up the Shovel
To our esteemed readers:
The blog team here at Home Improvement Stack Exchange has endeavored to keep the content flowing with at least one new entry a week. We want to keep you coming back for more and we want to share posts that are interesting and worth reading. Unfortunately, our small contributor pool means that we’re having a hard time getting an entry together each week. The blog can’t continue to publish worthwhile content weekly without new contributors.
We need your help! Keep the blog in mind as you gear up for your DIY projects. Take pictures of the work in progress and send them along. If you have old stories to share, new tools to review, or article ideas, please let us know. This is a community run blog, we want to share everyone’s experiences and build a site you want to be part of. Please see this for more info on how to contribute.

We’re not closing up shop, there are interesting projects, tools, and ideas in the pipe. Please bear with us as we attempt to unclog the line, and try to get posts flowing.
Thanks,
DIY.SE Blog Team
Learning on the Job
It’s come up in the chat a few times, why are all these programmers and sysadmins avid DIYers? I think it’s partly a natural extension of the tinkering we do on the job and partly our comfort of dealing with huge mistakes that cost a lot of money. Nearly everyone in this field has war stories of downtime on systems that can not go down or impossible bugs that ruin deployments. Big bucks are on the line and you have to come through. In comparison, the prospect of a few holes in the wall and a small flood in the bathroom aren’t that scary.
So in that vein, I’m happy to pick up a hammer and drill and set to work destroying improving my home. And things don’t go quite right. This is another feeling I associate with programming for a living: beating my head against the wall trying to figure out why this simple thing isn’t working as designed. That feeling of learning on the job. And while I’m outwardly cussing at myself or others, I’m secretly enjoying myself.
I’ve spent most of my life surrounded by marvelously handy people. My dad designed a switch that cut the volume on the stereo and TV speakers when you picked up the phone. Our sliding glass door was remote controlled to let the dog out (this is in the 80s, people). My grandpa owned his own family woodmaking business. My brother is a bathroom remodeler. Despite all this, I managed to absorb perhaps 5% of what they know.
After I reached a certain age, I suppose I started asking the right questions. I actually paid attention and started trying to learn how to do certain things. I learned more about construction techniques, and lo and behold, this stuff wasn’t as easy as they made it look. They had to learn on the job. The only difference is when they screwed up they usually had someone nearby to tell them it was wrong, how to make it right, and if it was too far gone and they should just start over. This is clearly where we DIYers can get in over our heads. So I’m glad there’s a resource like Home Improvement Stack Exchange to help me out!
There are a lot of small details in construction and finishing that add up. That’s a good chunk of the reason why a DIY project always seems to take so long. I learned a great deal more about framing and drywall while building a closet above my garage. There was one corner in particular where the wall was already framed in by the roof supports for the garage. Not knowing any better, I reused that “wall” when framing and threw some drywall on top. The drywall wasn’t quite flush, but certainly “close enough”. Then I went to mud. And mud. And mud. Three corners on a piece that wasn’t quite right? Oy vey. So I learned the hard way, it’s easier to fix it in framing than it is before drywall. It’s easier to cut the drywall again than fix it with mud. It’s easier to get the mud smooth than cover it with paint. Each shortcut taken early just makes the overall project take longer – at least until you figure out which shortcuts you can use effectively. On the other hand, now that I have that kind of hard-earned experience, I can cover up many of my mistakes hanging drywall. Now I can focus on figuring out when to apply which experience, much like I do on the job.
DIY usually forces you to improvise. If you had unlimited time and budget, you might not even do the work yourself. DIYers tend to put some pretty unreasonable constraints on a project, ones that a professional would never agree to. Reusing roller covers, resuing old fasteners, barely having enough material to finish the job, using the wrong tool for the job because it’s handy – all things I’ve found myself doing that I would never agree to if I was being paid to do the job. These improvisations are really at the heart of what makes DIY fun and frustrating, and most importantly, creates funny stories.
So while I was doing this closet, I did the carpet myself too. I got the carpet for free (DIY alert!) which meant I couldn’t get those lovely cheap install prices. First time doing a carpet job myself – I rented a stretcher and kicker and got to work. And it went pretty well – until:
 Pro tip: Always make sure the stretcher is in the middle of the stud!
My experience led me to the easy fix: cut it square, toenail in a 2×4, and slap up a new piece of drywall. Look ma, I’m improvising!
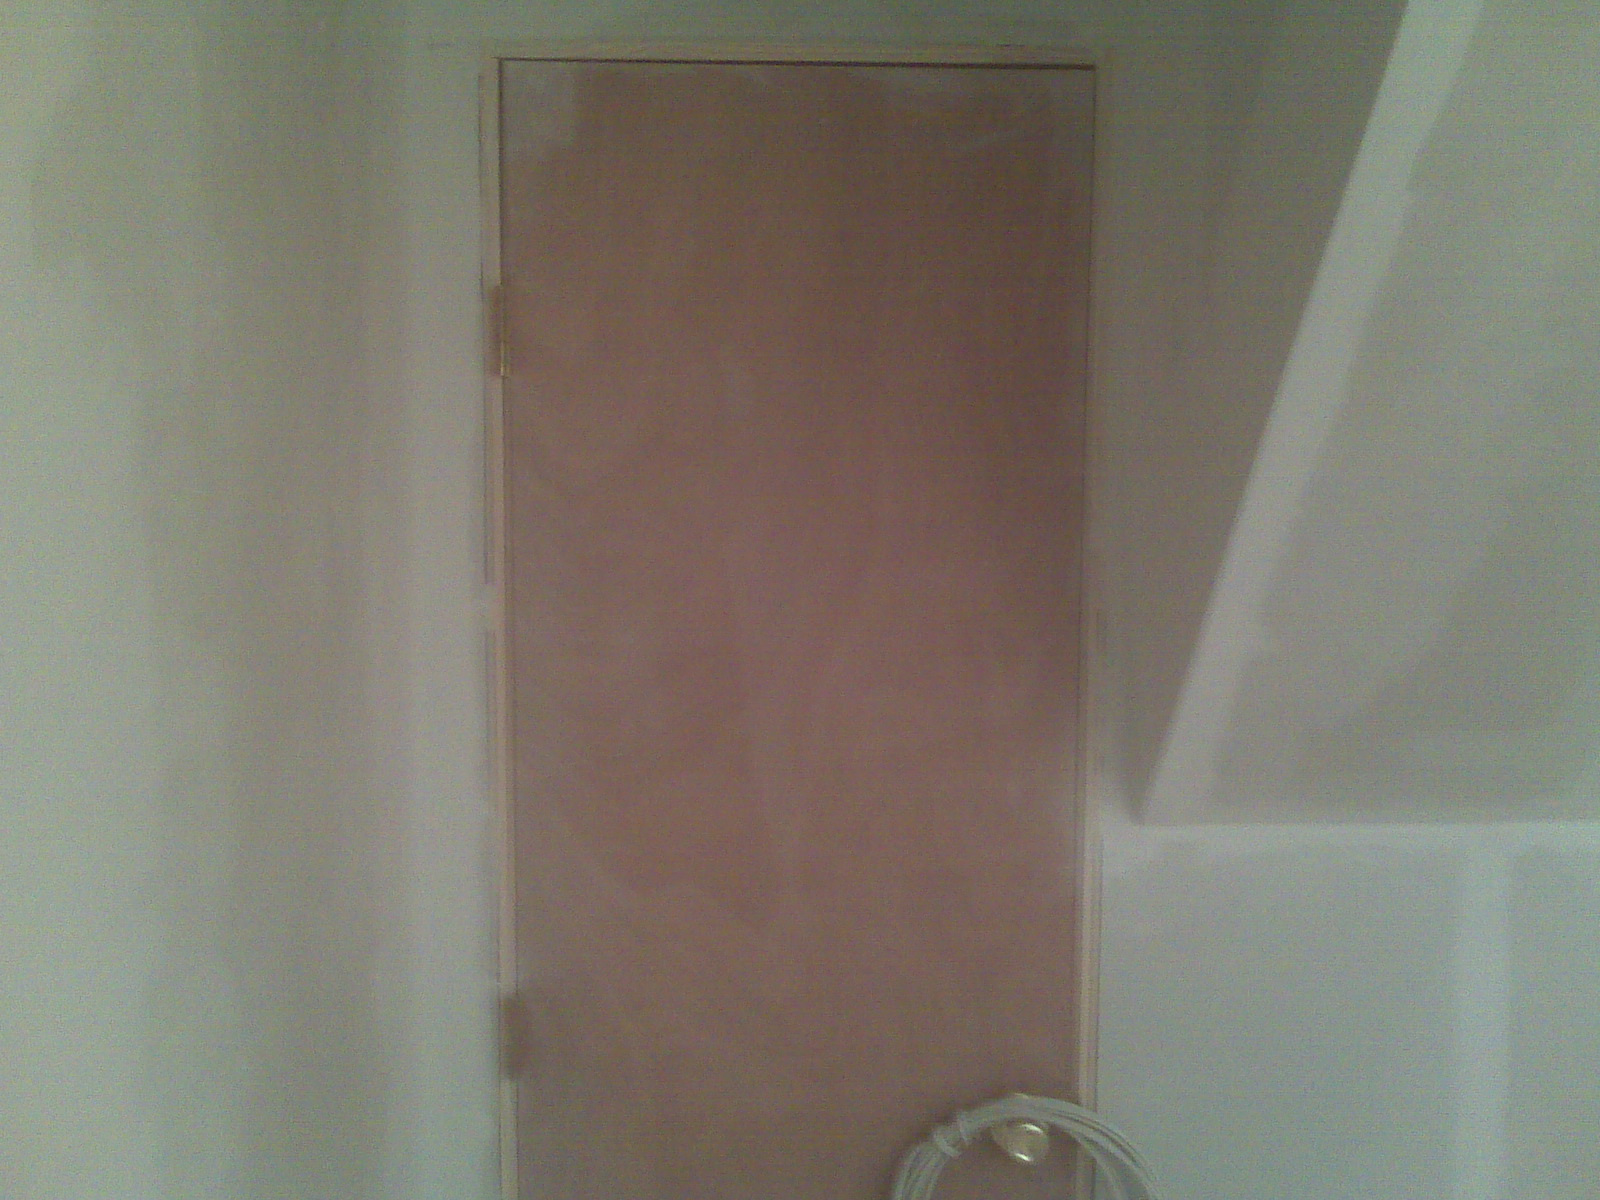
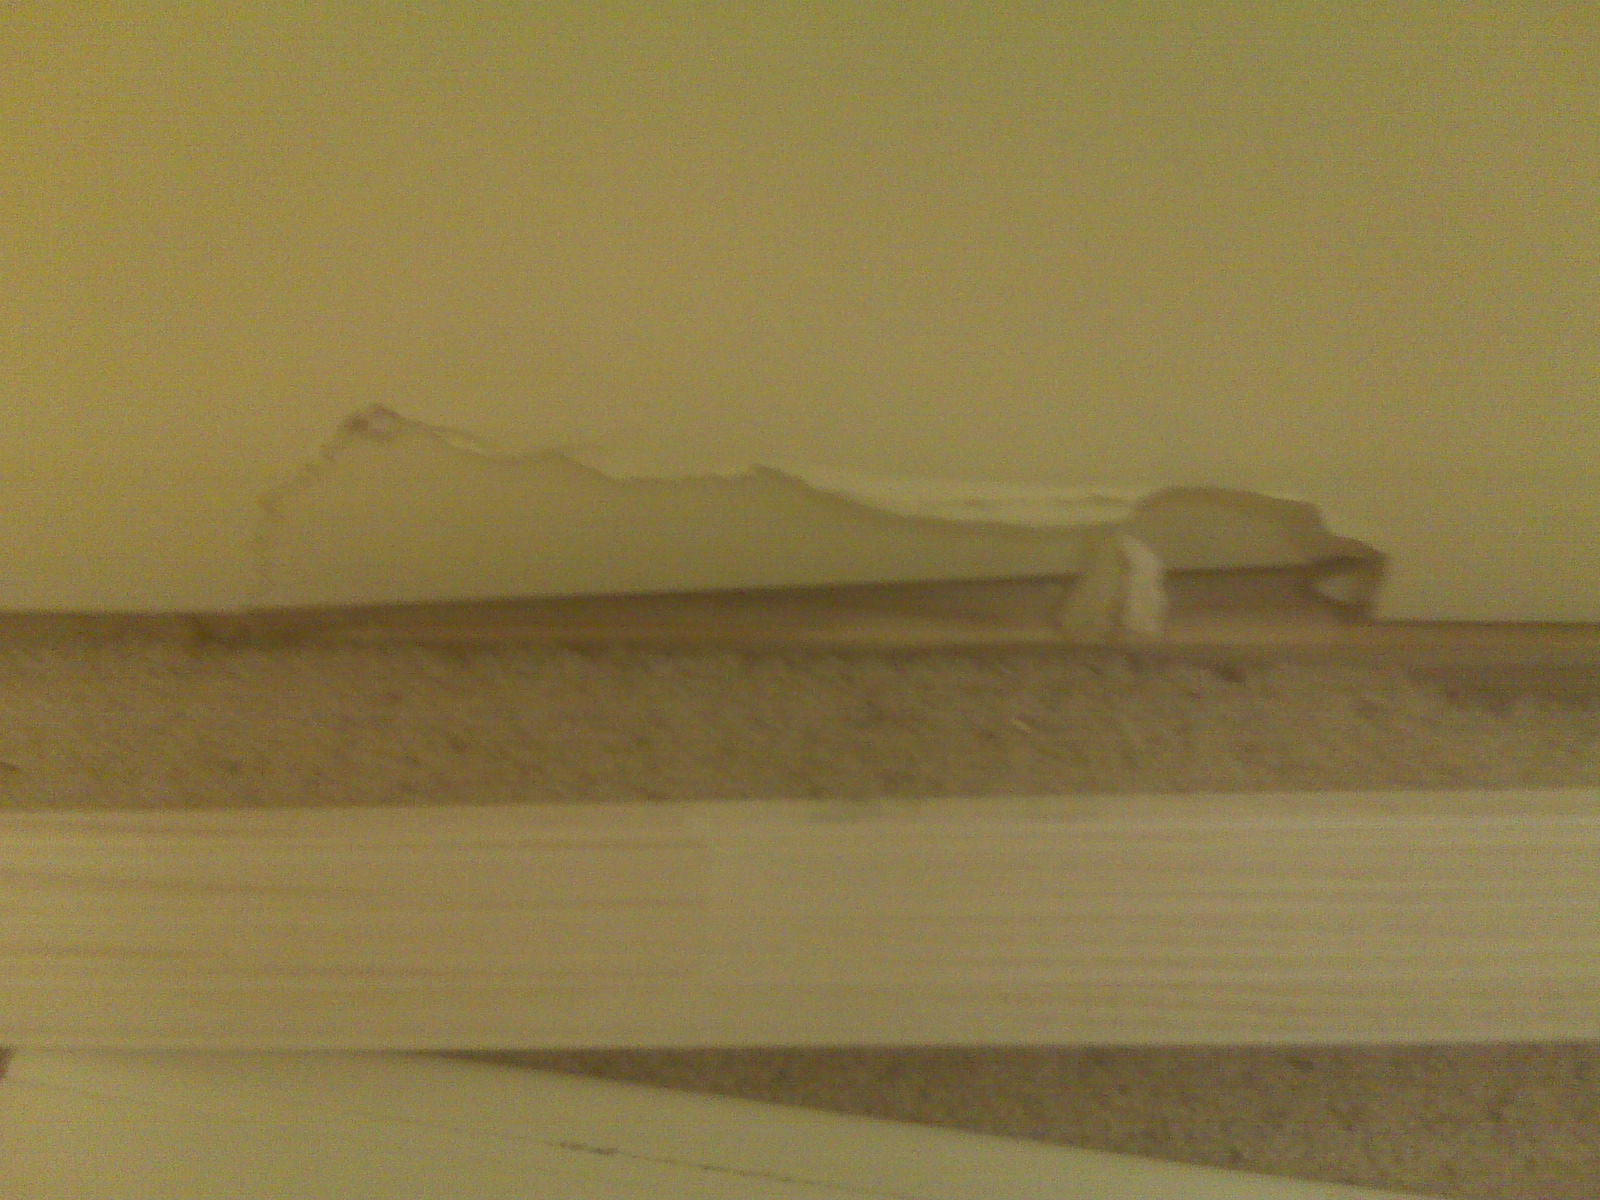
Later I was doing the trim – and remember that funky corner? Well my trim wasn’t going to fit as-is, so I traced the wall and whipped out the jig saw:
 Whoa! Step away from the jigsaw!
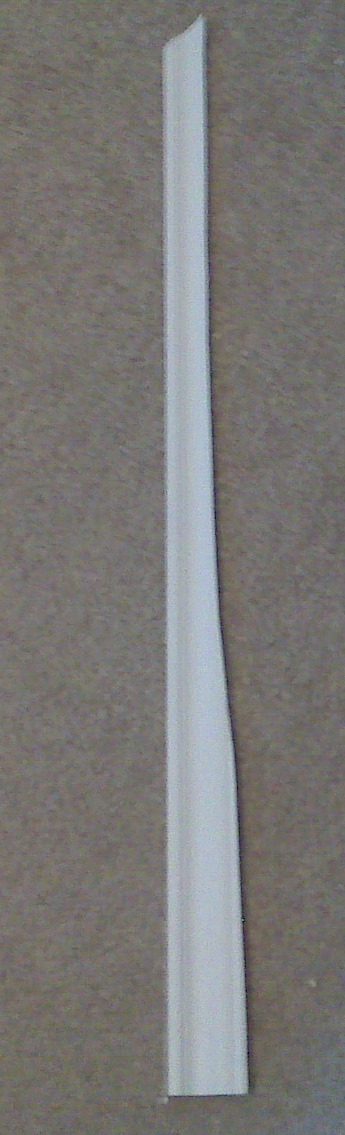
 Turned out pretty well though
What sorts of “fun” things have you learned while doing DIY? Share in the comments!

Tool Review: Ideal In-Sure™ Push-In Wire Connectors
A while ago I asked if push-in connectors were up to code. After determining they were, I checked the local Home Depot for these things every time I went. Then one day, bam! There they are. I grabbed an assorted 10 pack for ~$2.00, and ran home, filled with the type of excitement only a child feels on Christmas morning when he first lays eyes upon the bounty left by old Saint Nick. Admittedly, I was probably more excited than any grown man should ever be over this sort of thing.
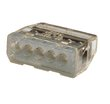
Some may not know what Ideal In-Sure™ Push-In Wire Connectors are used for. Ideal In-Sure™ Push-In Wire Connectors, are devices used for joining two or more wires and insulating those connections. They can be used as an alternative to traditional twist-on wire caps (wire nuts), and require no twisting motion to create a solid connection. When using push-in connectors, the ends of the wires to be joined are stripped and pushed into the connectors. With traditional wire caps, the wires would have to be twisted together (mechanically joined) before twisting on the insulating wire cap.
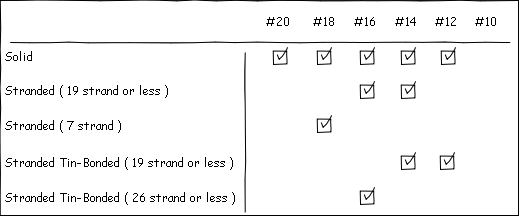
Unlike twist-on wire connectors, it’s easy to remember how many wires can be connected with a single push-in wire connector. If you have a 2-port connector, you can connect any combination of 2 #18 AWG to #12 AWG wires. Using twist-on connectors, you’ll likely have to memorize or reference a combination chart.
In-Sure™ Push-In Wire Connectors come in 7 varieties, so selecting the appropriate connector is easy.
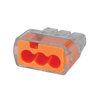
2-Port
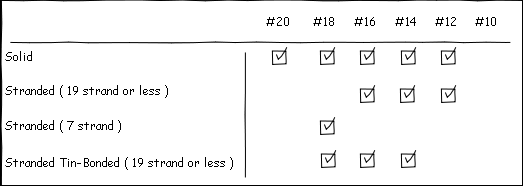
Acceptable Wire Sizes
3-Port
Acceptable Wire Sizes
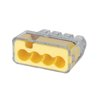
3-Port Large

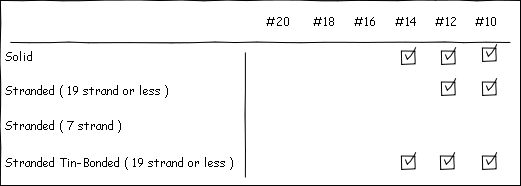
Acceptable Wire Sizes
4-Port
Acceptable Wire Sizes
5-Port
Acceptable Wire Sizes
6-Port
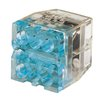
Acceptable Wire Sizes
8-Port

Acceptable Wire Sizes
Features
- No-twist connection reduces repetitive motion fatigue
- Low insertion force for fast and easy connections
- Compact size makes installation easy
- Clear shell gives visual verification of connection
- UL Listed to 486C and CSA Certified to C22.2 #188
- UL 467 Listed for grounding and bonding applications
- 600V maximum building wire, 1000V maximum signs and lighting fixtures
- Shell rated at 105 C (221 F)
Most old school electricians hate push connectors, due mostly to the crappy design of the first generation stab connectors on the back of receptacles. I, however, am more open minded, and will try anything that might make a job easier.
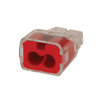
Once I got these things home, I did the only thing any reasonable and sane DIYer would do: I took one apart to see how they worked.
As you can see, they’re made up of three parts. The bushing (red), the contacts (metallic), and the insulating cover (clear).
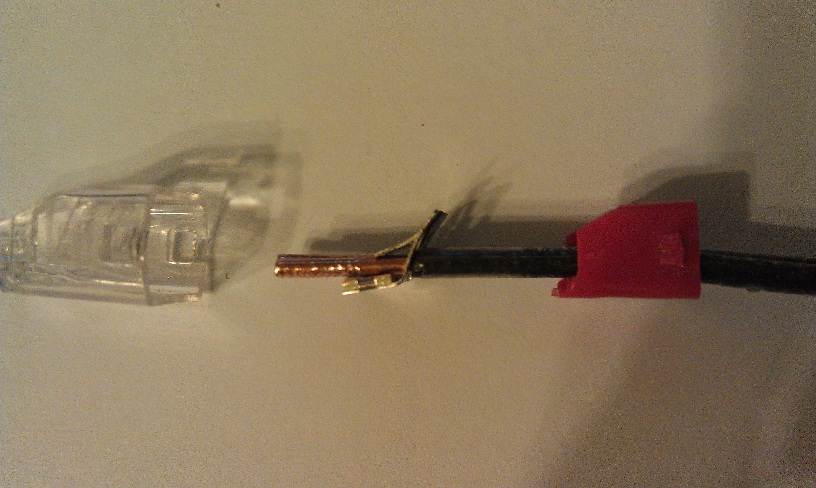
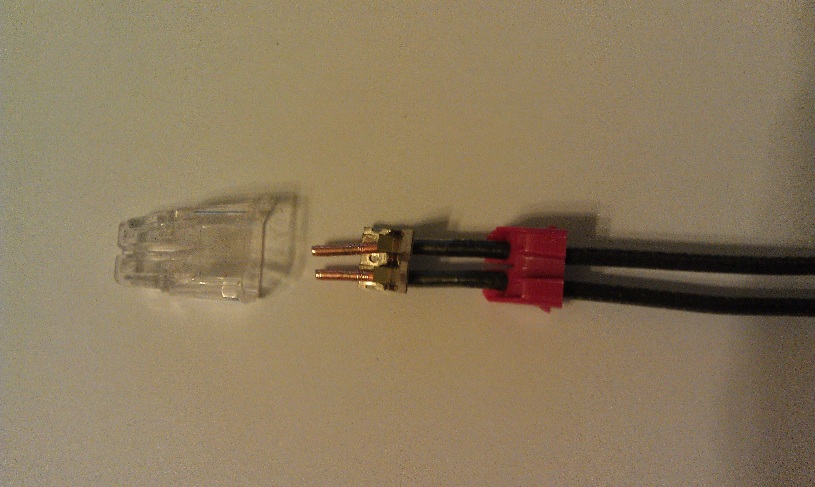
From the side, you can clearly see how the wires are held in place. And let me tell you, they are held in place really well. I yanked, tugged, pried, and pulled to try and get the wires to come out. So under normal circumstances, you shouldn’t have to worry about a wire slipping out. I did, however, find a way to remove the wires surprisingly easily. If you twist the wire back and forth while pulling, the wires will come right out. Doing so does damage the wire quite badly (you may be able to see the damage if you look closely at the above images), so it would have to be trimmed back and re-stripped before inserting it into a new connector. According to Ideal, twisting the wire to release it is a feature, not a bug.
When fully inserted into the connectors, the wires make a solid connection. So there should be no worry of resistive heating or arcing with these connectors.
Now I was satisfied the wires were not going to fall out, and I wasn’t going to burn down the house due to a bad connection. I decided to see how much time these things could save me in a typical situation. I wanted to see how long it would take to wire up a simple luminaire, first with traditional twist-on wire caps, then with push-in wire connectors.
The Setup
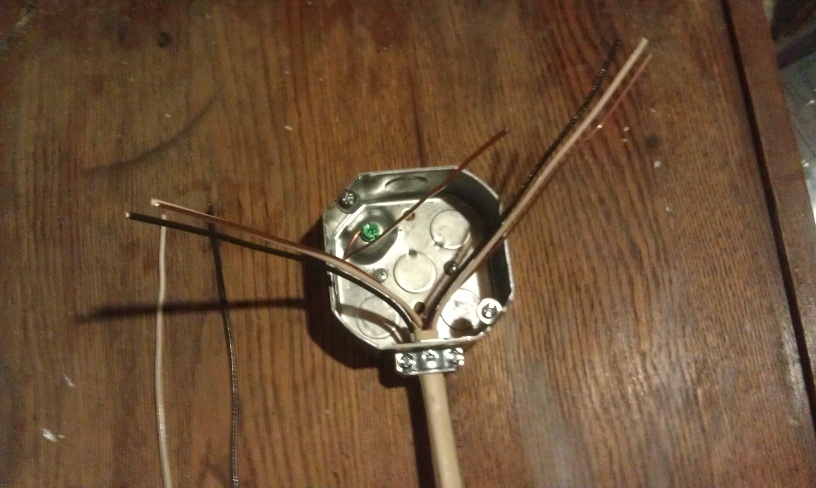
As you can see, I set up a typical scenario that electricians have seen many times. I have a feeder (from breaker), a feeder to the next fixture, and a couple pig-tails to connect the lamp holder.
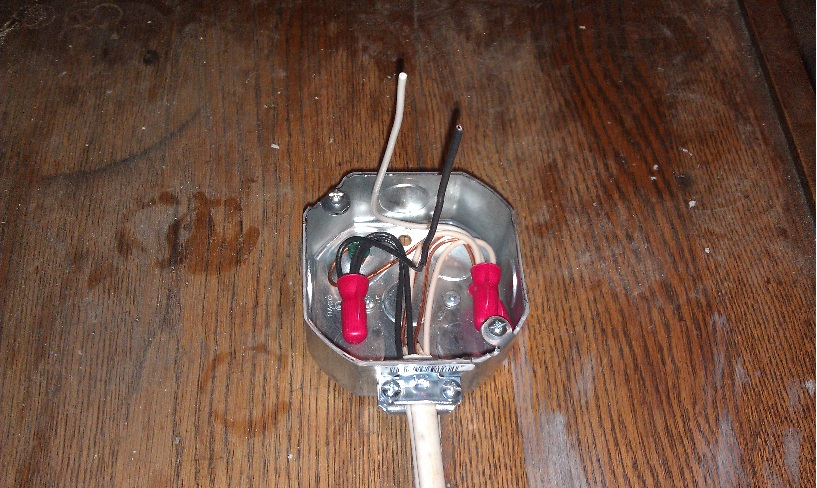
Twist-on wire caps
The Procedure
- Strip wires.
- Twist wires together.
- Trim wires.
- Install wire cap.
- Repeat for each group of wires.
The Result
3:03.2
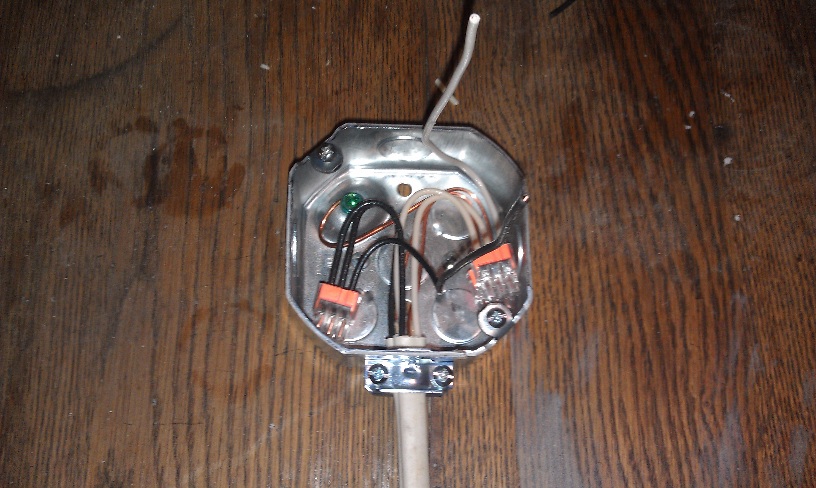
Push-in Wire Connectors
The Procedure
- Strip wires.
- Insert into wire cap.
The Result
1:50.5
For each luminaire I could save over a minute, using push-in wire connectors. That could be quite a time saver, if I was installing 10-20 lights.
The only fault I could find is that the wires can easily be twisted out of the connector. I don’t think this is a major issue; since the wiring would likely not see that much motion, but it is a small issue that hopefully Ideal can work out. They do cost more than the run of the mill twist-on wire cap, but the installation time savings could easily render that moot. All in all, I’d say these are a pretty slick product. I give Ideal In-Sure™ Push-In Wire Connectors 4 Captain Constructions out of 5.


Poles and Throws
No, we’re not talking Caber Toss here (I don’t have the legs for a skirt… err kilt… call it what you will, it’s still not a good idea to wear it while you’re working around the house).

We’re talking about switches! Specifically those found in your home, used to turn on and off lights and other devices.

First let’s start by defining a switch. A switch is a device for making and breaking the connection in an electric circuit. A switch can have one or many poles and one or many throws. All switches look about the same on the outside; a lever or button that is flipped or pushed, but internally the number of poles and throws determine how the switch is used.
In a switch, a Pole is the number of circuits that can be controlled by a switch. It might be easier to think of this as the number of inputs. Throws are the number of positions the switch can take. Throws can be thought of as the number of outputs (sort of).
Single Pole Single Throw (SPST)
A single pole single throw switch has one input, and one output. It is used to turn a circuit on, or off. “But wait…” you might be thinking “It turns the circuit on and off, isn’t that a double throw?“. You’re sort of right, I guess I didn’t explain throws so well. It’s not about the physical positions a switch can be in: up or down, it’s about the number of contacts in the switch. Maybe it’s easier to explain with a picture.

As you can see, there is one pole contact and one throw contact. With a SPST switch, turning on and off the light is easy.
Now that we’ve got the concept down, let’s take a look at some other types of switches. Keep in mind that you can have switches with as many poles and throws as you need, but we’re only going to focus on those typically found in residential wiring.
Single Pole Double Throw (SPDT)
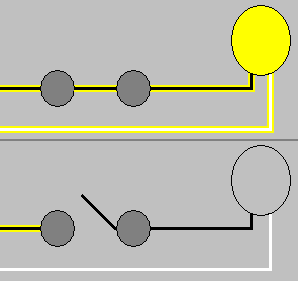
A single pole double throw may also be known as a 3-way (2-way in Europe) switch. They are used to control a single device (light, string of lights, etc) from multiple locations. With this kind of switch, you can turn the light on at the bottom of the stairs. Then you can walk up the stairs and turn the light off at the top of the stairs. To do this, you’ll need two SPDT switches. One switch at the top and one at the bottom of the stairs. Internally they look like this:

As you can see, the single circuit can be switched between one of two contacts. In the US, these two contacts will be connected using wires called Travelers. These wires connect the contacts of one SPDT switch to the contacts of another SPDT switch (typically).

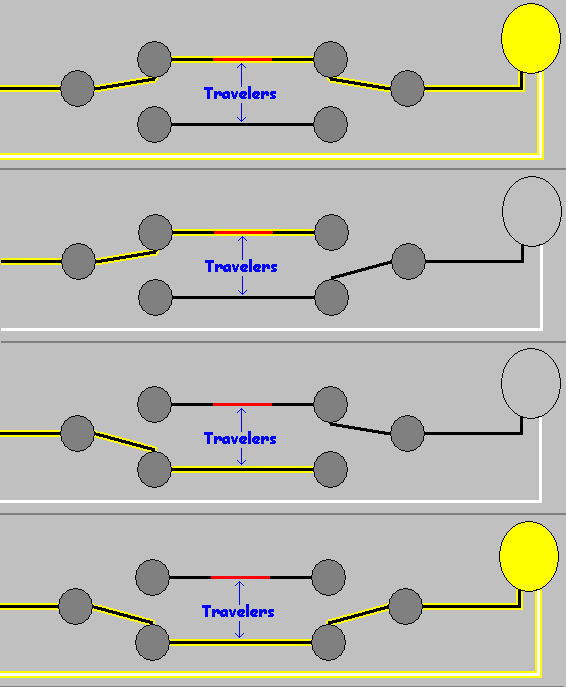
So how does this turn the lights on and off? Well let’s finish the drawing.
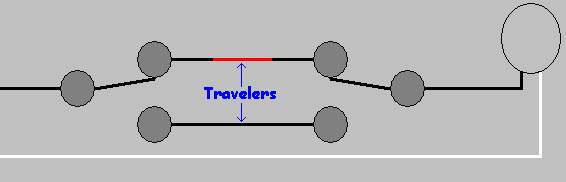
The power from the circuit is connected to one of the switch’s pole contacts, and the light is connected to the other switch’s pole contact. When both switches are in a similar position, electricity flows in the first switch, through one of the traveler wires to the other switch, and finally to the light.
“What if I want to control a light from more than two locations?” you might ask. Well, that’s where the next switch comes in.
Double Pole Double Throw (DPDT)
Double pole double throw, also known as 4-way or intermediate switches, allow you to connect as many switches as you’d like into the circuit. Internally they look like this:
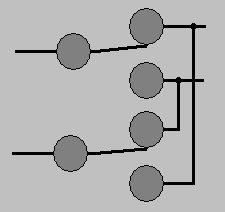
To control the light, we’ll add them into the circuit on the travelers between our SPDT switches.
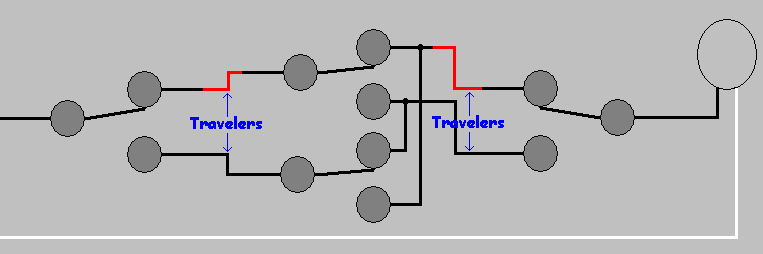
Now the current will flow into the first SPDT switch, out along one of the travelers to the DPDT switch, along one of the other travelers to the second SPDT switch, then finally to the light.
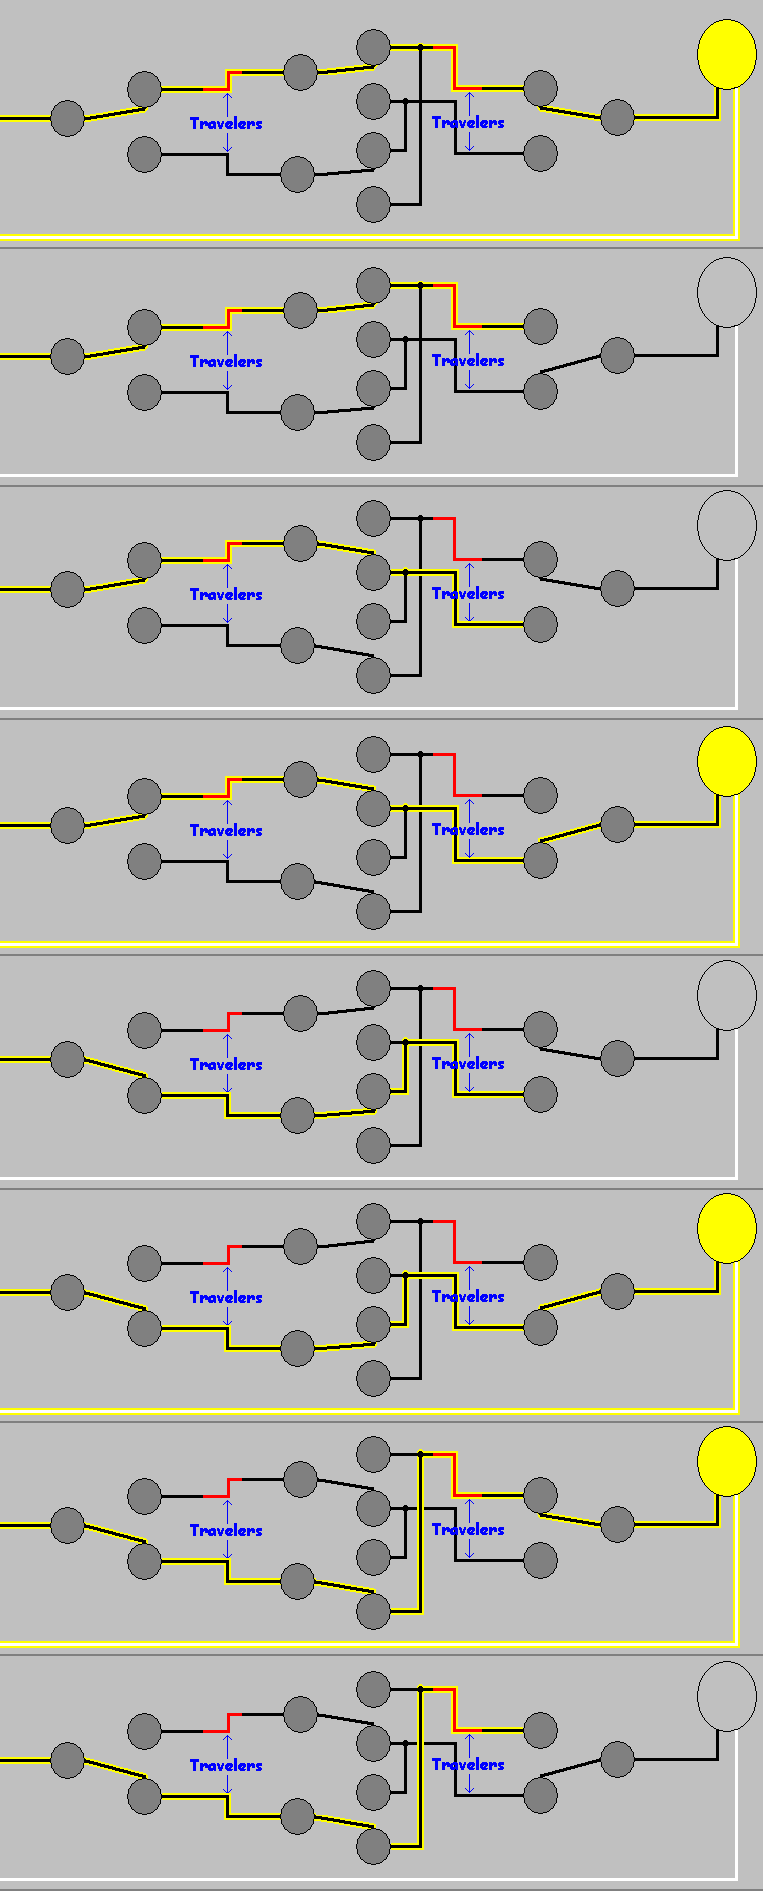
Using DPDT switches, we can control a device from as many locations as we want (within reason). All we have to do is add another DPDT switch, like so:
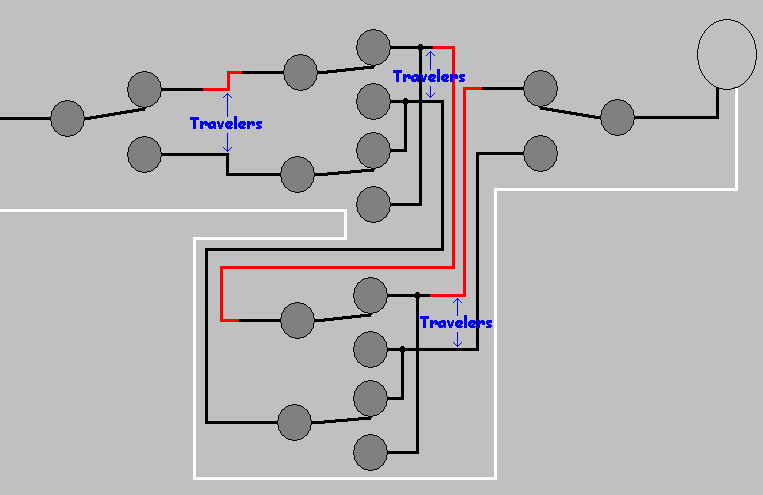
Understanding switches will help you whether you need to control a single light from one place or a group of lights from multiple locations. Anything you can imagine can be done, if you choose the right switch for the job. And please, no kilts while you’re working. It’s just dangerous.
Beginner Faucet Fixin’
A good starter DIY project is fixing or replacing a faucet. It looks overwhelming at the start, but the fix is usually straightforward: just replace the parts that look broken.
To determine if this is a good DIY project, determine the relative importance of the sink, how much you value your time and knuckles, and if you can shut the water off at the sink.
In my case, my kitchen faucet had been dripping for awhile and was driving me crazy. I have a shutoff under the sink and all my available free time is dedicated to playing dinosaurs or trains. We have a bathroom sink nearby if things go horribly wrong and a local plumber who’s set me right before. So I’m ready to take this on.
Once you’ve decided to do a fix, determine the manufacturer of your faucet. All the big brands have excellent websites for finding parts and diagrams. One of the best kept secrets is the stellar phone support. They really can answer questions like: “What is this plastic doohickey that slides over the rubber thingy and is held on with a screw?” My experience has been that they’re knowledgeable, patient, and give clear advice and instructions.
I actually cheated for this project and previously determined that the cartridge on my Moen faucet was the culprit, but a couple of my plastic connector pieces looked a little rough too. Easiest just to replace “the guts” of the faucet.
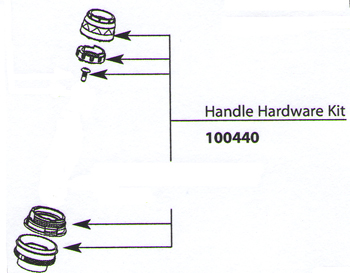 Thanks to the magic of the internet, I obtained a Moen 100440 Replacement Handle Hardware Kit and Moen 1200 cartridge a few days later. Once I had a few spare hours I was ready to take this on.
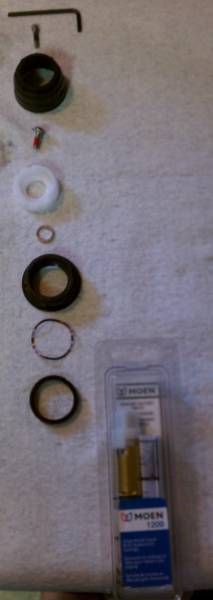
Here’s what you receive in the kit, with the new cartridge underneath.
First turn off the water and make sure it’s off. That’s a lousy surprise while your hands are full.
Disassembling my faucet is pretty straight forward. There’s a red/blue logo “button” in the front of the handle that covers a hex screw. Removing that allows you to remove the chrome handle. Then there’s a phillips screw in the top holding the “handle adapter” down. After that’s out, just start pulling and unscrewing parts, using an adjustable wrench as needed. I try to lay my parts out in the order removed, so I have a prayer of putting them back together properly.
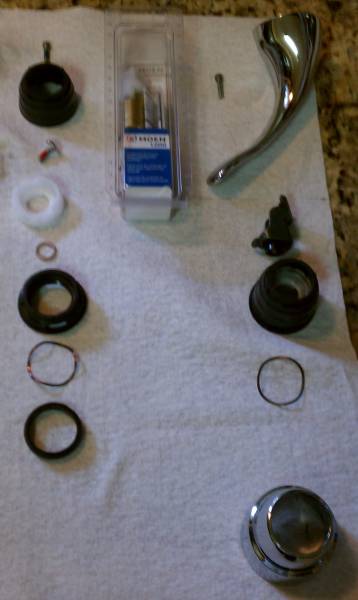 As you can see a number of connector parts between the “handle adapter” and cartridge that are stuck together. This is probably from my previous attempts to “fix” the leak by tightening things down just a bit more.
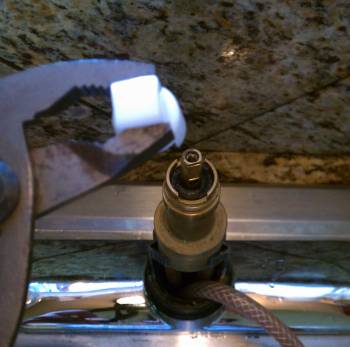
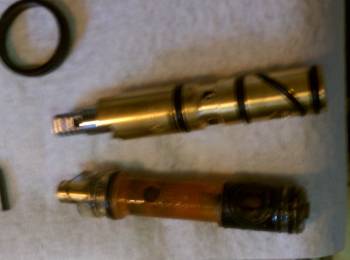
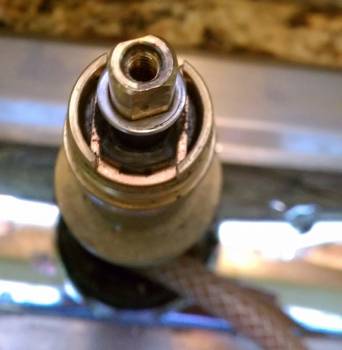 Now I just remove the brass clip in front and actually pull the cartridge out. The clip comes out with pliers, no problem. The cartridge is actually trickier. Sometimes you can loosen the cartridge with pliers, but with this one and just about every other faucet I’ve seen, you need the white plastic tool that comes with the new cartridge to remove the old one. Put it on there and twist it a few times back and forth and the cartridge can now be pulled out with pliers.
Here’s an old icky plastic cartridge and my new brass one. I doubt it makes a real difference, but it was maybe a dollar difference in price to get the brass one, so I did.
After that, push the new cartridge in, and reverse the dissasembly steps. It’s always a little difficult to get the next part lined up, but it’s manageable. If you’re like me, test the faucet before it’s fully assembled. I always reverse the hot and cold and need to rotate the stem 180 degrees.
That’s all there is to it. If you can assemble children’s toys, you can handle replacing faucet parts.
Home Improvement Blog on Google+
Home Improvement Blog on FaceBook
Bloggers Wanted
Latest Articles
Topics
- Electrical (8)
- Introductions (7)
- Plumbing (3)
- Projects (13)
- Repair (4)
- Safety (5)
- Tips and Tricks (5)
- Tool Review (5)
- Tools (6)
- Uncategorized (5)