![]()
We’ve all seen it, and hopefully everyone has used one, but there are a few tricks up the sleeve of your ordinary tape measure. And since they usually don’t come with an instruction manual, here are a few pointers that I’ve picked up over the years.
Disclaimer: I’m American, so for all the normal people with metric tape measures, this will be of limited use.
Size Matters
To start, when you buy a tape measure, wider is better. Cheap tape measures will be narrow and will lose their shape after a few feet or so when extended. If you do a lot of measuring on your own, or need to be able to reach the ceiling without a ladder, then get at least a 1″ wide, if not a 1 1/4″ wide tape measure.
Don’t Trust the End
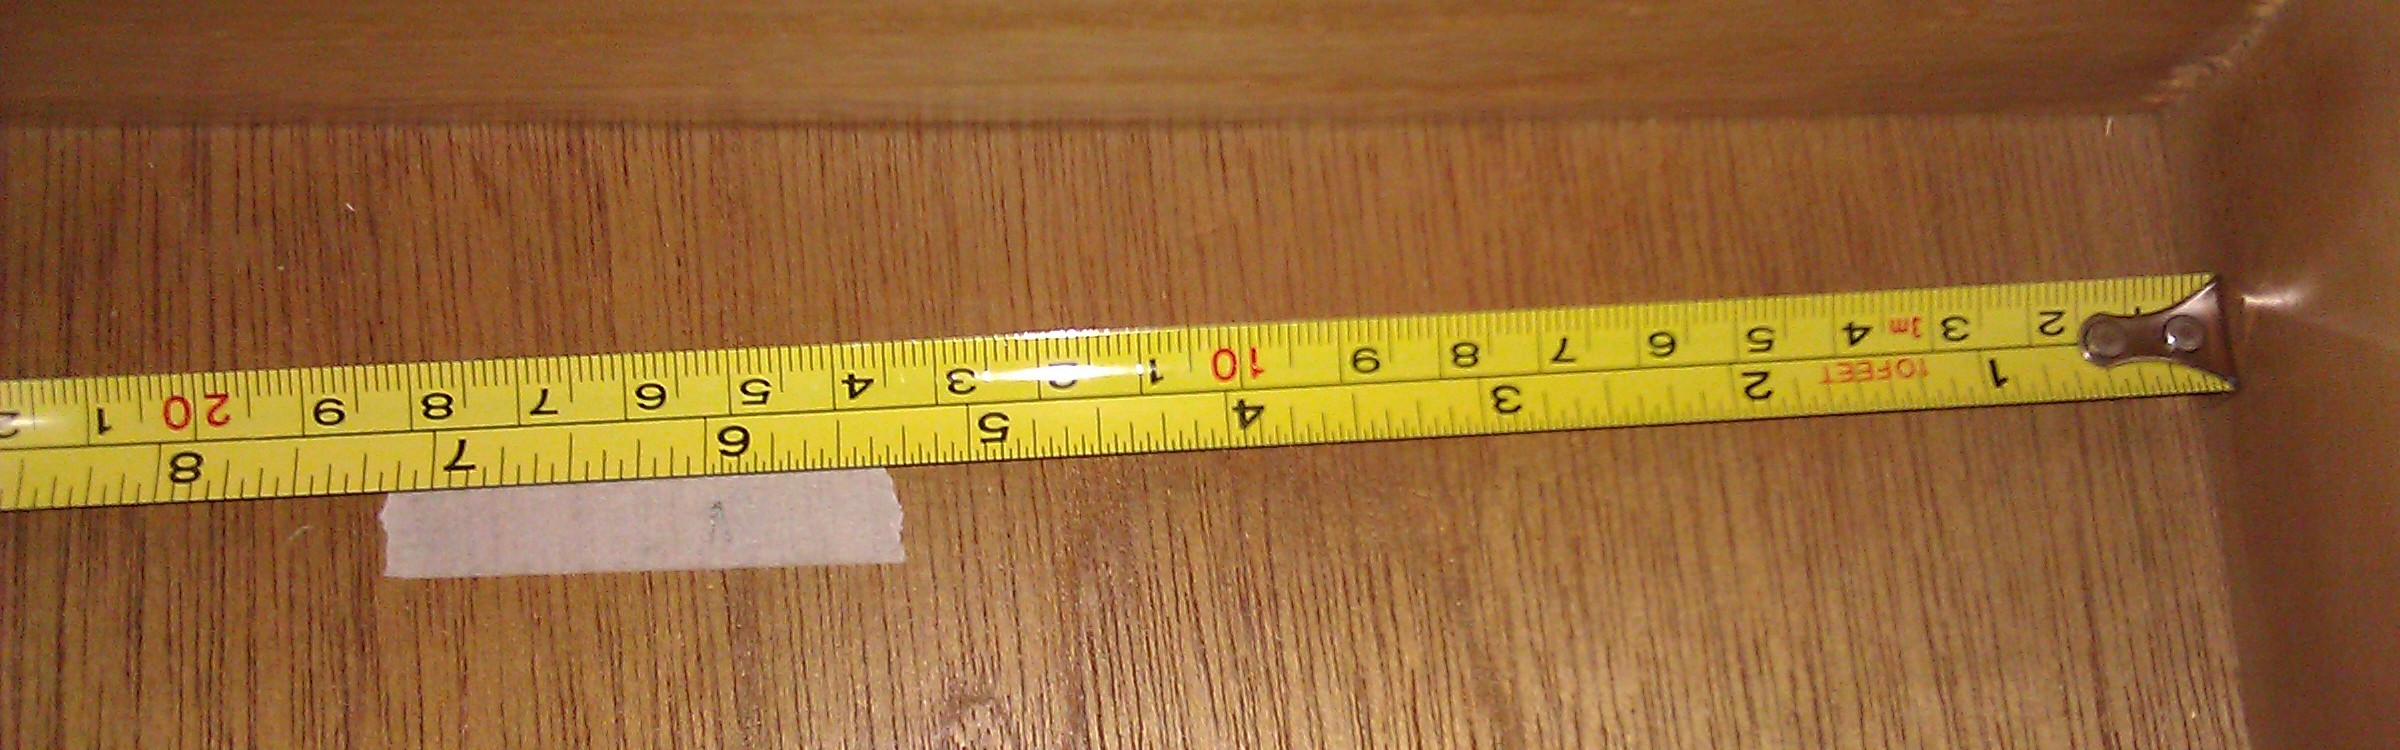
The end of the tape measure will have a metal hook to grab onto a board or butt into a wall. These ends can get bent over time, and it’s easy to fix that by using a pair of pliers. They are designed to be adjusted, but should you break off the tip, it’s probably time to get a new tape measure. This time, get the extra wide model. To avoid having to recalibrate all the time, don’t allow your tape measure to retract at full speed and smack the hook against the case. I’m in the habit of stopping the end against my finger instead of the case itself, which is a good incentive to slow down before you take your finger off.
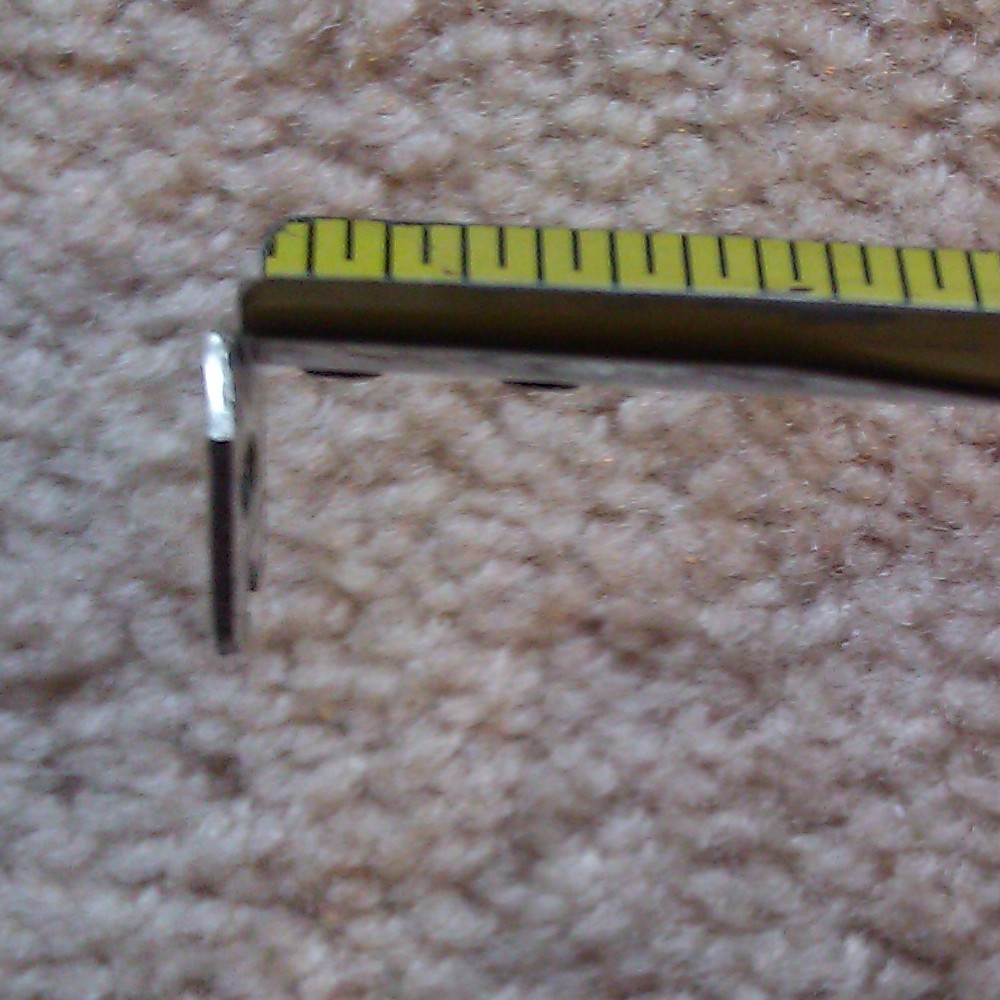
You can bend this to calibrate
Burn an Inch
If you are transferring measurements between people using different tape measures for precision work, and you haven’t had time to calibrate each of the tapes, you should burn an inch, or more. This is also useful when you need to measure something that you can’t hook the tape measure onto. To burn an inch, you just line up one end on the 1″ mark (or 10″ or 1′ depending on your preference) and then measure the span from that point. Then be sure to subtract the extra from your measurement or be consistent and burn the same amount everywhere.
The Hook is Supposed to be Loose
I’ve seen many people that want to fix a bad tape measure because the end of it is loose. Well, it’s like that for a reason. When you butt the end of the tape against a wall for an inside measurement, that hook is compressing by the width of the hook itself. Or, conversely, when you hook it onto something for an outside measurement, it’s expanding by the width of the hook. So don’t get fancy and try to fix it, since then your tape would only work for one kind of measurement, at best.

Tab extended
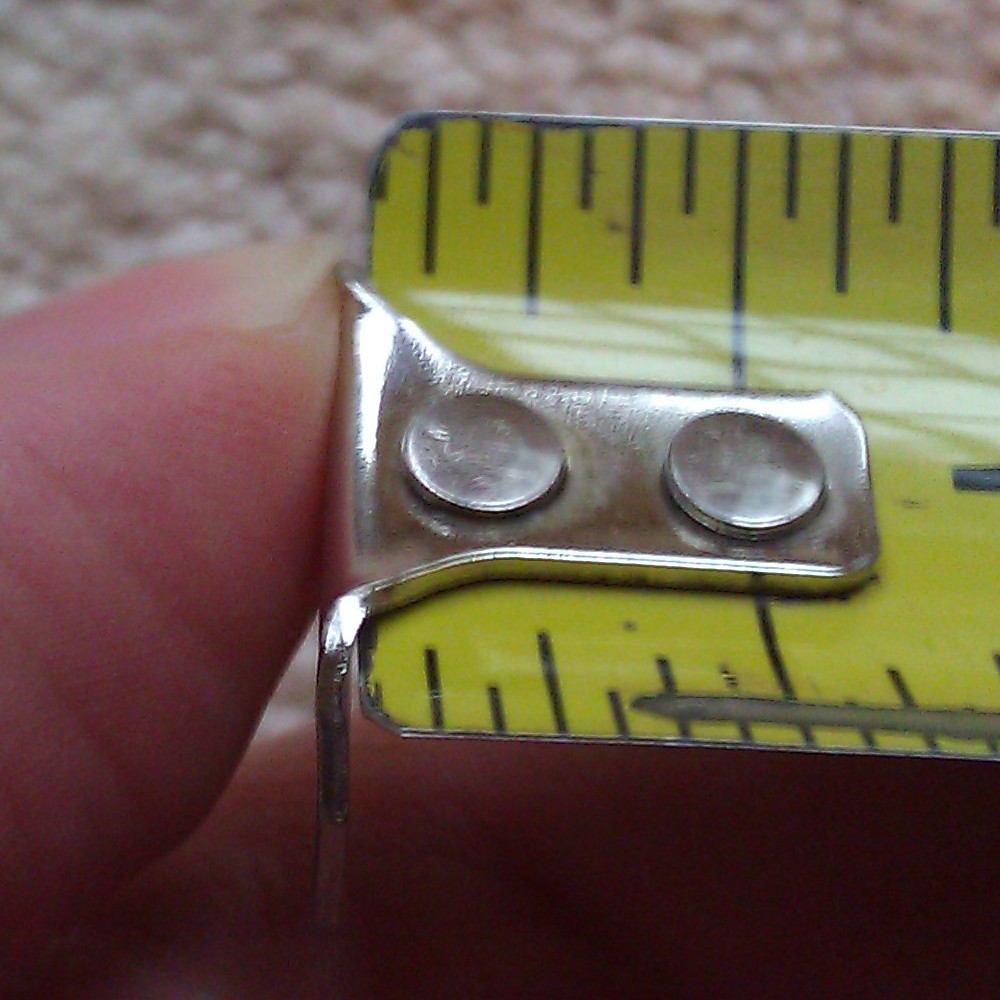
Tab compressed
What’s Up with the Studs and Diamonds
Ok ladies, get your minds out of the jewelry store. A lot of tape measures will have marks for measuring studs at 16″ and joists at 19.2″. Studs are typically spaced 16″ OC (that’s “on center” or from the center of one stud to the center of the next stud, not the gap between the studs). Note that the second stud in the wall is installed 16″ from the end of the wall, not from the center of the first stud. Also note that you may have additional studs at other points, like the opposite end of the wall, doors and windows, and where other walls intersect.

Studs are 16" OC
Lesser known than the studs is the 19.2″ joist measurement. Like studs, they are spaced with OC measurements. The reason for this odd 19.2″ measurement is similar to the reason for the 16″ stud measurement; it divides evenly into an 8′ span, which is typical for American building materials. A 4’x8′ piece of plywood or OSB will span 6 joists, and a 4’x8′ piece of drywall will span 7 studs (or 4 studs if you’re hanging vertically). If the math looks funny to you, make sure you remembered to count the first stud/joist at the 0″ mark.
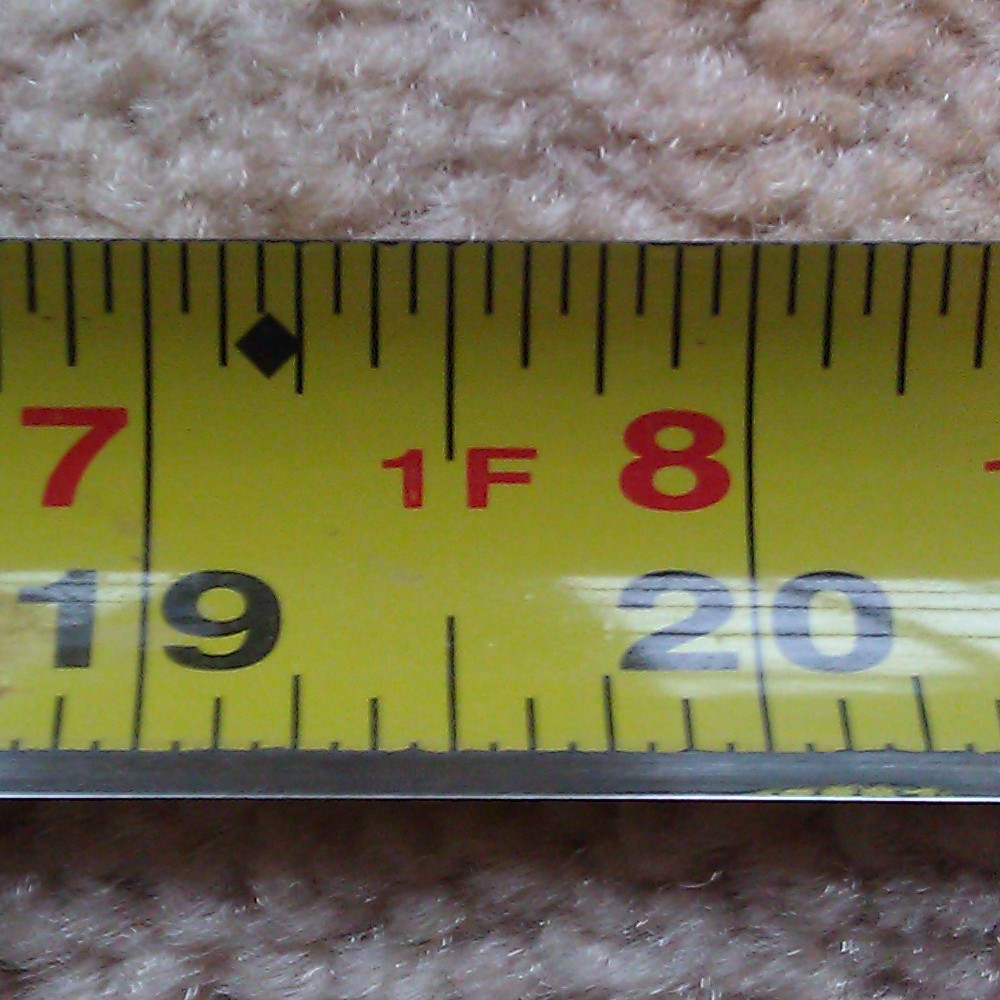
Joists are 19.2" OC (see the black diamond)
Half, Quarter, Oh Just Switch to Metric
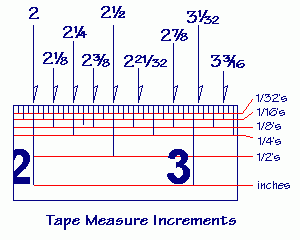
Ok, I won’t get into why Americans don’t just switch to metric, it really would make things easier. But until we do, all those lines between the inch mark are measuring fractions of an inch. That longest line in the middle, that’s a half inch. The next longest line, between the half mark and the ends of the inch are the 1/4″ and 3/4″ marks. Between the 1/4″ and 1/2″ mark, the next longest would be the 3/8″ mark, since the 2/8″ is 1/4″ and the 4/8″ is 1/2″. And while we are imperial measurements, I tend to give out all my measurements in inches and fractions, but some people read off feet. Most measuring tapes will have the inches within a foot marked in red.
Marking Your Measurements
When you make a measurement, and especially when you mark it, make sure the side of the tape is flat against the surface where you mark it. The tape is naturally cupped out from the surface, so just give it a twist to get one edge flag against the surface. Unless you’re using a square, I’d suggest marking your measurement on a board with a V point since you can be sure that this point is correct. Without the second line and the point, someone could use the wrong end of your mark and cut the wrong length. Also, since carpenter pencils are not designed for accuracy, my rule is “If I mark it, I cut it” since I’m the one that knows where in the mark is the spot that needs to be cut. Some people can be accurate with their pencil marks and will draw their line to have the line itself cut off. See this answer for more details on how to mark your measurement for accurate cuts.
Reading Upside Down
When possible, try to keep your tape measure right side up. When that’s not possible, realize that the 59″ you just measured may have actually been 65″, so double check. This goes double when you are adding on fractions of an inch, if you’re upside down, maybe you should be subtracting them?
Accurate Inside Measurements
When you are measuring between two inside corners, you can’t get the tape all the way into the corner for a good measurement. Many people will bend the tape into the corner as tight as they can and then guess what’s left. The easier way is to take two inside measurements. On one side, measure out a few inches and make a mark. Then measure from your mark to the other side and add the two measurements together.
Measure 6" from the right side and make a mark (yes, the tape is upside down)

And then measure from the left side to your mark
So the result is adding 6″ to 7 9/16″ which would be 13 9/16″ wide.
That’s All I Got
Do you have your own tape measure tips? Leave a comment below.

Filed under Tools
Tagged: tape measure, Tips, tools
I had a factory job which required I buy a new tape measure and give it to an inspector for calibration. They even put a sticker on it with the inspection date. That was a dozen years ago, and now I finally understand why!
We should be doing this with our Habitat tape measures. Every once in a while, someone will recalibrate the squares and levels, but I don’t think anyone has recalibrated the tape measures since they were unpacked and chucked in the plastic bin.
Great information in this article. It addresses many issues our customers ask about like movement of the end hook. In a production setting calibration of tape measures can be critical and ISO inspectors may require that you have a procedure in place for this. Lixer Tools offers tape measure calibration tools that allow you to compare tape measures for accuracy and also have a slot that allows for adjusting bent end hooks. It works much better than pliers and you can be sure all your tape measures read the same at the 10cm or 6″ marks. They are NIST (National Institute of Standards and Technology) traceable so you know 6″ is really 6″. You are not just comparing one tape measure to another, neither of which may truly be accurate. You can also purchase tape measures from Lixer Tools.
Here’s a tip I picked up from another carpenter in the theatre I used to work in. When you need to measure a long span it can be hard to tell sometimes if you have the tape straight, and just a slight angle can add inches to a measurement. His solution to that is to hook the dummy end, then sweep the smart end up and down and find the point where the measurement is the shortest… that’s your true measurement.
Nice tip! I often worry about that.
Great post. My dad taught me to read a tape (imperial units) when I was a kid, and when I took woodshop in high school, the teacher was amazed that I knew how to read a tape. My dad also taught me to mark my measurement with a “V”, pointing toward the measurement mark, just like you point out.
There are times when I take the push measurement with a large tape measure and a pull cut measurement with a much smaller tape measure, and it ends up bigger by about 1/32. Keeping in mind, when its push to push, they always are spot on. does the thickness of the end clip play a part in that? Do I need to adjust one to move more than it originally did in order to match the other?
Nice article. But regarding size (the width of the tape measure), it depends – for smaller indoor and finish work, I find a quality narrow tape much more convenient than a fat one, and you don’t want a wide 100ft tape either. Also, regarding reading upside down, I read the tape upside down probably 99% of the time (since I hold my pencil in my right hand and the tape measure in my left – this is even the case when measuring the distance between the blade and the rip fence on a table saw.) I have been reading it upside down for so long I would be confused as heck if I had a left-handed tape measure!
To measure into a corner, I cut a block of wood 10in long. Stick it into one corner, measure from the other corner to end of the block of wood and add 10in. It is better than using the length of my tape measure which happens to be 3 and 5/8 inches long.
Pretty good article but….. Calibrating your tape measure will do zero good if you are not consistent with your cuts. For instance: when making your cut do you leave the line or cut it. When two or more are measuring and cutting do you each do the same. Cut a board to length and have each person measure with their own tape. One may have to leave the line and another may have to cut it. Fact…. Why calibrate your tape unless it is crucial ( like a troy ounce) for another person sometime in the future. If your using your own tape all measurements will coin inside each providing you establish your cut line.
For inside measuring I have a Stanley Galaxie II 30-855 tape.. which is specifically designed for this purpose…. it has a viewing window to read the measurement on top,.
I bought it around 2003 in France.. but as far as I know no longer made..
What is the meaning of the 1F1 after the 1 foot measurement? the letters are at the half inch mark after the 1 foot. Then they go every inch and labeled 1f2,1f3,1f3….etc.
Its just to keep people reminded that the inches are within the 1FT, so they can read it as 1′ 4″, or 1’5″, 1’6″, as if it were in the 2FT, it would be read as 2’3″, 2’4″, etc.
I found the greatest “add-on” invention for a tape measure. It’s called the Tape-Ease Rubber Grip, and it fits onto the end hook of any standard one-inch-wide tape measure. The Tape-Ease has a rubber end that grips whatever you’re measuring and doesn’t slip off. Brilliant! Check it out at http://www.tape-ease.com.
Why are tape measures up side down? I’m right handed as most are. I start the with end on the right side so I don’t have to put the tape down to mark my board. The numbers are upside down. Doesn’t make sense to me. Thanks
How about very long measurements where the tape sags? I’m guessing that commercial tapes all assume the tape is supported (no sag) like measuring along a baseboard. How can we get an accurate measurement across a long ceiling?